Posey's Tips & Tricks
How To Perform a USB Passthrough in Hyper-V
If you're familiar with how to access a USB device from inside a VMware environment, be aware -- the process isn't quite as seamless as it is in Hyper-V. Here's how to do it in Hyper-V at the host and client levels.
One of the questions that I get asked most often about Microsoft Hyper-V is how to perform a USB passthrough.
USB passthrough refers to accessing a USB device from inside a virtual machine (VM). The USB device might be attached to the computer from which the VM is being accessed or it might be attached to the Hyper-V host.
In case you are wondering, VMware has long offered a USB passthrough feature. The feature allows USB devices that are attached to an ESXi host to be accessed by a VM. The main limitation is that you can't attach a USB device to more than one VM at a time.
You can attach a VMware VM to a USB device by opening the VMware Web console, right-clicking on a VM, and choosing the Edit Settings command. From there, you just click on New Device, select the Host USB Device option, and then choose the USB device that you want to add. Simple enough.
Things work quite a bit differently in a Hyper-V environment, though. You can perform a USB passthrough at the host level (but only for USB storage devices) or at the client level.
Host-Level USB Passthrough
Although you can make a host-attached USB storage device available to a Hyper-V VM, the process is not quite as seamless as it is in VMware.
I'm also pretty sure that Microsoft does not intend for USB storage to be permanently attached to a Hyper-V server. I have never seen the issue addressed in Microsoft's best practices, but my recommendation would be to only use USB storage for one-off file transfer situations.
So with that said, let's go ahead and get started. If you look at Figure 1, you can see that I have inserted an 32GB USB drive (Drive E) into my Hyper-V server. Right now, the host OS recognizes the USB drive as available storage. The problem with this is that only one OS can have direct access to USB media. Hence, we need to take the USB drive offline, thereby making it inaccessible to the host OS.
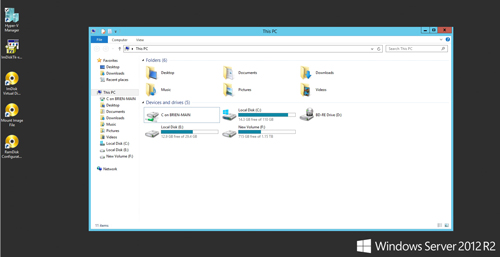 [Click on image for larger view.] Figure 1: My server contains a 32GB USB flash drive.
To accomplish this, enter the DISKMGMT.MSC command at the server's Run prompt. This causes the server to open the Disk Management console. Now, find the listing for your USB disk. You will need to right-click on the disk itself, not on the volume or on the drive letter. In my case, the disk is called Disk 8, so I am right clicking on Disk 8, as shown in Figure 2.
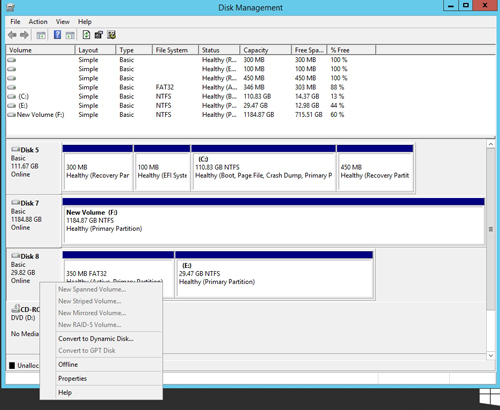 [Click on image for larger view.] Figure 2: Right-click on the USB flash drive in the Disk Management Console.
As you can see in the figure above, the shortcut menu contains an option marked Offline. You will need to use the Offline option to take the USB disk offline. Unfortunately, the Disk Management Console does not display an Offline option for every USB disk, so if you have a really small USB storage device, there may not be an offline option -- which means that you can't use passthrough.
Once the USB storage device is offline, open the Hyper-V Manager, right-click on the VM that needs access to the USB device, and then choose the Settings command from the shortcut menu. This causes the VM's Settings screen to be displayed. Now, select the SCSI controller, then select the Hard Disk option, and click Add. On the following screen, choose the Physical Hard Disk option, and then choose your USB storage device from the drop-down menu, as shown in Figure 3.
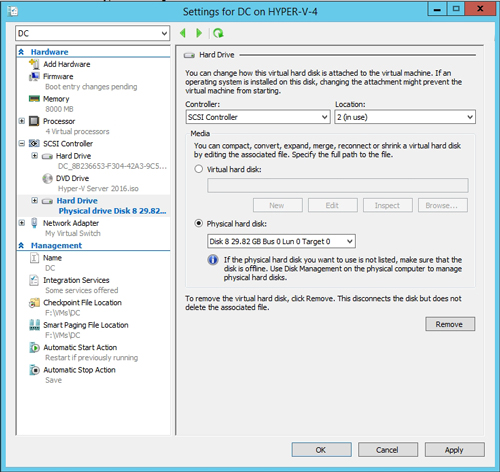 [Click on image for larger view.] Figure 3: Attach your USB storage device to the SCSI controller.
The USB device should now be available for use in the VM. If you do not immediately see the USB device listed in the VM, then you may need to open the Disk Management Console (inside of the VM) and add a drive letter to the USB device.
What About Client USB Passthrough?
So far, I have shown you how to perform a server-side USB passthrough, but what about accessing the USB hardware that is attached to a client device?
Your options for doing so vary depending on whether you are using Enhanced Session Mode. For the purposes of this column, I am going to focus on a regular RDP session without Enhanced Session Mode.
If you scroll back up to Figure 1, you will notice that File Explorer lists a drive on a computer called Brien-Main. Brien-Main is the name of my client computer. In other words, the RDP client that I am using made my local drives available for access from inside of a Hyper-V VM.
If you open the Windows Remote Desktop Connection Manager and go to the Local Resources tab, there is an option to make printers and the clipboard available for use within the RDP session. If you click on the More button, then you can choose which drives you want to make available, as shown in Figure 4.
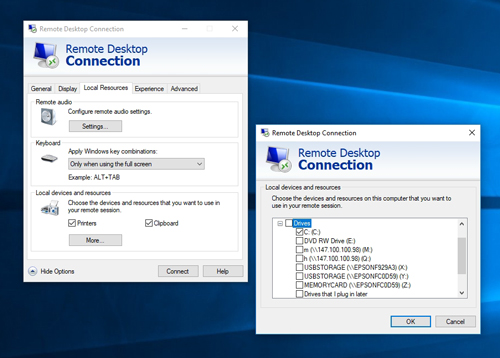 [Click on image for larger view.] Figure 4: The RDP Connection Manager can make local resources available within an RDP session to a Hyper-V VM.
So those are two different ways that you can make USB media available for use within a Hyper-V VM.
About the Author
Brien Posey is a 22-time Microsoft MVP with decades of IT experience. As a freelance writer, Posey has written thousands of articles and contributed to several dozen books on a wide variety of IT topics. Prior to going freelance, Posey was a CIO for a national chain of hospitals and health care facilities. He has also served as a network administrator for some of the country's largest insurance companies and for the Department of Defense at Fort Knox. In addition to his continued work in IT, Posey has spent the last several years actively training as a commercial scientist-astronaut candidate in preparation to fly on a mission to study polar mesospheric clouds from space. You can follow his spaceflight training on his Web site.