Posey's Tips & Tricks
Getting Started With Hyper-V Groups
With the help of PowerShell, Hyper-V management is simplified when actions can be performed in bulk.
Throughout its history, the Windows operating system has changed a lot. Even though Windows 10 barely resembles early versions of Windows, there are a few things that have remained the same. One example of this is the concept of a computer name. Computer names were first introduced with Windows for Workgroups way back in the '90s, and have remained a part of Windows ever since. Even so, the usefulness of computer names in today's world is somewhat debatable. Let me explain.
Windows for Workgroups predated Active Directory, and even the concept of a domain. The idea was that several computers could be networked together into a workgroup for collaborative purposes. The computer name served as a way to identify group members.
In contrast, modern Windows operating systems assign semi-random computer names automatically. Random names aren't really all that useful for identifying a system. You can manually assign computer names, but manually assigning names really doesn't scale very well.
Of course randomly assigned computer names can make administration tough. Not only can it be difficult to locate the system that you are trying to manage, the concept of computer names implies that systems are being managed one at a time, which is not an efficient way of doing things.
Thankfully, Microsoft has introduced a grouping feature that makes the management of virtual machines easier. For example, you might create a group for all of your domain controllers. You might create another group for your virtualized Exchange servers. You can then collectively manage the Hyper-V virtual machines within each group, rather than having to locate and manager virtual machines individually.
If you have never seen a mechanism for arranging Hyper-V virtual machines into groups, it's because the grouping function is not exposed through the Hyper-V Manager. Groups can however, be created and managed through PowerShell.
The cmdlet that is used to create a virtual machine group is New-VMGroup. This cmdlet is easy to use, as it only requires the use of two parameters.
The first parameter that you will need to specify is -Name. The -Name parameter is used to assign a name to the group. Going back to my earlier example, you might assign names such as DomainControllers or ExchangeServers.
The other parameter that is required is -GroupType. This one needs a bit more explaining. As you have probably already guessed, -GroupType is used to determine the type of group that you are creating. There are only two group types. The most commonly used group type is called VMCollectionType. A group type of VMCollectionType is suitable for acting as a collection of virtual machines.
The other group type that you can specify is ManagementCollectionType. A ManagementCollectionType group is a group that will contain other VM groups.
Here is an example of how you would create a VM group:
New-VMGroup -Name "MyGroup" -GroupType VMCollectionType
The command listed above creates an empty VM group called MyGroup. In order for this group to serve a useful purpose, you would need to add some virtual machines to the group.
In order to add a virtual machine to a group, you will need to know the group name and the name of the virtual machine that you want to add to the group. There is, however, one caveat. You can't actually add a virtual machine by name. Remember, a virtual machine can potentially be renamed, and so if VM groups were based around VM names, then renaming a VM would invalidate its group membership. That being the case, virtual machines are instead added by object ID. Of course you probably don't want to have to look up a virtual machine's object ID and then type it into a PowerShell command. Fortunately, there is an easier way of doing things. Here is the command that I recommend using:
Add-VMGroupMember -Name "MyGroup" -VM (Get-VM "WKS1")
In the command above, I am adding a VM named WKS1 to a VM group named MyGroup. Notice how I have embedded the Get-VM cmdlet as a way of retrieving the VM object based on the VM name. This allows me to add the VM to the group, without having to specifically reference the VM's ID. You can see how these commands work in the figure below. You can also see that I have used the Get-VMGroup cmdlet to display my group and its membership list. The VM name appears in the VMMembers section. The ComputerName field displays the name of the Hyper-V host.
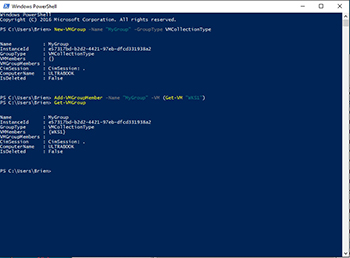 [Click on image for larger view.] Figure 1. This is how you create a virtual machine group and add a member to the group.
This approach greatly simplifies Hyper-V administration (when that administration is done through PowerShell) because administrative actions can be performed in bulk against group members.
About the Author
Brien Posey is a 22-time Microsoft MVP with decades of IT experience. As a freelance writer, Posey has written thousands of articles and contributed to several dozen books on a wide variety of IT topics. Prior to going freelance, Posey was a CIO for a national chain of hospitals and health care facilities. He has also served as a network administrator for some of the country's largest insurance companies and for the Department of Defense at Fort Knox. In addition to his continued work in IT, Posey has spent the last several years actively training as a commercial scientist-astronaut candidate in preparation to fly on a mission to study polar mesospheric clouds from space. You can follow his spaceflight training on his Web site.