Posey's Tips & Tricks
How To Create a Recovery Drive for Reinstalling Windows 10
Microsoft has made it easier than ever to create a backup Windows OS, ready for when disaster strikes.
When Microsoft first released Windows 10, they gave customers who were running certain editions of Windows a one year window within which they could upgrade to Windows 10 for free. In most cases, those who accepted the offer ended up upgrading to Windows 10 by way of Windows Update.
Although using Windows Update to upgrade an operating system seems like a logical enough approach, it did create a problem for some people. What happens if someone who has used Windows Update to upgrade to Windows 10 ends up needing to reinstall Windows? Because the upgrade was initiated by Windows Update, the person who needs to reinstall Windows probably isn't going to have a Windows 10 installation DVD laying around.
In retrospect, there were a few different ways of getting around the problem of reinstalling Windows without a copy of the Windows 10 installation media. Microsoft's primary recommendation was to create a recovery drive.
The recovery drive option was discussed often in the months following the initial Windows 10 release. Even so, it has probably been at least a year since I have heard anyone talk about the recovery drive option. Recently, however, Windows Update applied the Windows 10 Creator Update to my primary desktop computer. Once the update was complete, I noticed that a recovery drive option was prominently displayed on the Windows 10 Start menu, as shown in Figure 1. Since there will probably be some people who wonder what the recovery drive is and what it does, I wanted to take the opportunity to show you how it works.
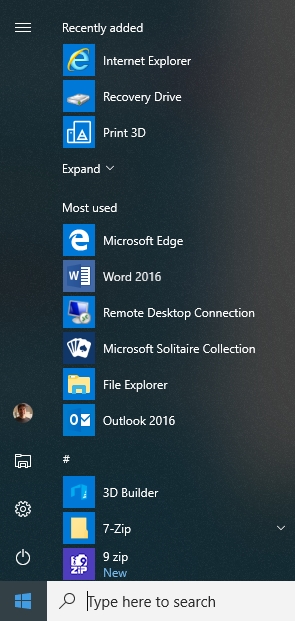 Figure 1. A recovery drive option appeared on the Windows 10 Start menu.
When you click on this option, the window shown in Figure 2 will be displayed. As you can see, the dialog box explains that a recovery drive can be used to repair an unbootable system, or to reinstall Windows. There is also a checkbox that you can use to back up your system files to the recovery drive.
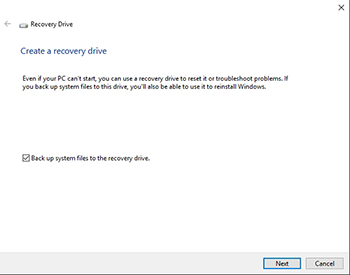 [Click on image for larger view.] Figure 2. A recovery drive can be used to repair an unbootable system.
When you click Next, Windows will begin scanning your system. The scan takes a minute or two to complete, and then you will be prompted to insert a USB flash drive. The prompt, which you can see in Figure 3, cautions you that the drive needs to be empty and should be at least 8GB in size. If any data is on the drive, that data will be deleted.
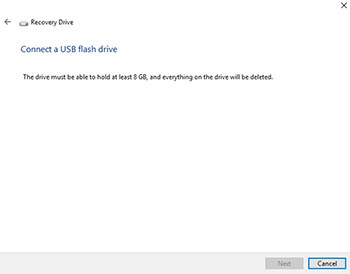 [Click on image for larger view.] Figure 3. You will need an 8GB USB flash drive.
At this point of course, you would insert a USB flash drive, click Next a couple of times, and the recovery drive will be created. Now, all you have to do is to store the recovery drive in a safe place in case it is ever needed.
So what happens if you ever do need to use the recovery drive? Well, the first thing that you will have to do is to configure the computer to boot from a USB device. The method for doing so varies considerably from one manufacturer to another, but typically you will need to press a key such as Escape or F1 during the early phases of the boot process to boot into the system board's Setup environment. From there you can enable USB booting.
When you boot from the recovery drive, you may initially see some prompts asking you to choose your language or your keyboard layout. Once you have answered any initial prompts, you will see a screen like the one shown in Figure 4, asking you whether you want to troubleshoot a problem, or turn off the PC.
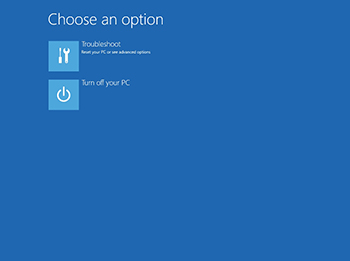 [Click on image for larger view.] Figure 4. Choose the Troubleshoot option.
Click Troubleshoot, and you will be taken to a screen that offers you various troubleshooting options. The options that are listed will vary depending on the edition and version of Windows that was running when the recovery drive was created. Some of the earlier versions gave you the option of resetting the PC or recovering from a drive. In later versions, you might see options for reverting to a previous version of Windows, repairing Startup, or performing system image recovery. If these options seem familiar, its probably because you can launch similar troubleshooting tools by booting from the Windows 10 installation media, as shown in Figure 5.
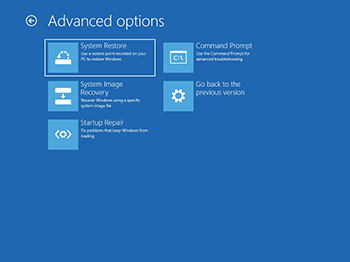 [Click on image for larger view.] Figure 5. You can access a variety of recovery tools by booting from the Windows 10 installation media.
About the Author
Brien Posey is a 22-time Microsoft MVP with decades of IT experience. As a freelance writer, Posey has written thousands of articles and contributed to several dozen books on a wide variety of IT topics. Prior to going freelance, Posey was a CIO for a national chain of hospitals and health care facilities. He has also served as a network administrator for some of the country's largest insurance companies and for the Department of Defense at Fort Knox. In addition to his continued work in IT, Posey has spent the last several years actively training as a commercial scientist-astronaut candidate in preparation to fly on a mission to study polar mesospheric clouds from space. You can follow his spaceflight training on his Web site.