Windows Server How-To
How To Shrink Hyper-V Virtual Machine Volumes
With the massive sizes of Hyper-V VMs, it might be a good idea to put a hard cap on how large they can grow to.
When you create a new virtual machine using the Hyper-V Manager, the virtual hard disk that you create will be 127GB in size (unless you specify another size). The problem with this is that not all virtual machines need 127GB of storage space. Granted, by default the volumes that Hyper-V creates are dynamically expanding, so your 127GB disk isn't necessarily going to consume 127GB of disk space. Even so, you may decide later on that you want to shrink a virtual disk as a way of ensuring that it cannot grow beyond a certain size.
Hyper-V makes it easy to shrink a VHDX file, but there is also a way to shrink the volume residing within the virtual hard disk -- not just the virtual hard disk file. Doing so prevents the virtual hard disk file from growing beyond the size that you specify.
The first thing that I recommend doing prior to shrinking a volume on a virtual machine is downloading and installing the SDelete utility from Sysinternals. SDelete is a secure delete utility that does a really good job of zeroing out previously used storage blocks. Running SDelete is not required, but some people have reported that they were able to reclaim significantly more storage space if they used SDelete to zero out empty blocks before trying to shrink the volume.
Sdelete is a command line utility. The SDelete download consists of a ZIP file that contains a 32-bit version of SDelete, and a 64-bit version called SDelete64. If you want to use SDelete to zero out free space, simply use the -z switch, and specify the drive letter. For example, if you wanted to zero out the free space on E: then you would use this command:
SDelete -z e:
You can see what this looks like in Figure 1.
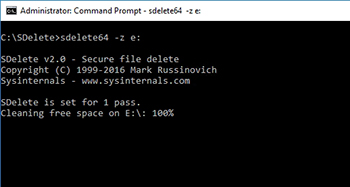 [Click on image for larger view.] Figure 1. You can use the SDelete utility to zero out free space.
The next step in the process is to shrink the volume itself. The technique used to do so will vary slightly depending on the operating system that is running within the virtual machine. The instructions in this article are based on a VM that is running Windows Server 2016 as the guest OS.
Begin by entering the DISKMGMT.MSC command at the Run prompt. This brings up the Disk Management Console, which you can see in Figure 2. Take a look at the volume types, and make sure that they are set to Basic. You won't be able to use this method to shrink a dynamic volume (not to be confused with a dynamically expanding disk).
 [Click on image for larger view.] Figure 2. Make sure that the disk type is set to Basic.
Next, right click on the volume that you want to shrink, and choose the Shrink Volume command from the shortcut menu, as shown in Figure 3.
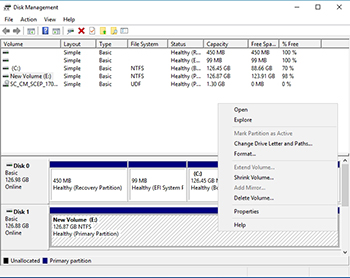 [Click on image for larger view.] Figure 3. Right click on the volume, and choose the Shrink Volume command.
Now you will be taken to a dialog box that asks you to enter the amount of space to shrink. Don't enter the desired volume size, but rather the number of MB of storage that you want to remove from the volume. In Figure 4, for example, I am removing 100,000 MB of space from the volume. Click Shrink to resize the volume.
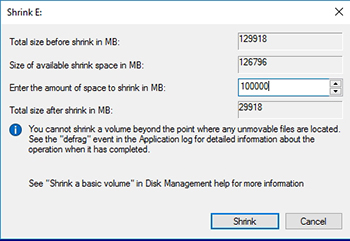 [Click on image for larger view.] Figure 4. Enter the amount of space that you want to remove from the volume.
Now, take a look at Figure 5. Here you can see that the volume has been shrunk, and that there is now 97.66GB of unallocated space on the disk. Keep in mind, however, that the underlying disk is virtual. What this means is that we still have a virtual hard disk file that could potentially be up to 127GB in size. This virtual hard disk now contains a single 29.22GB volume, and an additional 97.66GB of unallocated space. So with that in mind, let's shrink the virtual hard disk file.
 [Click on image for larger view.] Figure 5. We have shrunk the volume.
In order to shrink the virtual hard disk file, it is necessary to shut down the virtual machine and to delete any checkpoints. Next, open the Hyper-V Manager and click on the Edit Disk link, found in the Actions pane. This will launch the Edit Virtual Hard Disk Wizard.
Click Next to bypass the wizard's Welcome screen and you will be taken to a screen that asks you to choose the disk that you want to edit. Make your selection, and click Next.
Now Windows will ask what type of action you want to take. Choose the Compact option and click Next, followed by Finish to compact the virtual hard disk.
About the Author
Brien Posey is a 22-time Microsoft MVP with decades of IT experience. As a freelance writer, Posey has written thousands of articles and contributed to several dozen books on a wide variety of IT topics. Prior to going freelance, Posey was a CIO for a national chain of hospitals and health care facilities. He has also served as a network administrator for some of the country's largest insurance companies and for the Department of Defense at Fort Knox. In addition to his continued work in IT, Posey has spent the last several years actively training as a commercial scientist-astronaut candidate in preparation to fly on a mission to study polar mesospheric clouds from space. You can follow his spaceflight training on his Web site.