Posey's Tips & Tricks
Creating 3D Objects in Windows 10
If your hardware is powerful enough for the task, rendering 3D objects isn't too difficult to do with Windows, a Kinect device and some free apps.
One of the things that I have been noticing lately is that Microsoft seems to be whole heartedly embracing all things 3D. The trend started with the HoloLens and has continued with the upcoming Windows 10 "Creators" update. Even Microsoft Paint has gotten a 3D makeover. But how can those of us who do not have a HoloLens and who lack artistic talent create 3D content on Windows? Well, I recently discovered a really cool trick that I want to share with you.
One thing about HoloLens is that as awesome as the device is, it would be completely useless without holograms. Of course these Holograms have to come from somewhere, and it turns out that you can create them yourself without using a HoloLens.
The trick is to use a Windows 10 PC, a couple of free apps from Microsoft and a Kinect device from an Xbox One (the Xbox 360 version won't work).
Before I show you how to create your own 3D content, there are a couple of things that you need to know. First, the Kinect uses proprietary ports, so you can't plug it directly into a PC. However, Microsoft makes an adapter that is designed to allow you to plug the Kinect into an Xbox One S. This adapter will also let you plug the Kinect into a PC.
This leads to my second point. Creating holographic content is computationally intensive, so you will need a USB 3.0 port and a fast GPU. So with that said, let's get started.
Once I attached the Kinect to my PC, I downloaded and installed three apps. First, I downloaded Kinect for Windows Runtime. This is essentially a driver package that lets the Kinect work with a Windows 10 PC. Next, I went to the Windows app store and downloaded and installed 3D Scan and 3D Builder.
In my attempt to create 3D content, I tried to scan several objects. In doing so, I learned several things about the process. First, you really do need a fast GPU. I was using an older laptop, and although I got everything to work, I suspect that the process would have worked much better with a faster machine.
Second, scanning 3D objects requires the right environment. You will need to scan objects in a location in which Kinect won't pick up the background and try to treat it as a part of the scan (you can adjust the scan depth).
Finally, try to avoid placing the object that you are scanning onto a reflective surface. I used my kitchen table, which is made of marble, and the reflection caused by the marble was picked up by the scan. You will see what this looks like later on.
Performing a scan is a relatively simple process, at least in theory. If you look at Figure 1, you can see that the 3D Scan app lets you adjust the width, height and depth of the scan. Once everything is adjusted, click Start and your object will be scanned.
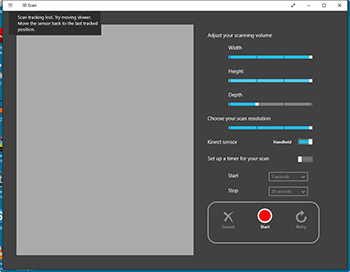 [Click on image for larger view.] Figure 1. This is the 3D Scan app.
Although the 3D Scan interface is relatively simple, scanning an object is something of an art form. I found it to be somewhat difficult to position the Kinect just right, and to set the right width, height and depth. Reflections were also an issue. If you look at Figure 2, you can see that I tried scanning a model car, and the marble table top caused a reflection to be picked up by the scan.
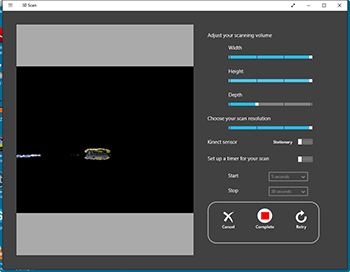 [Click on image for larger view.] Figure 2.Try to avoid scanning objects on top of a reflective surface.
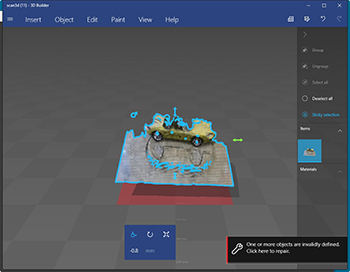
Once the scan is complete, the scan is automatically loaded into the 3D Builder app. You can see what this app looks like in Figure 3. You can also see that in this case, Kinect didn't do such a good job of scanning the model car. There is some data missing (on the side of the car), and the car's reflection on the shiny table top was captured as part of the object.
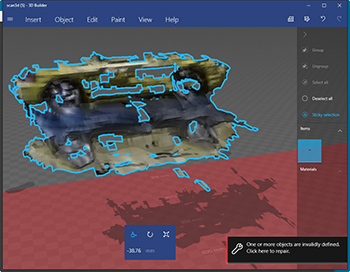 [Click on image for larger view.] Figure 3. My fist scan didn't turn out so well.
Part of the poor scan quality can probably be attributed to my computer's lack of CPU and GPU resources. Of course scanning an object that was on a reflective surface probably didn't help either.
I spent some time experimenting with the various settings and with the position of the Kinect sensor. Eventually, I was able to get better (but not perfect) results. You can see a subsequent scan in Figure 4. As you look at this figure, you will also notice that Kinect picked up the marble table top and the car's reflection (although I was able to reduce the reflection).
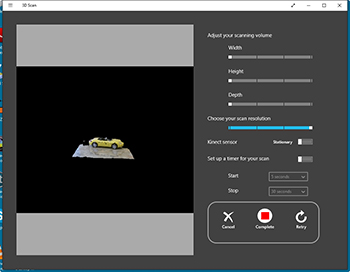 [Click on image for larger view.] Figure 4. Kinect improved the scan quality, but captured part of the table top.
Even though the scan shown in the previous figure looks pretty good, it was not a complete scan. Remember, the model car is a 3D object. If you look at the scan from a different angle in Figure 5, you can see that half of the car is missing. So what happened?
 [Click on image for larger view.] Figure 5. Half of the car is missing.
In order to get a complete 3D scan, you must either move the Kinect sensor around the object that is being scanned, or place the object on a turn table. My computer wasn't fast enough to keep up with these types of scans, so I used a stationary Kinect to scan a stationary object. Half of the object is missing because I didn't do a walk around. In case you are wondering what a more complete scan looks like, Microsoft provides a few sample objects. You can see an example of such an object in Figure 6.
 [Click on image for larger view.] Figure 6. This is one of the sample objects that was included with the 3D Builder app.
So what can you do with 3D objects once you scan them? Well, the 3D Builder app allows you to 3D print the object, or to perform a wide variety of edits to the object before you save it.
Personally, I think that 3D Scan and 3D Builder have a lot of potential, but my laptop really wasn't up to the job of scanning 3D objects. I plan to continue experimenting with 3D scans using better hardware, and will eventually write about my experiences.
About the Author
Brien Posey is a 22-time Microsoft MVP with decades of IT experience. As a freelance writer, Posey has written thousands of articles and contributed to several dozen books on a wide variety of IT topics. Prior to going freelance, Posey was a CIO for a national chain of hospitals and health care facilities. He has also served as a network administrator for some of the country's largest insurance companies and for the Department of Defense at Fort Knox. In addition to his continued work in IT, Posey has spent the last several years actively training as a commercial scientist-astronaut candidate in preparation to fly on a mission to study polar mesospheric clouds from space. You can follow his spaceflight training on his Web site.