Windows Server How-To
Perform a Rolling Upgrade of a Clustered Hyper-V Deployment, Part 2
Now that the upgrade has been applied, there's some cleanup and maintenance work to be done.
In my previous column, I explained how to perform a rolling upgrade on a clustered Hyper-V deployment, taking the servers from Windows Server 2012 R2 to Windows Server 2016. Once this process has completed, there are several other tasks that you may wish to perform. This column discusses some of those tasks.
Update the Cluster Functional Level
One of the first things that you may wish to do upon completion of the cluster upgrade is to update the cluster functional level. Until you update the cluster functional level, the cluster is considered to be running in mixed mode, even if every server in the cluster is running Windows Server 2016. As its name implies, mixed mode allows the cluster to use a mixture of Windows Server 2012 R2 servers and Windows Server 2016 servers. As such, your cluster upgrade is completely reversible. If after a few days you decide that you need to revert the cluster back to Windows Server 2012 R2, you can easily do so, so long as you have not updated the cluster functional level.
Updating the cluster functional level means that the cluster can take full advantage of new features introduced in Windows Server 2016, but is also means that you cannot add any legacy Windows servers to the cluster. Because updating the cluster functional level is considered to be a permanent change, it is a good idea to create a backup of your cluster prior to moving forward with the update.
To update the cluster functional level, open an administrative PowerShell session and enter the following command:
Update-ClusterFunctionalLevel
You can see what this process looks like in Figure 1.
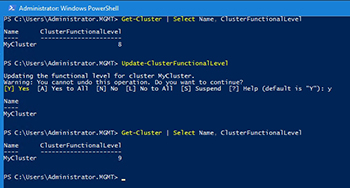 [Click on image for larger view.] Figure 1. Don't update the cluster functional level until you are sure that the cluster is working properly.
Configure NIC Teams
Another thing that you may wish to do following a transition to Windows Server 2016 is to enable NIC teaming. I admit that this seems like a really random step that has nothing to do with failover clustering, but there is a reason why I'm mentioning it.
The lab servers that I upgraded in the previous column had been previously configured to use NIC teaming. In my case, that was the only way to provide the virtual machines with an adequate amount of network bandwidth. However, Microsoft recommends that you perform a clean installation of Windows onto each cluster node, and doing so destroys your NIC team. In case you are wondering, even if you were to perform an in place upgrade of your nodes (which preserves most of your previous settings, but is openly discouraged by Microsoft), your NIC team is still destroyed by the upgrade process. In fact, if you look at Figure 2, you can see a screen capture from Windows Server Setup in which Setup specifically says that NIC teams are not preserved during an upgrade.
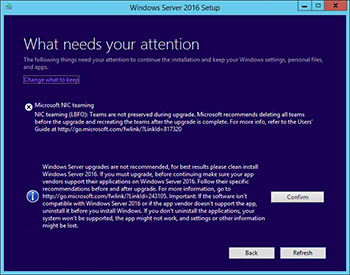 [Click on image for larger view.] Figure 2. Windows Server Setup does not preserve your NIC teams.
Updating the Virtual Machine Version
One last thing that you will probably want to do is to update the virtual machine version. As was the case with updating the cluster functional level, updating the virtual machine version allows the virtual machine to take full advantage of features introduced in Windows Server 2016. The virtual machine does so, however, at the cost of compatibility. Once a virtual machine's version has been updated, the virtual machine cannot be run on legacy Hyper-V servers. You cannot live migrate the VM to a Windows Server 2012 Hyper-V server, nor can you simply take the VM offline and move it to a server running an older version of Hyper-V.
Updating the virtual machine version is a simple, but non-reversible process. The PowerShell command that is used to change the VM version is:
Update-VMVersion -Name <virtual machine name>
If you look at Figure 3, you can see that I have used the Get-VM cmdlet to display the current version number for the virtual machines on a Hyper-V server. The virtual machines are listed as version 5.0. I then used the Update-VMVersion cmdlet to update the version of a virtual machine named DPM. After doing so, I entered the Get-VM cmdlet one more time. This time, the DPM virtual machine displays a version number of 8.0.
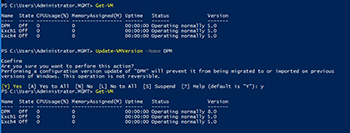 [Click on image for larger view.] Figure 3. The virtual machine named DPM has been updated to version 8.0.
Updating the cluster functional level and the virtual machine version are both completely optional tasks. Even so, it is a good idea to go ahead and perform these updates once you are sure that there is no chance that your cluster will ever need to support Windows Server 2012 R2 Hyper-V.
About the Author
Brien Posey is a 22-time Microsoft MVP with decades of IT experience. As a freelance writer, Posey has written thousands of articles and contributed to several dozen books on a wide variety of IT topics. Prior to going freelance, Posey was a CIO for a national chain of hospitals and health care facilities. He has also served as a network administrator for some of the country's largest insurance companies and for the Department of Defense at Fort Knox. In addition to his continued work in IT, Posey has spent the last several years actively training as a commercial scientist-astronaut candidate in preparation to fly on a mission to study polar mesospheric clouds from space. You can follow his spaceflight training on his Web site.