Windows Server How-To
Perform a Rolling Upgrade of a Clustered Hyper-V Deployment, Part 1
Here's how to get started deploying a Hyper-V upgrade through PowerShell.
One of the best new capabilities that Microsoft has introduced with Windows Server 2016 is the ability to upgrade the nodes within a failover cluster without incurring any down time in the process. This technique, which is known as a rolling cluster upgrade, works especially well for clustered Hyper-V deployments within which virtual machines are highly available. The process works by draining a cluster node (through live migration), placing the node into maintenance mode, provisioning the node, and then returning the node to the cluster.
The first thing that you should know about a rolling cluster upgrade, is that it can be performed in a few different ways. For example, it is possible to perform a rolling cluster upgrade using PowerShell, but you can also use Virtual Machine Manager as an alternative. For the purposes of this article, I am going to be using the PowerShell method. There are two main reasons why I have chosen the PowerShell method. First, the PowerShell method has fewer requirements than the Virtual Machine Manager method. If you use Virtual Machine Manager, then nodes must support BMC out-of-band management, and you will also need VMM licenses. Never mind the fact that there are also VMM agents to deal with. In all honesty, the VMM method is probably easier than the PowerShell method, but the PowerShell method can be scripted, which is handy if you need to upgrade multiple clusters.
To get started, you will need to make sure that your cluster is running on Windows Server 2012 R2 and that all of the most current updates are installed. You will also want to download the Sysinternals Coreinfo tool and use it to verify that your CPU supports Second Level Address Translation (SLAT). Finally, make sure that your cluster nodes are online, have been backed up, and that your cluster will be able to retain quorum, even when a node is removed from the cluster.
It's also important to check to see if Cluster Aware Updating is being used. You can use the Get-CauRun cmdlet to determine whether Cluster Aware Updating is enabled. If it is enabled, then you will need to disable it by using the Disable-CauClusterRole cmdlet.
Once all of the prep work has been completed, you can move forward with the upgrade process. Open an administrative command prompt on a cluster node. You will then need to suspend and remove the cluster node. The commands used for doing so are:
Suspend-ClusterNode -Name <node name>

  Remove-ClusterNode -Name <node name>
You can see what this process looks like in Figure 1.
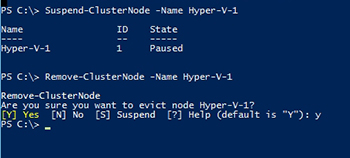 [Click on image for larger view.] Figure 1. You will need to suspend and remove a node from the cluster.
Now that the node has been evicted from the cluster, you can install Windows Server 2016 onto the node. One thing to keep in mind is that although Windows Server Setup gives you the option of performing an upgrade, Microsoft recommends that you avoid performing an upgrade, and opt instead to perform a clean installation. You can accomplish this by using the Nothing option shown in Figure 2.
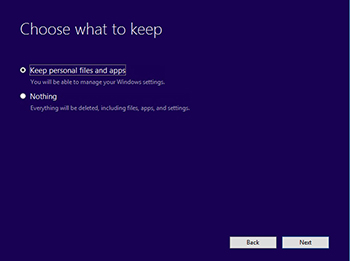 [Click on image for larger view.] Figure 2. Choose the Nothing option to install a fresh copy of Windows Server.
Once the operating system installation completes, add the server to the Active Directory domain (be sure to make note of change the server name), and install the Hyper-V role and the Failover Clustering feature. The commands used for doing so are:
Install-WindowsFeature -Name Hyper-V

  Install-WindowsFeature -Name Failover-Clustering
After the required components have been installed, check the Hyper-V virtual switch to make sure that its name matches the name that was in use prior to the upgrade. If the virtual switch does not exist, then you will need to create it.
From your newly upgraded node, open an administrative PowerShell window and enter the following command (this must be done from a server that is running Windows Server 2016):
Add-ClusterNode -Name <the server name> -Cluster <the cluster name>
You can see what this looks like in Figure 3. Notice in the figure that I have used the Get-ClusterNode cmdlet to verify that the node has indeed been added to the cluster.
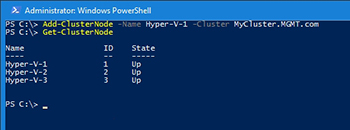 [Click on image for larger view.] Figure 3. The Windows Server 2016 node has been added to the cluster.
You can now repeat this process for each of the remaining cluster nodes, until each node has eventually been upgraded. Once the cluster has been upgraded however, there are some other tasks that you will probably want to perform. I will discuss these tasks in Part 2.
About the Author
Brien Posey is a 22-time Microsoft MVP with decades of IT experience. As a freelance writer, Posey has written thousands of articles and contributed to several dozen books on a wide variety of IT topics. Prior to going freelance, Posey was a CIO for a national chain of hospitals and health care facilities. He has also served as a network administrator for some of the country's largest insurance companies and for the Department of Defense at Fort Knox. In addition to his continued work in IT, Posey has spent the last several years actively training as a commercial scientist-astronaut candidate in preparation to fly on a mission to study polar mesospheric clouds from space. You can follow his spaceflight training on his Web site.