Windows Server How-To
How To Get Detailed Information on Your Server's Processes with PowerShell
While many know that the Get-Process command in PowerShell can provide basic process information, it can also display specific details with some minor tweaks.
If you have been using Windows PowerShell for a while, then you are probably familiar with the Get-Process cmdlet. This cmdlet, which you can see in Figure 1, returns a list of the various processes that are running on your computer. This information can obviously be helpful, but there is a lot more information that is available to you if you know how to access it.
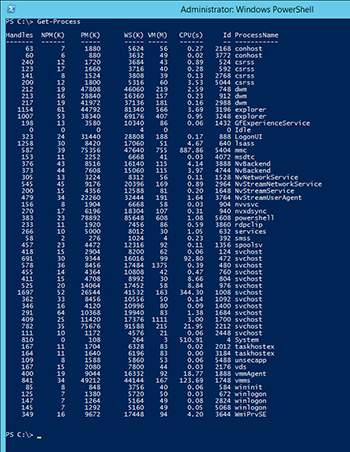 [Click on image for larger view.] Figure 1. The Get-process cmdlet returns a list of the processes that are running on your server.
To show you the types of information that you can access, let's narrow down the list a bit by looking at a single process. For the sake of demonstration, I'm just going to use the last process on the list. As you can see in the figure above, this process has an ID of 3644. If I want to examine this process by itself, I can type Get-Process -ID 3644.
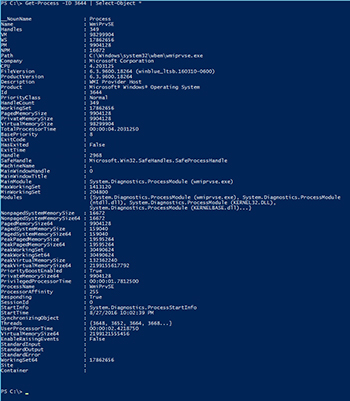
This command returns exactly the same information as before, but displays only the specified process. However, we can access a lot more information about this process. One way of doing so is to append the Select-Object cmdlet, and the wildcard character (*). This tells PowerShell to display all of the properties that are associated with the selected process. The full command is:
Get-Process -ID 3644 | Select-Object *
If you look at Figure 2, you can see that PowerShell returns very detailed information about the specified process. Indeed, this is an improvement over the information that is provided by default, but we can still do better.
 [Click on image for larger view.] Figure 2. PowerShell can provide detailed information about an individual process.
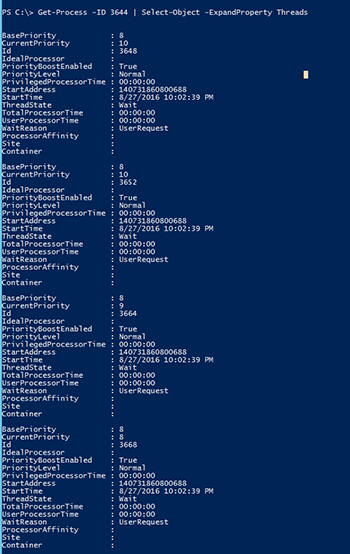
There are two main techniques that we can use to get more information. One technique is to expand the information that is already being displayed. For example, if you look at the figure above, you will notice a property called Threads. Windows displays an incomplete list of threads, as indicated by the ... after the last thread number. If you wanted to see a comprehensive list of threads, we could do so by using the -ExpandProperty parameter. The command would look something like this:
Get-Process -ID 3644 | Select-Object -ExpandProperty Threads
The ExpandProperty parameter is a common PowerShell parameter that will normally cause PowerShell to reveal a full list of properties rather than truncating the list. As such, it would be reasonable to assume that this command would display a list of thread ID numbers. In this case, however, PowerShell gives us more information. For each thread, we see the ID number, but we also see things like the priority and the total processor time. You can see a partial output in Figure 3.
 [Click on image for larger view.] Figure 3. Windows provides detailed thread information.
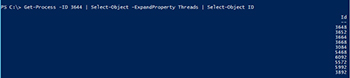
That's all well and good, but it does raise the question of how we can access that list of thread IDs. The solution is to use the Select-Object cmdlet a second time. I have never seen anyone use Select-Object twice in a single command string before, but it does work. The full command is:
Get-Process -ID 3644 | Select-Object -ExpandProperty Threads | Select-Object ID
You can see the output from this command in Figure 4.
 [Click on image for larger view.] Figure 4. This is how you produce a list of threads for the specified process.
Earlier I mentioned that there were two main techniques for pulling more data from the Get-Process cmdlet. The other method involves using dotted notation. If you look back at Figure 2, you will notice a property called StartInfo, and you will see that its value is System.Diagnostics.ProcessStartInfo. This value is meaningless by itself, but we can drill into it to get some useful information. To do so, we must first declare a variable that we can use. The command that I will be using is:
$A = Get-Process -ID 3644
Once this variable has been decaled, we can look at individual properties by typing the variable name, a period, and the property name. Watch in Figure 5, however, what happens when I do this with the StartInfo property.
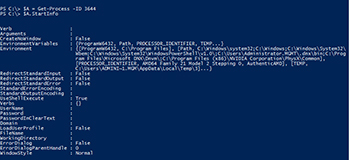 [Click on image for larger view.] Figure 5. We can use dotted notation to access more data.
Now we can see some of the start info for the process, but this information is still of limited usefulness. The dirty little secret is that you can use dotted notation to drill down even further. Most of the data shown in the previous figure was related to the environment. So with that in mind, let's add another dot and the word "environment" to the previous command. The command therefore becomes:
$A.StartInfo.Environment
Now, we have access to some useful information. You can see the output in Figure 6.
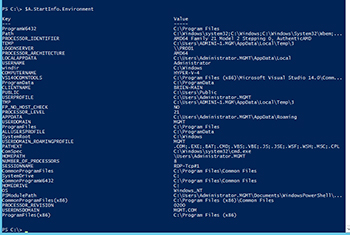 [Click on image for larger view.] Figure 6. We can drill down into the startup environment.
It is worth noting that the examples that I have provided are by no means all inclusive. These same techniques can be applied to other properties and to other PowerShell cmdlets.
About the Author
Brien Posey is a 22-time Microsoft MVP with decades of IT experience. As a freelance writer, Posey has written thousands of articles and contributed to several dozen books on a wide variety of IT topics. Prior to going freelance, Posey was a CIO for a national chain of hospitals and health care facilities. He has also served as a network administrator for some of the country's largest insurance companies and for the Department of Defense at Fort Knox. In addition to his continued work in IT, Posey has spent the last several years actively training as a commercial scientist-astronaut candidate in preparation to fly on a mission to study polar mesospheric clouds from space. You can follow his spaceflight training on his Web site.