In-Depth
First Look: Azure Resource Manager
Deploy, manage or delete applications without having to deal with the individual components that make up the application.
The complexity of deploying and managing server workloads is a major challenge facing IT organizations. Although these issues have existed since the dawn of servers and the datacenter, IT pros are taking a renewed interest in addressing the various problems associated with application workload deployment and management. One way they're doing so is automating these cloud-based app workloads using the Microsoft Azure Resource Manager.
At one time, deploying a workload consisted of little more than installing Windows onto a server, inserting the application's installation media and running Setup. Today, however, applications very often span multiple virtual machines (VMs). Such applications also tend to come with a complex set of external dependencies. On top of all of this, the IT staff must also consider issues such as service-level agreement and regulatory compliance.
Another reason for the renewed interest in workload deployment and management is the realization that repeatable configurations could simplify the volume of tasks facing IT organizations. Sure, one-off workloads can still be deployed manually, but consider how applications are typically deployed in public, private and hybrid cloud environments these days. An administrator or an authorized user deploys pre-configured applications made available through a service catalog. In these situations, an administrator has done all of the work up front to automate the workload deployment. This includes making sure the workload is configured according to the organization's policies.
The nice thing about this approach is even though some work is required up front, it greatly simplifies the application-deployment process. This type of automation allows applications to be dealt with as a whole, as opposed to dealing with individual components. This is much more in line with the way applications are generally thought of in a corporate or enterprise environment.
There have been many times, for example, when someone has asked me to install Exchange Server. However, I have never had anyone ask me to set up five Windows Servers, join four of them to a domain, configure the non-domain joined server as an Edge Server, configure the four domain-joined servers as mailbox servers, create a database availability group and so on. The point is, we tend to think of applications as a single entity, rather than thinking of all of the moving parts that make up an application.
The Microsoft System Center suite includes a variety of tools that can be used to simplify and to automate workload deployment within the datacenter. But what cloud applications? The tool of choice for automating workload deployments in the cloud is the Resource Manager.
The Resource Manager is a tool for managing complex workloads as a single entity. This tool allows you to create resource groups, which are containers that hold all of the resources required by a particular application. These resources might include VMs, virtual networks, storage and more. In essence, a resource can refer to any of the individual components that allow an application to function. A resource group is a logical grouping of the resources required by the application.
The Resource Manager is designed to let administrators and developers deploy, manage or delete applications without having to deal with the individual components that make up the application. These application-level functions are made possible through the use of templates.
Resource Manager Templates
Resource Manager templates are different from the templates that can be created using System Center Virtual Machine Manager (VMM). Whereas you can point and click your way through the creation of VMM templates, Resource Manager requires you to build text-based template files. In fact, the process has more in common with setting up a Desired State Configuration than it does with creating a VMM template.
Resource Manager templates are based on the use of JSON files, which are based on JavaScript. Although JSON files aren't as widely used as some other types of configuration files in Windows environments, the file type is starting to gain traction. For example, some hyper-converged systems rely on JSON files for the initial configuration process.
The main thing you must understand about a JSON file is it leverages declarative syntax. This means a JSON file isn't a script, at least not in the traditional sense.
The Roles of JSON and PowerShell
Consider the anatomy of a Windows PowerShell script. A PowerShell script is a text file that contains a sequence of commands that collectively perform a task. Such a script specifies each individual step that must be completed as part of the overall task. In contrast, JSON files don't instruct the OS how to perform a task, as PowerShell does. Instead, a JSON file is declarative. It tells the OS what to do, rather than how to do something. The system is able to figure out for itself how to perform the task set forth by the JSON file.
Although JSON files do all of the heavy lifting, you're going to need to use PowerShell to connect to Azure, create resource groups and deploy templates. As such, you'll need to install the Azure PowerShell module. You can download the Azure PowerShell module and can find instructions for installing the module here.
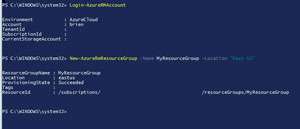
The next step in the process is to log into Resource Manager (see Figure 1). To do so, enter the following command:
Login-AzureRmAccount
 [Click on image for larger view.]
Figure 1. You'll need to log into Azure before you can create a resource group.
[Click on image for larger view.]
Figure 1. You'll need to log into Azure before you can create a resource group.
After logging into Azure, you'll be able to create a resource group. The command used for doing so is:
New-AzureRmResourceGroup -Name MyResourceGroup -Location "<location name>"
Creating a Template
Although the basic template structure is relatively simple, templates can grow to be quite complex. As such, I'll explain the basic elements found in a template and then describe a tool that can assist with more complex templates. Templates are made up of elements, of which there are six basic ones, and only three of those elements are actually required.
The first required element is named $Schema. The $Schema element points to the location of a schema file. This file is provided by Microsoft (you don't have to create it yourself), and sets the rules by which the template's contents will be processed. The $Schema is available for download.
The second required element is the ContentVersion. This element allows you to assign a version number to the templates you create. You can use any version number you want. The ContentVersion element simply helps you to keep track of the template version.
The final required element is the Resources element. Templates are used to deploy, maintain or delete workloads. Those workloads are made up of individual resources. The Resources element describes the resources being created or modified by the template.
Setting Parameters
One of the optional elements is Parameters. The Parameters element allows you to customize the resources with which you're interacting. For example, a parameter might be used to define a VM name, or perhaps an admin username. Parameters use a collection of elements of their own. A few of the parameter elements include ParameterName, DefaultValue, Type and AllowedValues.
A second optional element is a Variable. Variables are used as a mechanism for simplifying a template. Each Variable includes a name and a value. Although Microsoft uses the term "variables," it's important to keep in mind JSON files are not true scripts and, therefore, do not use variables in the same manner a full-blown scripting language might. As such, Variables behave more like constants.
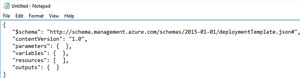
The third optional element type is Outputs, which simply are values returned following a template-based deployment. In the case of the template illustrated in Figure 2, it doesn't actually do anything, but it does follow the correct syntax, and includes the previously discussed elements. If this template were to be used, it would need to be saved to a file with the JSON extension.
Although the template in Figure 2 is simple, templates can grow to be quite complex. A single template can reference multiple resources (VMs, storage and so on), and it's even possible to create linked templates. Thankfully, there is help for dealing with template complexity.
 [Click on image for larger view.]
Figure 2. An extremely simple sample template.
[Click on image for larger view.]
Figure 2. An extremely simple sample template.
Template Visualizer
Microsoft offers a free tool called the Azure Resource Manager Template Visualizer (see Figure 3). This free, Web-based tool is available at here.
 [Click on image for larger view.]
Figure 3. The Azure Resource Manager Template Visualizer can help you cope with resource template complexity.
[Click on image for larger view.]
Figure 3. The Azure Resource Manager Template Visualizer can help you cope with resource template complexity.
The template that's loaded in the visualizer defines a VM. It also shows the VM is made up of resources such as NICs, load balancers and a storage account.
Meanwhile, the aforementioned template elements are fully editable. Double-clicking on any of the template Resources causes the Resource Properties to be displayed. These properties are fully editable.
Incidentally, if you do decide to modify the code (or write your own code), you can use the Validate button to check the file structure for syntax errors.
Another way to modify a template is to edit the parameter definitions. If you refer back to Figure 3, you'll notice an Edit Parameter Definitions button. Clicking this button causes the tool to display a window listing all of the parameters used within the template. You can use this window to delete or modify any of the existing parameters, or to create additional parameters.
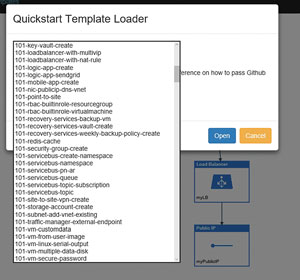
Even though the Azure Resource Manager Template Visualizer is great for editing existing templates, it can also be used to create new templates. To do so, click on the Load ARM Quickstart Template button, which causes the tool to display a window containing a huge list of Quick Start Templates. Quick Start Templates exist for everything from adding a subnet to creating a Linux VM (see available choices in Figure 4).
 [Click on image for larger view.]
Figure 4. You can use any of the Quick Start Templates as a starting point for building your own template.
[Click on image for larger view.]
Figure 4. You can use any of the Quick Start Templates as a starting point for building your own template.
After opening a Quick Start Template, you can modify its code on an as-needed basis. You can also use the toolbox items to modify the template through Visio-style drag-and-drop. When you're done, you can use the Download ARM Template button to download your completed template.
Recommendations
Azure Resource Manager templates can be quite useful, but they can also be complicated to create. Unless you're experienced in the manual creation of JSON files, it's a good idea to use the Azure Resource Manager Template Visualizer to create and validate your templates. Microsoft also provides a description explaining how to create manual templates.
About the Author
Brien Posey is a 22-time Microsoft MVP with decades of IT experience. As a freelance writer, Posey has written thousands of articles and contributed to several dozen books on a wide variety of IT topics. Prior to going freelance, Posey was a CIO for a national chain of hospitals and health care facilities. He has also served as a network administrator for some of the country's largest insurance companies and for the Department of Defense at Fort Knox. In addition to his continued work in IT, Posey has spent the last several years actively training as a commercial scientist-astronaut candidate in preparation to fly on a mission to study polar mesospheric clouds from space. You can follow his spaceflight training on his Web site.