Windows Server How-To
How To Install PowerShell on Linux
Even if you have little experience with Linux, getting PowerShell up and running will only take a few simple steps.
Ever since Microsoft's recent announcement that PowerShell was going to be made open source, I have been curious as to how PowerShell behaves in a Linux environment. I decided to take this opportunity to deploy PowerShell onto a Linux VM. My plan is to use this article to show you how the deployment process works, and to use a separate article to talk about using PowerShell.
Before I get started, I need to mention that for this particular article, I am going to be deploying PowerShell on to Ubuntu Desktop version 16.04. There are two reasons why I chose this particular Linux build. First, Ubuntu 16.04 is free, and PowerShell is documented to work with it.
My second reason for using this particular Linux build is that, quite frankly, I have relatively little experience working with Linux. Being that I am delving into the unknown with running PowerShell on a Linux box, I thought that things might be a little bit easier if I stick to using the desktop version. From what I have read, Ubuntu Server is a command line-only environment.
If you would like to try running PowerShell on Ubuntu Desktop for yourself, you can download the operating system here. The download consists of an ISO file. In preparation for writing this post, I created a Hyper-V Generation 1 virtual machine and configured it to use the ISO file as a DVD drive. I won't bore you with the details, but I will say that installing Linux proved to be a really simple process, even for someone like me who has relatively little Linux experience. The entire deployment process was GUI-based, and I was only required to answer three or four easy questions.
The first step in installing PowerShell onto a Linux desktop was to download PowerShell. The download link can be found on Github. Ubuntu has a shortcut to Firefox right on the desktop, so I used the Linux VM's browser to complete the download. As you can see in Figure 1, there are several different PowerShell releases, so be sure to download the version that matches your Linux build.
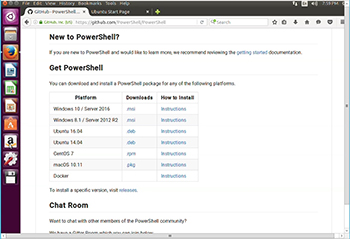 [Click on image for larger view.] Figure 1. Be sure to download the PowerShell build that matches your platform
The download process places a file named powershell_6.0.0-alpha.10-1ubuntu1.16.04.1_amd64.deb into the Downloads folder, as shown in Figure 2. You will need to know this file's location in order to perform the next step. You will also need to know the exact filename, which will likely be different from what I am using here. For the purposes of this article, I am assuming that the powershell_6.0.0-alpha.10-1ubuntu1.16.04.1_amd64.deb file is residing in the Downloads folder.
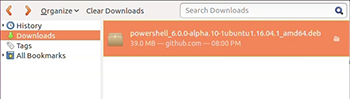 [Click on image for larger view.] Figure 2. The Powershell.deb file is placed into the Downloads folder.
The next step in the process is to open a terminal window. If you look back at Figure 1, you will notice a purple icon in the top, left portion of the screen. Click on this icon, and then type Terminal in the search box. The Linux desktop should display a Terminal icon, as shown in Figure 3. You can click on this icon to launch the terminal.
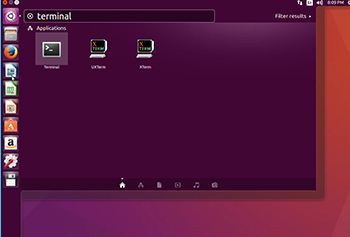 [Click on image for larger view.] Figure 3. Click on the Terminal icon to launch the terminal.
There are two commands that you will need to type into the terminal window. Those commands are:
sudo apt-get install libunwind8 libicu55

  sudo dpkg -i ~/Downloads/powershell_6.0.0-alpha.10-1ubuntu1.16.04.1_amd64.deb
The first command installs the dependencies required for running PowerShell. The second command installs PowerShell itself. You can see the PowerShell installation command shown in Figure 4.
 [Click on image for larger view.] Figure 4. This is what the PowerShell installation process looks like.
It is worth noting that you must verify the name of your .deb file prior to running the command shown in the figure above. Open source code is updated frequently, and the name of the .deb file changes to reflect the current version number. Hence, the commands listed above are accurate at the time that this article is being written, but the filename will have almost certainly changed by the time that you read this.
Now that PowerShell has been installed, you can launch it by typing PowerShell into the terminal window. Upon doing so, you will see the terminal prompt change to a PowerShell prompt, as shown in Figure 5. When you are done using PowerShell, you can type Exit.
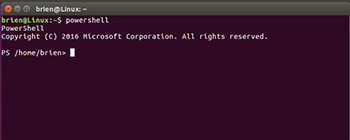 [Click on image for larger view.] Figure 5. Type PowerShell in the terminal window to launch PowerShell.
About the Author
Brien Posey is a 22-time Microsoft MVP with decades of IT experience. As a freelance writer, Posey has written thousands of articles and contributed to several dozen books on a wide variety of IT topics. Prior to going freelance, Posey was a CIO for a national chain of hospitals and health care facilities. He has also served as a network administrator for some of the country's largest insurance companies and for the Department of Defense at Fort Knox. In addition to his continued work in IT, Posey has spent the last several years actively training as a commercial scientist-astronaut candidate in preparation to fly on a mission to study polar mesospheric clouds from space. You can follow his spaceflight training on his Web site.