In-Depth
How To Back Up Hyper-V to Amazon Web Services
A guide to configuring the AWS Gateway to back up your Hyper-V VMs in the Amazon public cloud.
Remote backups have historically involved replicating data to a remote datacenter or shipping backup tapes to an off-site storage facility. In more recent years, however, public clouds have become a more viable cost-effective option for remote backup storage.
The most widely used public cloud, Amazon Web Services (AWS), is the common alternative to a secondary datacenter as that off-site option. In addition to its EC2 compute and S3 storage offerings, AWS offers low-cost archiving via its Glacier service. Given the vast number of Windows Server and Hyper-V instances running in AWS, it's no surprise that it has become a popular option for backing up those workloads and data.
The key to backing up Hyper-V virtual machines (VMs) to the AWS cloud is to create an AWS Storage Gateway. The AWS Storage Gateway functions as a liaison between your local datacenter and AWS. Before you can set up the gateway, however, you're going to need to choose a configuration.
AWS Storage Gateway Options
There are three different ways to configure the AWS Storage Gateway.
One way is to act as a virtual tape library (VTL). The advantage to using the VTL option is you can continue using your existing third-party backup and recovery software. The gateway appears to your backup application as an iSCSI-connected VTL. Keep in mind, the VTL option is designed to write backups to the cloud. As such, you'll still need an on-premises backup target if you want to keep a local backup.
A second option is the Gateway Cached Volume, which can be a good choice for organizations not already creating local backups because frequently accessed data is stored in a local cache for low- latency access.
The third configuration is with Gateway Stored Volumes, which is similar to Gateway Cached Volume, except a full copy of your entire dataset is stored on-premises, rather than the gateway merely retaining a cache of the most commonly accessed data.
Backing Up Hyper-V VMs to AWS
Let's back up some Hyper-V VMs to AWS, using a gateway configured as a VTL. You'll need a supported iSCSI Initiator and a supported backup application. I used a Windows Server 2012 R2 iSCSI initiator and Microsoft System Center 2012 R2 Data Protection Manager. AWS maintains a list of the supported iSCSI Initiators and backup applications, which include earlier versions of Windows Server, Windows 7, Red Hat Enterprise Linux 5 and higher, and VMware ESX Initiator. AWS said the Storage Gateway doesn't currently support Microsoft Multipath I/O (MPIO). The backup software listed by AWS includes Veritas (formerly Symantec) Backup Exec, NetBackup, Veeam Backup and Replication, Dell NetVault Backup, and EMC NetWorker (other backup vendors say they also support AWS as a target).
The first decision you'll have to make is whether to run the gateway on-premises or to deploy it as an EC2 instance. I deployed a local gateway but a gateway hosted on an EC2 instance can be used for disaster recovery and data mirroring for VMs that are stored in the EC2 cloud.
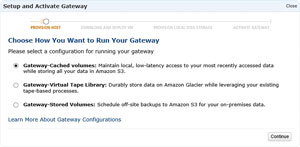
The first step is to log into AWS and then choose the Storage Gateway option from the Services menu, which will direct you to the Getting Started section with the AWS Storage Gateway screen. Click the Deploy a New Gateway link, found in the Navigation pane, and your browser will open the Setup and Activate Gateway wizard. The wizard's first screen asks how you want to run your gateway. Choose the Gateway Virtual Tape Library option (see Figure 1), and click Continue.
 [Click on image for larger view.]
Figure 1. Choose the Gateway Virtual Tape Library option, and click Continue.
[Click on image for larger view.]
Figure 1. Choose the Gateway Virtual Tape Library option, and click Continue.
A warning message will indicate you're configuring the gateway as a VM and a supported hypervisor is required. AWS supports Hyper-V 2008 R2 and higher and VMware ESXi 4.1 and higher. Regardless of which hypervisor you choose to use, your VM will need to meet certain requirements, including:
- Either four or eight virtual CPUs
- 7.5GB of RAM
- 75GB of storage space
- Additional storage for the gateway cache and the upload buffer Click Continue, and the next screen will ask which hypervisor you wish to run the gateway VM on. Make your selection and click Continue, which will then direct you to download your gateway VM. Click the Download button and then save the resulting .ZIP file to a location accessible to your hypervisor.
Next, you'll import the gateway VM. The actual steps used to accomplish this task vary depending on the hypervisor you're using. In the case of Windows Server 2012 R2 Hyper-V, open the Hyper-V Manager and choose the Import Virtual Machine command, found in the Actions pane. This will cause Windows to open the Import Virtual Machine Wizard. Click Next to bypass the wizard's Welcome screen, which will prompt you to specify the folder containing the VM you want to import. Point the wizard to the VM downloaded. In order to make this work, you'll have to decompress the .ZIP file and copy its contents to another location. The path that you'll need to enter into the wizard is: \AWS-Storage-Gateway-HyperV-2012\AWS-Storage-Gateway.
Click Next, which will prompt you to select the VM you want to import. Select the AWS-Storage-Gateway VM and click Next and then choose the import type. Select the option most appropriate for your environment and click Next. Then you must specify the virtual switch the gateway VM should use. Click Next, followed by Finish to complete the process.
Now that the VM is created, you'll need to create an upload buffer and cached storage. To do so, right-click on the VM, and choose the Settings command from the shortcut menu. Click on the IDE controller and use the Add Hard Drive option to create a hard disk (you'll need to create two disks). Assuming you're creating a virtual tape library, the upload buffer disk will need to be between 150GB and 2TB. The Cache storage buffer will need to be 1.1 times larger than the upload buffer, but can be as large as 16TB. AWS has the sizing guidelines listed here.
Now, go ahead and power up the gateway VM and connect to the console, which will then prompt you to enter a set of credentials. The default username and password are sguser and sgpassword.
After logging in, you'll have to assign a static IP address to the gateway VM by pressing option 2, followed by option 3. Enter the required IP address information and then exit the network configuration screen.
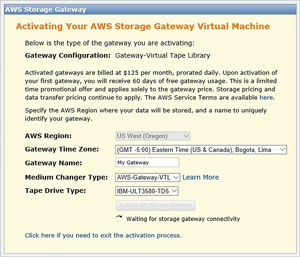
Once you've applied a static IP address to the VM, go back to the Setup and Activate Gateway wizard and click your way through the wizard until you reach the Activate Gateway screen. Enter the gateway IP address into the space provided and then click the Proceed to Activation button, which will direct you to the gateway configuration screen, which requests basic information (see Figure 2). Be sure to read the dialog box carefully because it details the cost of activating the gateway. Click Activate My Storage Gateway to complete the process.
 [Click on image for larger view.]
Figure 2. You must activate your storage gateway.
[Click on image for larger view.]
Figure 2. You must activate your storage gateway.
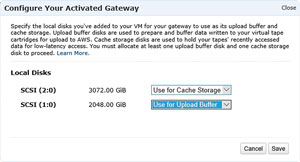
After activating the gateway server, select the gateway within the Web interface and then click on Configure Local Storage. Choose the disks you want to use as an upload buffer and as cached storage (see Figure 3) and then click Save.
 [Click on image for larger view.]
Figure 3. Choose the disks that you want to use as an upload buffer and for cached storage.
[Click on image for larger view.]
Figure 3. Choose the disks that you want to use as an upload buffer and for cached storage.
Now that the gateway is configured, it's time to establish connectivity to the Data Protection Manager server. Open Server Manager on the Data Protection Server and choose the iSCSI Initiator option from the Tools menu. If prompted, click Yes to start the initiator.
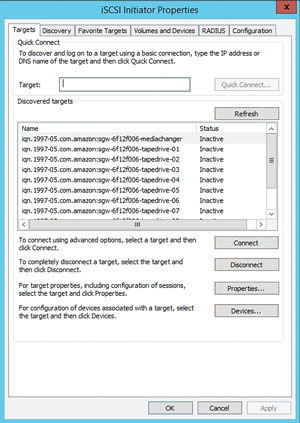
When the iSCSI Initiator Properties dialog box opens, click on the Discovery tab and then select the Discover Portal button. Now, enter your gateway server's IP address into the space provided and make sure that the port number is set to 3260. Click on the Targets tab and you should see a list of tape drive devices (see Figure 4). Select a device and click Connect. Now, repeat the process for the remaining devices.
 [Click on image for larger view.]
Figure 4. Select a device and click Connect.
[Click on image for larger view.]
Figure 4. Select a device and click Connect.
Once all of the devices are connected, switch to the AWS Gateway Web console. You'll need to click on your gateway (see Figure 5) and then click on the Create Tape button in order to create your first virtual tape. When doing so, you'll be presented with options for configuring buffer alarms, creating multiple tapes, defining tape capacity and establishing a barcode prefix.
 [Click on image for larger view.]
Figure 5. Click the Create Tape button and follow the prompts to create a tape.
[Click on image for larger view.]
Figure 5. Click the Create Tape button and follow the prompts to create a tape.
Now, go to your Data Protection Manager server and open the System Center 2012 R2 DPM Administrator Console. Select the Management workspace and then click on Libraries. Click the Rescan button, and Data Protection Manager will scan for tape drives that can be used for backup (see Figure 6).
 [Click on image for larger view.]
Figure 6. Data Protection Manager has detected my virtual tape library.
[Click on image for larger view.]
Figure 6. Data Protection Manager has detected my virtual tape library.
Now it's time to back up your Hyper-V server. You'll need to deploy an agent to the server before you'll be able to protect it. The agent deployment options are located within the DPM console's Management workspace.
Once the agent has been installed, you'll need to create a protection group. The exact options that you'll choose during this process will vary widely according to your own network configuration. To begin the process, go to the Protection workspace and click the New button. This will launch the Create New Protection Group Wizard.
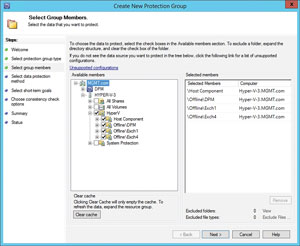
Click Next to bypass the wizard's Welcome screen. Next, set the protection group type to Servers, and click Next. This lets you select the resources you want to protect. It's possible to protect Hyper-V as a whole, or individual VMs (see Figure 7). After making your selection, click Next.
 [Click on image for larger view.]
Figure 7. Choose the resources you want to back up.
[Click on image for larger view.]
Figure 7. Choose the resources you want to back up.
The next screen asks you to choose the types of long-term protection and short-term protection you want to use. In a production environment, you'd typically use disk for short-term protection and tape for long-term protection. If you simply want to test your gateway, however, you can choose tape for both. The wizard's remaining options are intuitive, and must be configured according to your own unique needs. Upon completion of the wizard, a protection group will be created. Data Protection Manager will now begin writing data to your tape backup according to the schedule that you've set.
Watch the Meter
As you can see, it's relatively easy to back your Hyper-V VMs up to AWS by using a cloud gateway server. It is worth noting that as with most things in the public cloud, there are fees associated with the backup process, so it's important to determine what cloud backups will cost before attempting a backup.