In-Depth
Hybrid Search with SharePoint and Office 365
The new SharePoint release shares more properties with Office 365 than ever. Perhaps the most welcome new feature is the ability to search for files running both on-premises and in the cloud. Learn how to implement hybrid search.
Over the past several years, it has become increasingly common for organizations to extend traditional SharePoint functions into the Office 365 cloud. Although these hybrid SharePoint deployments tend to be more flexible and scalable than their on-premises counterparts, they've traditionally created some unique challenges of their own. As such, one of Microsoft's primary objectives in creating its new on-premises release, SharePoint 2016, has been to offer a more seamless hybrid SharePoint experience.
SharePoint 2016 introduces three new features specifically designed to help organizations that currently have or want to create a hybrid deployment. The first is support for hybrid sites. Previously, there was a bit of a disconnect between SharePoint and SharePoint Online. With the Hybrid Sites feature, Microsoft consolidates SharePoint sites into a single list, regardless of whether those sites exist within SharePoint Online, or within the organization's own datacenter. As a very welcome bonus, the new Hybrid Sites feature also establishes a single profile for each user within Office 365. All of the user's profile information is stored within this profile.
Microsoft's second hybrid SharePoint feature is related to OneDrive for Business. Introduced in SharePoint 2013 SP1, Microsoft added OneDrive for Business as an alternative to the company's consumer-oriented OneDrive (previously known as SkyDrive, which replaced SharePoint Office Workspace and Office Groove in earlier versions). OneDrive for Business lets users synchronize and store files in the cloud so they can access them from various devices, as well as share documents with others. SharePoint 2016 introduces the Hybrid OneDrive for Business. This feature allows users to sync files directly with Office 365, and share those files with others. Files stored on OneDrive for Business are accessible directly from Office 365.
Microsoft's third, and arguably most significant hybrid SharePoint improvement, is cloud hybrid search. Simply put, this feature allows a user to enter a search query into SharePoint and receive results from both SharePoint and SharePoint Online.
Hybrid Search Capabilities
On the surface, the concept of a hybrid search seems deceptively simple. After all, how difficult could it possibly be to search SharePoint and SharePoint Online, and then blend the results? People perform content searches every day, and have for years.
One of the primary reasons SharePoint Online is only now receiving a hybrid search feature is the difficulties involved in security trimming. Whether a user is searching SharePoint within an on-premises farm, SharePoint Online or some combination of the two, the search results should only include resources to which the user has access. This not only means a user's identity must be federated across the two environments, but also a single search index must be established. The concept of a unified search index presents challenges from an access control list standpoint.
In order to use the hybrid search capability, SharePoint 2016 must be running within the local SharePoint farm (although some Microsoft documentation indicates hybrid search can also be enabled for a SharePoint farm based on SharePoint Server 2013 SP1 and the August 2015 PU update). However, there's no requirement for all of the farm's SharePoint servers to be running SharePoint 2016. SharePoint 2007, 2010 and 2013 are also supported. The SharePoint 2016 content crawler can be configured to crawl content sources on SharePoint servers running any of these supported versions. Once the content has been crawled, it's added to a search index based within Office 365. This means if a user wants to receive unified search results, they must base their search on Office 365, because Office 365 contains the only index with a full record of local and cloud-based content.
Security trimming is important to organizations that want to ensure users don't receive query results of content they're not supposed to access. In order to make this possible, SharePoint has to do three things. First, the local SharePoint farm has to write the crawl data for local content to the Office 365 index. Second, SharePoint must make SharePoint Online aware of the Access Control List entries that correspond to locally crawled content. Finally, SharePoint Online must establish a deep enough understanding of the on-premises Active Directory user accounts able to determine which pieces of content a user does and does not have access to (based on the Access Control List entries), regardless of where the content is actually located.
Enabling Hybrid Search
Six basic steps are required to set up a hybrid search. In order to enable hybrid search, you'll need an on-premises SharePoint farm running supported SharePoint versions. You'll also need an Office 365 subscription with licenses for the users who need to be able to perform hybrid search.
Step 1: Establish Active Directory Synchronization
Although establishing Active Directory synchronization was once a daunting task, Microsoft has made the process much easier. The key to success is to use the correct synchronization tool. There are a number of different directory synchronization tools available for download. The tool of choice is the Microsoft Azure Active Directory Connect tool.
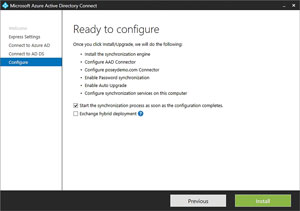
The Microsoft Azure Active Directory Connect Tool provides a simple, wizard-based approach to directory synchronization. Initially, an administrator must provide a set of credentials for Office 365 (even though the tool says Azure), and for the local Active Directory. For single-forest environments, Microsoft recommends setting up DirSync with Password Sync. You can accomplish this by using the tool's Express Settings. The Microsoft Azure Active Directory Connect tool can automatically enable password synchronization as part of the directory synchronization process (see Figure 1). For multi-forest environments, Microsoft offers a number of choices for directory synchronization. Multi-Forest DirSync with Single Sign-On seems to be the most popular choice, but using the Azure Active Directory (AAD) Sync and the Windows Azure Active Directory Connector for Forefront Identity Manager are also viable options.
 [Click on image for larger view.]
Figure 1. The Microsoft Azure Active Directory Connect tool is used for directory synchronization in single-forest environments.
[Click on image for larger view.]
Figure 1. The Microsoft Azure Active Directory Connect tool is used for directory synchronization in single-forest environments.
Step 2: Create a Search Service Account
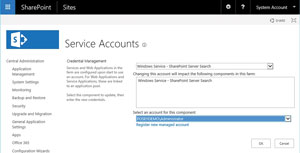
The second step in the process is simply to create a search service account for your local SharePoint farm. You can accomplish this by opening the SharePoint Central Administration tool, clicking on the Configure Service Accounts link (found in the Security section on the main screen) and then choosing the Windows Service – SharePoint Server Search option from the list of services. In many cases, it will be necessary to register a new managed account by using the Register New Managed Account link (see Figure 2).
 [Click on image for larger view.]
Figure 2. Associate a service account with SharePoint Server Search.
[Click on image for larger view.]
Figure 2. Associate a service account with SharePoint Server Search.
Step 3: Create a Cloud-Based Search Service Application
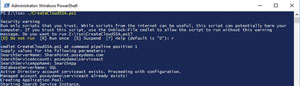
The third step in the process is to create a cloud Search service application. This application will need to be created within your local SharePoint farm. Microsoft provides a Windows PowerShell script that can be used to automate the creation of this application. You can download this script from connect.microsoft.com. The file is included in a .ZIP file named CloudHybridSearchPreview.zip. The name of the script you'll be using is CreateCloudSSA.ps1.
The script should be run on a local SharePoint Server. When you run the script, you'll need to provide the name of the SharePoint Search Server within your local farm, your Search Service account name (in domain\name format), the name you want to assign to the new Search Service application and the name of your database application (see Figure 3).
 [Click on image for larger view.]
Figure 3. Run the CreatCloudSSA.ps1 script.
[Click on image for larger view.]
Figure 3. Run the CreatCloudSSA.ps1 script.
Step 4: Enable Server-to-Server Authentication
The next step in the process is to enable server-to-server authentication. By doing so, the local SharePoint farm and the cloud-based SharePoint Servers will be able to request and access resources on one another's behalf. Once again, Microsoft has provided a script that automates the configuration process.
The aforementioned CreateCloudSSA.ps1 script included within a .ZIP file is called CloudHybridSearchPreview.zip. The documentation for setting up Hybrid Search also contains the Windows PowerShell script (OnBoard-HybridSearch.ps1) required for enabling server-to-server authentication.
There are two prerequisite components you'll need to put into place prior to running the script. First, you'll need to download and install the Microsoft Online Services Sign-in Assistant for IT Professionals RTW. You'll also need to install the 64-bit version of the Azure Active Directory Module for Windows PowerShell, available on that same page.
Step 5: Define Your Content Sources
The second-to-last step in the configuration process is to define a content source. The content stored within your specified content source will be indexed for searching. Given the complexity of hybrid search, Microsoft recommends you initially start by defining a small content source. You can use this content source for testing purposes until you're sure hybrid search is working correctly.
In order to add a content source, you'll need to log into the SharePoint Central Administration tool using an account that's an authorized administrator of the Cloud Search Service application. Now, click on the Manage Service Applications link, found in the Management section. Now, click on your Cloud Search Service application, followed by the Content Sources link found in the Crawling section (see Figure 4).
 [Click on image for larger view.]
Figure 4. Click on the Content Sources link.
[Click on image for larger view.]
Figure 4. Click on the Content Sources link.
Complete this process by clicking on the New Content Source link, and then entering the details for the content source you want to index. Ideally, your initial content source should only contain a few items at most. Remember, you can always add more content sources later on.
Step 6: Crawl the Content
The final step in the process is to start a crawl of your specified crawl sources. To do so, go back to the Manage Content Sources screen, and click on the Start all crawls link. You can use this screen to monitor the progress of the content crawling process.
As you configure the items on this page, be sure to pay close attention to the crawl settings and the crawl schedule. You'll want to make sure you're only crawling the desired content and crawling occurs according to a schedule that won't result in a performance impact noticeable to your users. The initial test crawl can be done at any time assuming only a few documents are being indexed, but you should carefully consider the potential performance impact of crawling production data. Potentially disruptive crawls can be scheduled to occur during non-peak hours.
SharePoint 2016 introduces a number of new features related to hybrid deployments. The most significant of these new features is Hybrid Search, which allows a user to initiate a search through SharePoint Online and receive unified search results from both the cloud and the local farm.
About the Author
Brien Posey is a 22-time Microsoft MVP with decades of IT experience. As a freelance writer, Posey has written thousands of articles and contributed to several dozen books on a wide variety of IT topics. Prior to going freelance, Posey was a CIO for a national chain of hospitals and health care facilities. He has also served as a network administrator for some of the country's largest insurance companies and for the Department of Defense at Fort Knox. In addition to his continued work in IT, Posey has spent the last several years actively training as a commercial scientist-astronaut candidate in preparation to fly on a mission to study polar mesospheric clouds from space. You can follow his spaceflight training on his Web site.