Windows Server How-To
How To Prepare a Hyper-V VM To Run on Microsoft Azure
Missing a step could cause data to disappear.
Uploading a Hyper-V virtual machine to Microsoft Azure is surprisingly easy to do, but there is a lot of prep work that must be done in order to get the virtual machine ready to upload. Much of this prep work is virtual machine or application specific, but there are also some more general preparation requirements.
The first thing that you must do prior to uploading your VM to Azure is to make a full backup of the VM. In order to run the VM in Azure, you will have to Sysprep the virtual machine. Running Sysprep effectively resets the virtual machine's operating system to an out-of-box state, which can be a destructive process. As such, making a full backup of your virtual machine is a critical step in the process.
The next thing that you absolutely must do is to verify that the time on your system clocks is correct. Windows Server uses the Kerberos protocol for authentication. Kerberos is sensitive to clock skew. Microsoft has largely solved the clock skew problem with a system service that is designed to keep system clocks in sync with one another. The problem is, however, that this synchronization does not extend to Azure. If the clocks on your local systems are set to a different time than is displayed within Azure, then there is a good chance that the VM upload process will fail with a 403 (Forbidden) error.
Once you have verified that the system clocks are set correctly, you will need to check to see what type of virtual hard disk is being used by the virtual machine. Hyper-V can use either VHD or VHDX based virtual hard disks. However, only VHD virtual hard disks can be uploaded to Azure. Azure does not support the uploading of VHDX disks.
If your virtual machines use VHDX virtual hard disks, then all is not lost. There is a way to convert a VHDX-based virtual hard disk to VHD format so long as the virtual hard disk is less than 2TB in size and you have enough physical storage space to accommodate two separate copies of the virtual hard disk.
To convert the virtual hard disk, shut down the virtual machine. From within the Hyper-V Manager, right click on the VM and select the Settings command from the shortcut menu. When the Settings screen appears, select the virtual hard disk that you want to convert and then click on the Edit button shown in Figure 1.
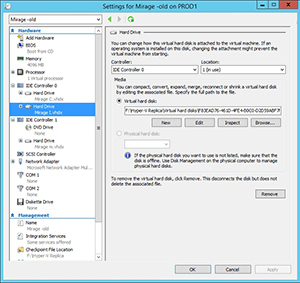 [Click on image for larger view.] Figure 1. Click the Edit button.
Upon clicking the Edit button, Hyper-V will launch the Edit Virtual Hard Disk Wizard. Click Next on the wizard's initial screen. You should now see a screen asking you what action you wish to take. Choose the Convert option and click Next. Now, tell the wizard that you want to convert the virtual hard disk to VHD format, as shown in Figure 2, and then complete the wizard.
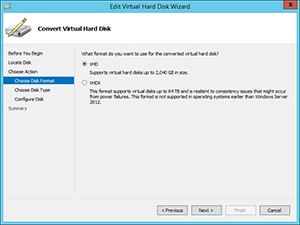 [Click on image for larger view.] Figure 2. You must convert the virtual hard disk to VHD format.
The Edit Virtual Hard Disk Wizard doesn't actually convert the virtual hard disk to VHD format. Instead, it creates a VHD file and then copies the contents of the VHDX file to the newly created VHD file. This means that at the end of the procedure, your virtual machine is still attached to its original VHDX virtual hard disk. Go back to the screen shown in Figure 1 and click Browse. Now, link the virtual machine to the VHD file that you have just created.
At this point, you will need to start the virtual machine. The virtual machine should be running off of the VHD file, and the VHDX file (assuming that one exists) should remain untouched. Even so, you should always make sure to have a "real backup" on hand just in case anything goes wrong.
Once the virtual machine boots, log in and then open an elevated Command Prompt window. Navigate to the C:\Windows\System32\Sysprep folder and then run Sysprep.exe. You must configure Sysprep to use the Out of Box Experience, generalize the virtual machine, and shut down (choosing the shut down option is important). You can see what these options look like in Figure 3.
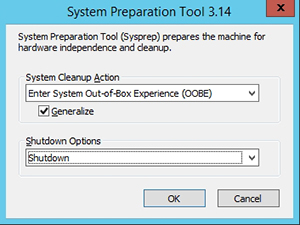 [Click on image for larger view.] Figure 3. You must use these options when sysprepping the virtual machine.
Sysprep will now prepare and then shut down the virtual machine. Once the virtual machine shuts down, its virtual hard disk can be uploaded to Azure. It is important that you not power the virtual machine back up until it has been moved to the Azure environment.
About the Author
Brien Posey is a 22-time Microsoft MVP with decades of IT experience. As a freelance writer, Posey has written thousands of articles and contributed to several dozen books on a wide variety of IT topics. Prior to going freelance, Posey was a CIO for a national chain of hospitals and health care facilities. He has also served as a network administrator for some of the country's largest insurance companies and for the Department of Defense at Fort Knox. In addition to his continued work in IT, Posey has spent the last several years actively training as a commercial scientist-astronaut candidate in preparation to fly on a mission to study polar mesospheric clouds from space. You can follow his spaceflight training on his Web site.