In-Depth
Implement IPAM with Windows Server
Brien Posey shows how to configure Microsoft's tool for auto discovery and the management of IP addresses, which can improve administration of Group Policies.
One of the new features Microsoft gave us in Windows Server 2012 was IP Address Management (IPAM). As the name implies, this feature was designed to keep track of IP addresses and make management of them easier for organizations using Microsoft DNS and DHCP servers.
Microsoft includes a set of tools that let IT pros plan, deploy, manage and monitor IP address infrastructures with a rich interface. IPAM automatically discovers IP addresses on both servers and the network, allowing you to centrally manage them. Included in IPAM is address space management, virtual address space management, multi-server management and monitoring, network auditing, and roll-based access control. All of this enables improved Group Policy management.
For the most part, Microsoft IPAM does a decent job. It isn't as full-featured as some of the third-party solutions such as SolarWinds IPAM, but it is more reliable than trying to keep track of IP addresses with a spreadsheet, which is what many organizations still so. Of course, this assumes you can get IPAM running and properly configured.
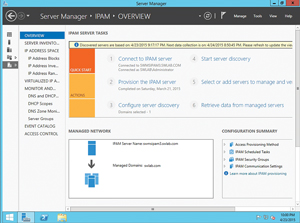
IPAM is relatively easy to deploy. Administrators can install it through the Server Manager using the same technique that would be used to install any other server feature. Once the feature has been installed, there are six tasks you must complete in order to get IPAM working (see Figure 1).
 [Click on image for larger view.]
Figure 1. The IPAM configuration process consists of six tasks.
[Click on image for larger view.]
Figure 1. The IPAM configuration process consists of six tasks.
The first four tasks on the list are easy to complete. They consist of connecting to the IPAM server, provisioning the IPAM server, configuring server discovery and then performing the server discovery. Each of these four tasks can be completed with a few mouse clicks. It's the fifth task that so often gives administrators problems.
The server discovery process compiles a list of resources that can be managed through the IPAM feature. By default, this list consists of domain controllers, DNS servers and DHCP servers. Once these resources have been discovered, the fifth step in the configuration process is to select the servers that you want to manage.
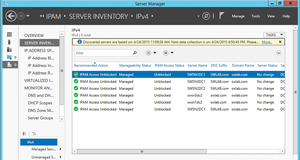
On the surface this would seem simple to do. However, each server in the list of discovered resources shows an IPAM Access Status of Blocked, which means that IPAM doesn't have the authority to manage the resource. Furthermore, the Manageability Status of the discovered resources is listed as Unmanaged or Unspecified, meaning that IPAM isn't being used to manage the server (see Figure 2).
In order to use IPAM to manage these servers, you'll have to unblock them and set the Manageability status to Managed. Herein lies the problem. Windows Server can be really stubborn when it comes to unblocking servers so that they can be managed through IPAM. Fortunately, there are some things that you can do to fix the situation.
 [Click on image for larger view.]
Figure 2. The IPAM Access Status.
[Click on image for larger view.]
Figure 2. The IPAM Access Status.
Create GPOs with Windows PowerShell
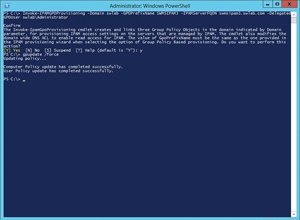
When provisioning the IPAM server it might sometimes require additional configuration before you'll be able to use it to manage your DHCP and DNS server resources. Windows PowerShell lets you complete this process by using the Invoke-IPAMGPOProvisioning cmdlet. The full command syntax is:
Invoke-IPAMGPOProvisioning –Domain <your domain> -GPOPrefixName <your GPO prefix name> -IPAMServerFQDN <your IPAM server's fully qualified domain name> -DelegatedGPOUser <the name of a delegated user>
In the syntax one of the pieces of information required by the command is a Group Policy Object (GPO) prefix name, to identify your IPAM server. For instance, my IPAM server is named SWMSIPAM3, so I'm using SWMSIPAM3 as my prefix name. The actual command that I'm using is shown in Figure 3. You'll notice after I ran the last Invoke-GPOProvisioning cmdlet I entered the GPUPDATE /FORCE command. This command updates the Group Policies so that the recently modified Group Policy settings are applied immediately.
 [Click on image for larger view.]
Figure 3. You might need to use Windows PowerShell to complete the IPAM provisioning process.
[Click on image for larger view.]
Figure 3. You might need to use Windows PowerShell to complete the IPAM provisioning process.
Verify New Group Policy Object
Although I've typically found it necessary to use the Invoke-IPAMGPOProvisioning cmdlet, the use of it alone doesn't typically fix the problem of servers being blocked from management. Assuming that you're still experiencing problems, the next step in the troubleshooting process is to make sure the GPOs are being applied correctly.
To show how this works, I'm switching over to one of the servers I'm trying to manage. It's a DHCP server, a DNS server and a DC.
The Invoke-IPAMGPOProvisioning cmdlet is supposed to create three GPOs. These GPOs use the prefix name you supplied in the Invoke-IPAMGPOProvisioning cmdlet, but also append an extension so that you'll know to what the GPO applies. To give you a more concrete example, check out Table 1. It lists the GPOs that should've been created based on the prefix name I entered.
| Use |
Prefix Name |
GPO Name |
| DHCP Servers |
SWMSIPAM3 |
SWMSIPAM3_DHCP |
| DNS Servers |
SWMSIPAM3 |
SWMSIPAM3_DNS |
| Domain Controllers or NPS Servers |
SWMSIPAM3 |
SWMSIPAM3_DC_NPS
|
Table 1. Group Policy Objects created with SWMSIPAM3.
|
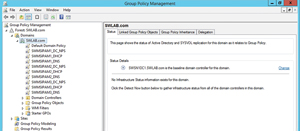
You should first check if the GPOs were actually created. To do this, open Server Manager (on a DC) and choose the Group Policy Management command from the Tools menu. When the Group Policy Management console opens, expand the listing for your domain and you should see the IPAM-related GPOs, as shown in Figure 4.
 [Click on image for larger view.]
Figure 4. Checking to verify the necessary Group Policy Objects have been created for the domain controller.
[Click on image for larger view.]
Figure 4. Checking to verify the necessary Group Policy Objects have been created for the domain controller.
There are some extra GPOs with names beginning with SWMSIPAM1 and SWMSIPAM2, which you can ignore. Previously, I set up a couple of other IPAM servers and the extra Group Policy settings you see are related to those servers.
Verify GPOs Applied
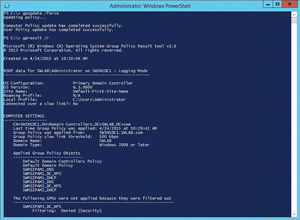
Now that you've created the GPOs, you need to make sure they're properly applied. To do this, open Windows PowerShell on one of the managed servers (this won't work if you try it on your IPAM server) and enter the following commands:
gpupdate /force
gpresult /r
The Applied Group Policy Objects list (see Figure 5) includes those "extra" GPOs, but it doesn't include the recently created GPOs. In this case, you'll notice the SWMSIPAM3-related GPOs weren't applied because they were filtered out. All of the newly created GPOs were filtered out, but I couldn't fit all of them into the screen capture.
 [Click on image for larger view.]
Figure 5. You can use the gpresult /r command in Windows PowerShell to see if the Group Policy Objects are being properly applied.
[Click on image for larger view.]
Figure 5. You can use the gpresult /r command in Windows PowerShell to see if the Group Policy Objects are being properly applied.
Correcting the Filtering Problem
Because the newly created GPOs are being filtered out, you must fix the problem before IPAM can manage the various DNS and DHCP servers and DCs.means the server doesn't have permission to use the GPOs. Fortunately, this is easy to fix.
To correct the problem, go back to the Group Policy Management console and select one of the policies filtered out. Now, click the Add button found in the Security Filtering section and add the names of the servers you want to manage through the IPAM server. When you click Add, the resulting dialog box isn't configured to add computer accounts, so you'll have to click the Object Types button and specify the Computer option prior to adding the computer accounts. Keep in mind that you'll have to add the list of computers to each of the IPAM-related GPOs.
Now, go back to Windows PowerShell and enter the same commands as earlier (gpudate /force and gpresult /r).
This time, you should see all of your GPOs being applied.
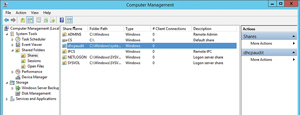
Check the Audit Share
Once all of the required permissions are in order, the next thing you should check is the audit share on your DHCP servers. To do this, open Server Manager (on your DHCP server) and select the Computer Management command from the Tools menu. When the Computer Management console opens, navigate through the console tree to Computer Management (Local) | System Tools | Shared Folders | Shares. You need to verify the existence of a share named dhcpaudit (see Figure 6). This share should exist by default, but you need to check it because IPAM will not work without the share. While you are at it, it's a good idea to open File Explorer and verify that the C:\Windows\System32\dhcp folder exists.
 [Click on image for larger view.]
Figure 6. Make sure the DHCP audit share exists.
[Click on image for larger view.]
Figure 6. Make sure the DHCP audit share exists.
Perform Tasks in Correct Order
If you've followed the instructions you should be able to unblock your managed servers. If you right-click on a managed server within the IPAM console and choose the Refresh Server Access Data command from the shortcut menu, however, you'll likely find the server remains blocked.
The trick to unblocking the server is you have to set the server's manageability status first. You do this by right-clicking on the managed server and selecting the Edit Server command from the shortcut menu. When the Add or Edit Server dialog box appears, set the Manageability Status to Managed and click OK.
You might see the server's status immediately change to Unblocked. If not, right-click on the server and choose the Refresh Server Access Data command from the shortcut menu. Sometimes there's a bit of a lag, so you might have to try this a couple of times. If things still don't work, close and reopen the Server Manager. Eventually you should be able to unblock the managed servers, which will be indicated in the Server Manager window shown in Figure 7.
 [Click on image for larger view.]
Figure 7. The IPAM Access Status of all the servers is now shown as Unblocked in the Server Manager window
[Click on image for larger view.]
Figure 7. The IPAM Access Status of all the servers is now shown as Unblocked in the Server Manager window
One Last Trick
Some administrators have reported that when they were unable to unblock their servers using any other technique, they were able to correct the problem by rebooting the servers they were trying to manage.
As you can see, unblocking servers for IPAM management can be a big job. The trick to unblocking them is to make sure all of your GPOs are configured correctly and to frequently refresh the Server Manager. I've found that sometimes the Server Manager will continue to show a server as being blocked even after it has been unblocked.