Windows Server How-To
How To Create File Screens in Windows Server 2012 R2
Get a glimpse into your file servers with this often overlooked tool.
One of the more underrated tools in Windows Server is the File Server Resource Manager. Among this tool's many capabilities is the ability to create file screens that can help you to control the contents of your file servers. In this post, I will show you how to set up a file screen.
I recommend that you start the process of creating a file screen by creating a file group (if necessary). A file group is exactly what it sounds like: a group of file types. To give you a more concrete example, consider the various file extensions that are sometimes used by audio files. If you were to create a file group for audio files you would probably include MP3, WMA, and some of the other popular audio formats. Incidentally, Windows already has a file group for audio and video files.
You can create a file screen by navigating through the console tree to File Server Resource Manager | File Screening Management | File Groups, as shown in Figure 1. Next, right click on the File Groups container and select the Create File Groups option from the shortcut menu.
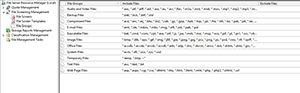 [Click on image for larger view.] Figure 1. Navigate through the console tree to File Server Resource Manager | File Screening Management | File Groups.
Creating a file group is simple. The Create File Group Properties dialog box requires you to enter a name for the file group that you want to create and then specify files that you want to include. You can optionally also specify files that you want to exclude.
As I mentioned before, there are some file groups that are created by default in Windows Server. All of these default file groups, which you can see in Figure 1, are based around file extension. However, you can also include other portions of the file name. For example, if your digital camera creates JPG files whose filename starts with IMG, you might include IMG*.JPG in a file group.
Once you have defined any necessary file groups, then the next thing that you will want to do is to check and see if you need to create a file screen template. There are some file screen templates that exist by default, but you always have the option of creating more if you need them. You can access the file screen templates by navigating through the console tree to File Server Resource Manager | File Screen Management | File Screen Templates. You can see the built-in templates in Figure 2.
 [Click on image for larger view.] Figure 2. There are a few file screen templates that are built into Windows Server.
As you can see in the figure above, a file screen template is really just an action. Some of the built-in file screen templates for example include: Block Audio and Video Files, Block E-Mail Files, Block Executable Files, Block Image Files, Monitor Executable and System Files.
If you want to create a custom file screen template, you can do so by right clicking on the File Screen Templates container and selecting the Create File Screen Template command from the resulting shortcut menu. When you do, Windows will display the Create File Screen Template dialog box, which you can see in Figure 3.
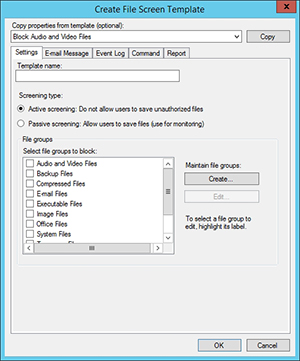 [Click on image for larger view.] Figure 3. This is the Create File Screen Template dialog box.
As you can see in the figure, you will need to give the template a name. The name usually reflects the template's purpose. Next, you will need to choose between active screening and passive screening. Active screening prevents users from saving unauthorized files, while passive screening only monitors for the existence of certain file types. Once you have entered this information, you can choose the file groups that you want to include.
You might have noticed in the figure above that there are a few extra tabs. The E-mail Message tab allows you to send a message to the administrator and / or to the user who attempted to save the unauthorized file. The Event Log tab gives you the option of writing a warning message to the event log. The Command tab gives you the option of running a script in response to the event, and the Report tab allows you to generate a report.
File screens are based around the use of file screen templates. To create a file screen, right click on the File Screen container and then choose the Create File Screen command from the shortcut menu. This will cause Windows to display the Create File Screen dialog box, shown in Figure 4.
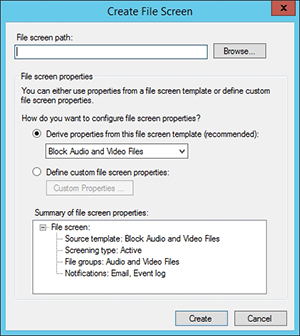 [Click on image for larger view.] Figure 4. The Create File Screen dialog box is used to create file screens.
As you can see in the figure, creating a file screen involves specifying a file screen path and choosing a template.
As you can see, file screens are a great tool for keeping unauthorized files or file types off of your Windows file servers. Better still, these screens are easy to create.
About the Author
Brien Posey is a 22-time Microsoft MVP with decades of IT experience. As a freelance writer, Posey has written thousands of articles and contributed to several dozen books on a wide variety of IT topics. Prior to going freelance, Posey was a CIO for a national chain of hospitals and health care facilities. He has also served as a network administrator for some of the country's largest insurance companies and for the Department of Defense at Fort Knox. In addition to his continued work in IT, Posey has spent the last several years actively training as a commercial scientist-astronaut candidate in preparation to fly on a mission to study polar mesospheric clouds from space. You can follow his spaceflight training on his Web site.