Windows Server How-To
How To Inject Files Into a Hyper-V Virtual Machine
Don't have a DVD drive connected to your server? No problem.
Recently I was setting up some Hyper-V virtual machines for a project that I am working on. For this particular project I needed a few virtual machines running Windows 7 and an older version of Office. Since I tend to create so many VMs for this and other projects, I have created a library of all of the ISO files that I tend to use. I have ISOs for various Windows operating systems and for a few different applications. In this particular case however, I was thrown a bit of a curve ball.
Although I had a copy of the Microsoft Office version that I needed, it was in the form of a self-extracting executable, not an ISO file. Normally this wouldn't pose a problem at all. I would just copy the file to a network share and then access the file from the VM. In this particular situation however, that simply wasn't an option. It's kind of a long story, but for various reasons I had to make sure that this VM had no network connectivity whatsoever.
So how could I get the executable file into the VM without network connectivity? The easiest solution probably would have been to burn the file to a DVD and then attach the DVD drive to the virtual machine. However, this particular Hyper-V server doesn't have a DVD drive. Thankfully, there are a couple of other options.
If you ever find yourself needing to copy a file to a Hyper-V virtual machine then one option is to shut down the VM, mount the virtual hard disk and then copy the file. You can mount the virtual hard disk by right clicking on it and choosing the Mount command from the resulting shortcut menu, as shown in Figure 1..
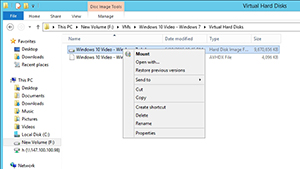 [Click on image for larger view.] Figure 1. You can mount a virtual hard disk.
In most cases when you mount a virtual hard disk, Windows will map a drive letter to the virtual hard disk's System Reserved Partition and then open the drive letter in File Explorer. This drive letter will appear to be empty. If you look at the list of available drives however, you should see another drive letter that points to the virtual machine's system drive. For example, in Figure 2 the G: drive is mapped to the virtual hard disk's system drive.
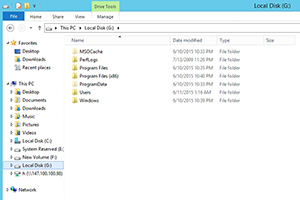 [Click on image for larger view.] Figure 2. This is what the virtual hard disk looks like when mounted.
As you can see in the figure above, the virtual hard disk looks just like any other disk. You can use File Explorer to copy files from the host server into the virtual hard disk. When you are done, right click on the disk mapping and choose the Eject command from the shortcut menu. This will dismount the virtual hard disk. When you boot the corresponding VM, it will contain the files that you have copied.
If you are using the Windows Server 2012 R2 version of Hyper-V, you have another option. If you open the Hyper-V manager, right click on the virtual machine, and choose the Settings command from the shortcut menu, you will be taken to the virtual machine's Settings screen. Click on the Integration Services option and you will notice that there is an integration service called Guest Services, as shown in Figure 3. The Guest Services allow files to be copied to the virtual machine through the VMBus. To do so, go ahead and enable the Guest Services and click OK.
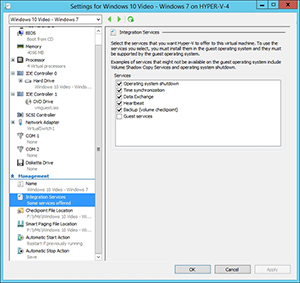 [Click on image for larger view.] Figure 3. The Guest Services allow you to copy files to the VM using the VMBus.
If you want to copy a file to a virtual machine in this way, you will have to use PowerShell. The cmdlet that you will use is Copy-VMFile. This cmdlet is surprisingly easy to use. All you really have to specify is the source, the source path, the name of the VM, and the destination path.
Suppose for instance that you had a file on your host server named C:\Data\MyFile.TXT and you wanted to copy it to a VM named WinVM and place it in a folder named C:\Data. Just to make things interesting, let's also pretend that C:\Data does not yet exist on the virtual machine. To copy the file, you would use the following command:
Copy-VMFile "WinVM" –SourcePath "C:\Data\MyFile.TXT" –DestinationPath "C:\Data\MyFile.TXT" –CreateFullPath –FileSourceHost
Notice that I used the CreateFullPath parameter to create the C:\Data folder on the VM.
So as you can see, there are a number of techniques that you can use to get a file into a virtual machine, even if no network connectivity is available.
About the Author
Brien Posey is a 22-time Microsoft MVP with decades of IT experience. As a freelance writer, Posey has written thousands of articles and contributed to several dozen books on a wide variety of IT topics. Prior to going freelance, Posey was a CIO for a national chain of hospitals and health care facilities. He has also served as a network administrator for some of the country's largest insurance companies and for the Department of Defense at Fort Knox. In addition to his continued work in IT, Posey has spent the last several years actively training as a commercial scientist-astronaut candidate in preparation to fly on a mission to study polar mesospheric clouds from space. You can follow his spaceflight training on his Web site.