In-Depth
First Look: Microsoft Azure Site Recovery
Hyper-V virtual machine protection in a private cloud or the Azure cloud is simplified with the new replication and recovery service.
The best way to truly protect your data is to have at least three copies of it. First, there's the original copy -- the live data, of course. Next, you need a backup copy of the data that you can quickly and easily restore. The third copy is the alternate backup that resides outside your datacenter. Once upon a time you could fulfill these requirements by writing a nightly backup to redundant tapes and keep one tape on-site and ship the copy off-site for safe keeping.
This tried-and-true backup technique is now outdated. Nightly backups have largely become inadequate. Organizations have come to expect near-real-time data protection. In the scramble to provide top-notch protection in the virtual datacenter, a number of competing solutions have evolved. Even Microsoft provides several different ways of protecting Hyper-V virtual machines (VMs).
At first glance, one of Microsoft's solutions would seem to be ideal: Hyper-V Extended Replication. If you aren't familiar with Hyper-V Extended Replication, it's a feature that was introduced with Windows Server 2012 R2 that allows you to create two separate replicas of a VM. One of these replicas can reside in the local datacenter, while the other can reside outside the datacenter. As such, the Hyper-V Extended Replication feature provides near-real-time protection, while also meeting the requirements of my three-copy rule. When you consider that Hyper-V replicas can be configured to provide point-in-time rollback capabilities, Hyper-V replicas appears to be an ideal solution.
There's just one problem with protecting your VMs using Hyper-V Extended Replication. The feature was designed for small and midsize businesses and simply doesn't scale well enough to make it a viable option for protecting large, enterprise-class organizations. So what's a company to do?
Enter Microsoft Azure Site Recovery -- a new disaster recovery feature in Azure that can replicate Hyper-V VMs in a way that can provide better scalability.
While native Hyper-V replication is designed to replicate individual VMs (or even individual virtual hard disks), Azure Site Recovery is focused on private cloud replication. In other words, if you have a System Center Virtual Machine Manager private cloud, you can replicate your Hyper-V VMs to another private cloud that's running in another datacenter. As an alternative, you can replicate VMs to Azure.
Although enabling protection for VMs involves a little bit of work up front, the process is surprisingly straightforward. The key to making the process work is ensuring the certificates are configured correctly. The certificates are used to positively identify your Virtual Machine Manager server to Azure.
Creating a Self-Signed Certificate
In order to use Azure Site Recovery, you need to generate a certificate. A self-signed certificate will work fine. There are a few different ways of generating the necessary certificate, but Microsoft recommends using a tool found in the Windows SDK for Windows 8.1 called MakeCert.exe (bit.ly/1DrOjTG). The SDK has a lot of different components, but the only component you have to install is the Windows Software Development Kit.
After installing the MakeCert utility, open an elevated command-prompt window and navigate to C:\Program Files (x86)\Windows Kits\8.1\Bin\x64 and run the following command:
makecert.exe -r -pe -n CN=AzureBackup -ss my -sr localmachine -eku 1.3.6.1.5.5.7.3.2 -len 2048 -e 01/01/2016 AzureBackup.cer
Azure is very picky about the way you create the self-signed certificate. If you deviate from the command here, MakeCert may tell you that you've entered too many parameters, or you could end up creating a certificate that Azure won't accept. Both are common problems you want to avoid, so be sure to correctly type the command.
Importing the Certificate
Now that the self signed-certificate has been created, you need to import it into the computer on which Virtual Machine Manager is running. To do so, enter the Microsoft Management Console (MMC) command at the server's Run prompt. Then, choose the Add/Remove Snap-in command from the shortcut menu. When the list of snap-ins appears, choose the Certificates option and click Add. When prompted, make sure to choose the Computer Account option, and then click Next. After that, choose the Local Computer option and click Finish, followed by OK.
Right-click on the Personal container and select the All Tasks | Import commands from the shortcut menus. This will cause Windows to launch the Certificate Import Wizard. Click Next, and then browse to and select the certificate you created earlier. Now, complete the wizard. When you're prompted to specify the certificate store, be sure to put the certificate in the Personal store.
Exporting the Certificate
Now you need to export the certificate in PFX format. To do so, navigate through the Certificates console tree to Certificates (Local Computer) | Personal | Certificates. Right-click on the certificate and select the All Tasks | Export commands from the shortcut menus. This will cause Windows to launch the Certificate Export Wizard. Click Next and you'll be asked if you want to export the private key. Choose Yes and click Next. Make sure the wizard is set to export the certificate in PFX format and then click Next. On the following screen, you must enter and confirm a password that can be used to encrypt the private key. Click Next and you'll be prompted for a path and filename to use for the exported certificate. Click Next, followed by Finish to complete the process.
Now you need to import the certificate on your Virtual Machine Manager servers. If you only have a single Virtual Machine Manager server and you already imported the certificate on that server, then you can skip this step. Otherwise, open the Certificates console on your Virtual Machine Manager server and import the PFX file you just created.
Create a Site Recovery Vault
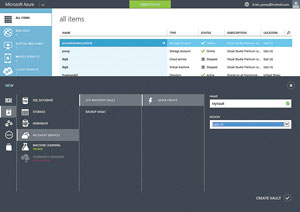
The next step in the process is to create a Site Recovery Vault. You'll need to log in to the Azure Management Portal. Now, click New and then click on Data Services | Recovery Services | Recovery Site Vault | Quick Create. You'll need to enter a name for the vault you're creating, and you must specify the region in which the vault is to be created, as shown in Figure 1. Click Create Vault to complete the process.
 [Click on image for larger view.]
Figure 1. Creating a Site Recovery Vault in the Microsoft Azure Management Portal.
[Click on image for larger view.]
Figure 1. Creating a Site Recovery Vault in the Microsoft Azure Management Portal.
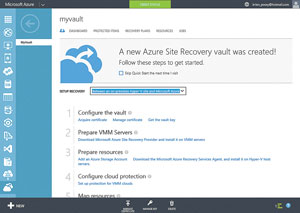
Now that you've created the vault, it must be configured. Click on the Recovery Services tab and then click on the vault you just created. The first thing you'll need to specify is whether site recovery will occur between a Hyper-V site and Azure, or between two on-premises Hyper-V sites (see Figure 2).
 [Click on image for larger view.]
Figure 2. Specifying the type of site recovery.
[Click on image for larger view.]
Figure 2. Specifying the type of site recovery.
Next, click on the Manage Certificates link. When prompted, provide the certificate (the .CER file) that you created earlier. Once the certificate has been uploaded, click on the Get the Vault Key link. Be sure to make a note of the key.
Azure Site Recovery Provider
Now it's time to download the Azure Site Recovery Provider and install it on your Virtual Machine Manager servers. Select the Download Microsoft Azure Site Recovery Provider and Install it on the Virtual Machine Manager servers link. When prompted, save the file to a centrally accessible location. Now, shut down the Virtual Machine Manager service and then run the executable file on each of your Virtual Machine Manager servers.
When you run the executable file, Windows will display the Microsoft Azure Site Recovery Provider Setup wizard. Click Install to begin the installation process.
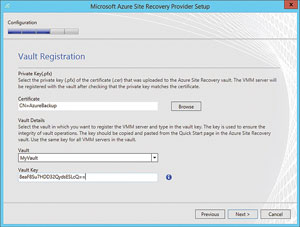
After a few seconds, you should see a message telling you that Setup completed successfully. Click Next and you'll be prompted for your Internet connection settings. Click Next again and you'll be taken to the Vault Registration screen. You'll need to select your certificate and then specify your vault and your vault key (see Figure 3).
 [Click on image for larger view.]
Figure 3. You must specify your certificate, vault and vault key.
[Click on image for larger view.]
Figure 3. You must specify your certificate, vault and vault key.
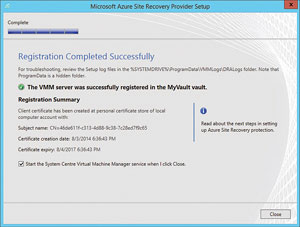
Click Next and you'll see a prompt asking you if you want to encrypt replicated data. If you allow this option, an encryption certificate will be automatically generated. You'll have to provide this certificate whenever you fail over VMs. Click Next, followed by Register to complete the process. When the process completes, you should see a message confirming you've successfully registered the Virtual Machine Manager server with your vault (see Figure 4).
 [Click on image for larger view.]
Figure 4. Confirmation of a successful registration.
[Click on image for larger view.]
Figure 4. Confirmation of a successful registration.
Protecting a Cloud
At this point, you've created a vault on Azure and associated the vault with Virtual Machine Manager. Usually, the next step in the process is to protect a private cloud. This will vary depending on your goals and whether you're replicating to Azure Storage or to a private cloud.
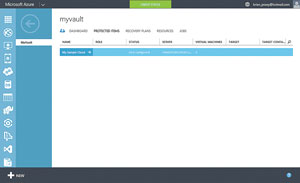
To protect a private cloud, you must right-click on the private cloud within the Virtual Machine Manager console (assuming the cloud isn't already being synchronized) and select the Properties command from the shortcut menu. When the cloud's properties sheet appears, go to the General tab and select the Send Configuration Data About this Cloud to the Azure Hyper-V Recovery Manager checkbox, and click OK. After doing so, go into Azure, click on your vault, and select the Protected Items tab. You should see your cloud listed in the vault, as shown in Figure 5.
 [Click on image for larger view.]
Figure 5. The private cloud now appears in the vault.
[Click on image for larger view.]
Figure 5. The private cloud now appears in the vault.
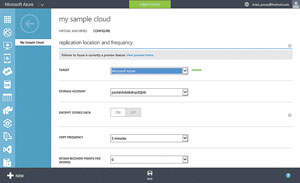
Click on the cloud and select the Configure Protection Settings link. You can now complete the process by answering questions about the protection you want. For instance, you're initially asked to select a target. This is where you would specify whether you want to replicate the cloud to Virtual Machine Manager or to Azure. After making this selection, you can specify your storage account (if you're synchronizing to Azure), as well as your copy frequency, recovery point retention period, and the frequency of application consistent snapshots (see Figure 6). Click Save to save your changes.
 [Click on image for larger view.]
Figure 6. Configuring the replication parameters.
[Click on image for larger view.]
Figure 6. Configuring the replication parameters.
And that's it! Replicating a Virtual Machine Manager to the Microsoft cloud using Azure Site Recovery is a fairly straightforward process. The key to making the process work is to generate the certificates correctly.
About the Author
Brien Posey is a 22-time Microsoft MVP with decades of IT experience. As a freelance writer, Posey has written thousands of articles and contributed to several dozen books on a wide variety of IT topics. Prior to going freelance, Posey was a CIO for a national chain of hospitals and health care facilities. He has also served as a network administrator for some of the country's largest insurance companies and for the Department of Defense at Fort Knox. In addition to his continued work in IT, Posey has spent the last several years actively training as a commercial scientist-astronaut candidate in preparation to fly on a mission to study polar mesospheric clouds from space. You can follow his spaceflight training on his Web site.