Windows Server How-To
How To Use the File Server Resource Manager in Windows Server 2012
This Windows Server 2012 feature makes it easy to set storage quotas and manage file types.
If you are going to use Windows Server as a file server then it is a good idea to make use of the File Server Resource Manager. The File Server Resource Manager is a tool that was introduced in Windows Server over a decade ago, but that is alive and well in Windows Server 2012 and 2012 R2. You can use this tool to set storage quotas and to control the types of files that can be saved to a file server.
The File Server Resource Manager is not installed by default in Windows Server 2012 and 2012 R2. To install it, you must open the Server Manager and choose the Add Roles and Features command from the Manage menu. The File Server Resource Manager is a part of the File and Storage Services role. The role is installed by default, but the File Server Resource Manager is not. You will therefore need to expand the File and Storage Services role, and then expand the File and iSCSI Services component and then select the File Server Resource Manager option, as shown in Figure 1. Depending on how your server is configured, you may be prompted to add some features in order to enable management of the File Server Resource Manager. You can then accept the defaults for the remaining wizard options to install the component.
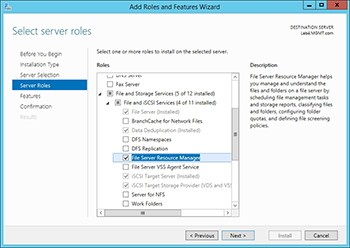 [Click on image for larger view.] Figure 1.The File Server Resource Manager is not installed by default.
When the installation process completes, you can launch the File Server Resource Manager by choosing the File Server Resource Manager command from the Server Manager's Tools menu. You can see what the management console looks like in Figure 2.
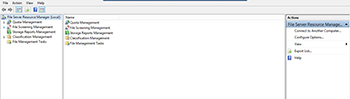 [Click on image for larger view.] Figure 2. This is the File Server Resource Manager console.
As you can see in the previous screen capture, there are a number of different containers. You can perform quota management, file screening management, storage reports management, classification management and other file management tasks.
Most of the organizations that use the File Server Resource Manager use the tool for quota management. If you expand the console's Quota Management container, you will see that it contains two sub containers: Quotas and Quota Templates. As the name implies, the Quota Templates container contains preconfigured quotas that can be applied as templates. There are about half a dozen built in templates, as shown in Figure 3. You can also create your own quota templates by making use of the Create Quota Templates link, found in the Actions pane.
 [Click on image for larger view.] Figure 3. Windows Server contains a number of built in quota templates.
By default there aren't any storage quotas. You can define a quota by selecting the Quotas container and then clicking on the Create Quotas link. This causes Windows to display the Create Quota dialog box, shown in Figure 4.
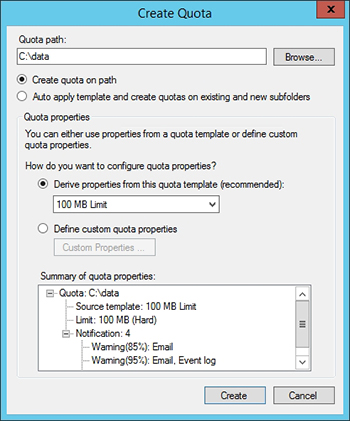 [Click on image for larger view.] Figure 4. Quotas are defined through the Create Quota dialog box.
As you can see in the figure above, defining a quota involves specifying a quota path (you can also choose to apply the quota to sub folders) and then choosing a quota template. You will notice that the dialog box provides thresholds for generating warning messages. The warning thresholds are a part of the quota template, but you can use the dialog box to specify custom values as an alternative.
Another really useful thing that you can do with the File Server Resource Manager is to define file screens. File screens allow you to control the types of data that can be saved in a specific path. File screens are based around the use of file groups and file screen templates. File groups are types of files. For instance, the Text Files group includes .asc, .text, and .txt files, as shown in Figure 5.
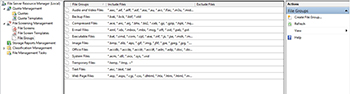 [Click on image for larger view.] Figure 5. The File Groups container defines various file types.
The File Screen Templates container lets you define actions that can be applied to file groups. Some examples of file screen templates might include Block Image Files or Block Audio and Video Files. There are several file screen templates that exist by default, but you can easily create your own.
You can create a file screen by selecting the File Screens container and clicking on the Create File Screen link (there is also a link that you can use to create a file screen exception). As you can see in Figure 6, creating a file screen is simply a matter of specifying a path (you can also choose to include sub-folders) and then choosing a file screen template. As was the case with quotas, you can use custom values in place of a template if necessary.
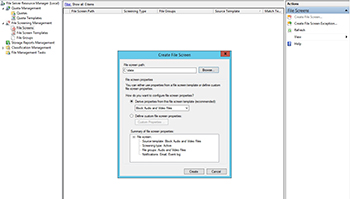 [Click on image for larger view.] Figure 6. A file screen includes a path and a file screen template.
I would encourage you to spend some time looking over the File Server Resource Manager. Although quotas and file screens are the most commonly used features, there are a number of other useful features in the tool.
About the Author
Brien Posey is a 22-time Microsoft MVP with decades of IT experience. As a freelance writer, Posey has written thousands of articles and contributed to several dozen books on a wide variety of IT topics. Prior to going freelance, Posey was a CIO for a national chain of hospitals and health care facilities. He has also served as a network administrator for some of the country's largest insurance companies and for the Department of Defense at Fort Knox. In addition to his continued work in IT, Posey has spent the last several years actively training as a commercial scientist-astronaut candidate in preparation to fly on a mission to study polar mesospheric clouds from space. You can follow his spaceflight training on his Web site.