In-Depth
How To Get Started with Microsoft's Azure Files Preview
The feature, part of Microsoft's Azure cloud service, makes it easy to create file shares in the public cloud.
In its effort to make its cloud service more appealing as an alternative or companion to on-premises-based storage, Microsoft has launched several new enhancements to its Microsoft Azure cloud service. One of them that aims to let organizations create file shares in the public cloud is the new Azure Files service.
Microsoft released the Azure Files preview in May upon announcing the new service at TechEd in Houston. The company hopes to make it generally available later this year, though it hasn't announced a specific release date.
After spending some time with the preview, I can say Azure Files has various useful new features but some limitations. Before I explain how to set up and use Azure Files, it's important to understand what it is. To put it simply, Azure Files allows for centralized SMB storage within Azure. In other words, you can establish an SMB file share that exists within Azure and that's accessible to your Azure Virtual Machines (VMs).
It's worth noting that the Azure Files service isn't really suitable for use as a general-purpose file server as there are some significant limitations. I'll explain those in detail later.
The Azure Files service is most suitable for situations in which file data needs to be accessible to multiple VMs. Imagine, for instance, a situation in which a multi-tiered application relies on a centralized configuration file. That configuration file could be stored using the Azure Files service.
Some organizations also use the Azure Files service as a centralized logging mechanism. Azure VMs (and the applications running on them) can sometimes be configured to write diagnostic logging data or crash dump data to an SMB share so that the logging data is stored outside of the VMs.
Similarly, Microsoft suggests setting up an SMB file share and using it as a location within which to store your testing and diagnostic tools. That way, if an Azure VM experiences a problem, the diagnostic tools are close at hand.
Setting Up the Azure Files Service
The first thing you'll need to do is to sign up for the preview here.
After you sign up, you'll need to wait for Microsoft to send you an approval notification. Once you receive the notification, you'll be ready to create your storage account. Oddly enough, existing storage accounts don't have access to Azure Files (at least not during the preview), so you'll have to create a storage account specifically for use with the service.
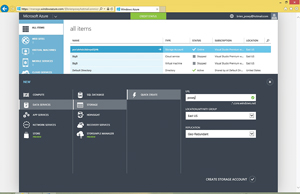
To create a storage account, log into the Azure Management Portal and click the New button. Next, click on Data Services, followed by Storage. Now, click Quick Create. You must enter a URL, choose a storage location, and choose your replication method (see Figure 1). Click Create Storage Account to create the account.
 [Click on image for larger view.]
Figure 1. Enter a URL, location and replication type for the storage account.
[Click on image for larger view.]
Figure 1. Enter a URL, location and replication type for the storage account.
After you create your storage account, the next step is to create a file share. There are two different ways of doing this. If you're a developer, you can create a file share programmatically by using the REST API. For everyone else, the process of creating a file share is done through Windows PowerShell.
Creating a file share through Azure requires you to download and install a Windows PowerShell module and some additional script files. You can download these files here.
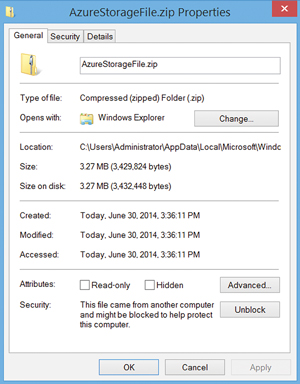
The download consists of a .zip file. When you download the .zip file, you must unblock the files within the .zip file or the script won't run correctly. To unblock the files, right-click on the .zip file and choose the Properties command from the shortcut menu. When the properties sheet opens, click on the Unblock button found on the properties sheet's General tab (see Figure 2).
 [Click on image for larger view.]
Figure 2. Unblock the files within the .zip archive.
[Click on image for larger view.]
Figure 2. Unblock the files within the .zip archive.
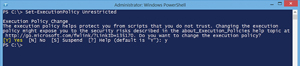
Before you attempt to create the file share, you may also have to change the Windows PowerShell execution policy on your system to allow scripts to run. You can remove restrictions from the execution policy by using the command Set-ExecutionPolicy Unrestricted, as shown in Figure 3.
 [Click on image for larger view.]
Figure 3. You can use the Set-ExecutionPolicy cmdlet to remove Windows PowerShell script execution restrictions.
[Click on image for larger view.]
Figure 3. You can use the Set-ExecutionPolicy cmdlet to remove Windows PowerShell script execution restrictions.
Switch to the folder containing the files that you've downloaded and extracted. It's important you don't extract the .zip file to C:\Program Files (X86)\Microsoft SDKs\Windows Azure\PowerShell\Service Management\Azure, as doing so will result in problems related to file versions.
On my system, I extracted the root of the C: drive, which resulted in a folder named AzureStorageFile being created. As such, the commands that I used to switch to this folder were CD \ and CD AzureStorageFile.
Once you've switched to the correct folder, there are a number of different Windows PowerShell commands you'll need to run. Microsoft's instructions indicate you should run the following commands:
# import module and create a context for account and key
import-module .\AzureStorageFile.psd1
$ctx=New-AzureStorageContext <account name> <account key>
# create a new share
$s = New-AzureStorageShare <share name> -Context $ctx
# create a directory in the test share just created
New-AzureStorageDirectory -Share $s -Path testdir
# upload a local file to the testdir directory just created
Set-AzureStorageFileContent -Share $s -Source D:\upload\testfile.txt -Path testdir
# list out the files and subdirectories in a directory
Get-AzureStorageFile -Share $s -Path testdir
# download files from azure storage file service
Get-AzureStorageFileContent -Share $s -Path testdir/testfile.txt -Destination D:\download
# remove files from azure storage file service
Remove-AzureStorageFile -Share $s -Path testdir/testfile.txt
As you look at these instructions, you'll notice it's possible to make things a lot simpler. First, roughly half of the lines of code are nothing more than comments. Furthermore, the majority of the "real" lines of code are there purely for testing purposes. They allow you to create a folder on the file share, test upload and download capabilities, and then remove your test file.
The process of creating the file share can be accomplished by running a mere three commands:
import-module .\AzureStorageFile.psd1
$ctx=New-AzureStorageContext <account name> <account key>
$s = New-AzureStorageShare <share name> -Context $ctx
The first command imports the AzureStorageFile module, which extends the Windows PowerShell command set. When I attempted this procedure in my own lab, I still received an error importing the Azure Storage File module even though I had unblocked the file. I was able to remedy this situation by entering the following Windows PowerShell command:
Unblock-File –Path C:\azurestoragefile\*
The second line of code creates a context for your account and key. You can't copy and paste the command listed here, because it contains two elements that are specific to your own environment. You'll have to enter a storage account name and a corresponding key.
I recommend going into the Azure Management Portal and clicking on Storage where you'll see the names of all the existing storage accounts, including the one you just created. Make note of the spelling of the storage account you'll be using. It's also important to note that the name is all lowercase.
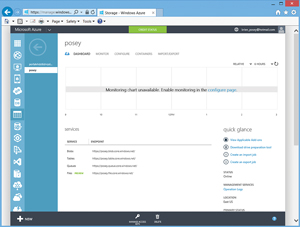
Now, click on the storage account and then go to the Dashboard view. The list of services should confirm the storage account is provisioned for use with Files (see Figure 4).
 [Click on image for larger view.]
Figure 4. The Files service should be listed in the Microsoft Azure Dashboard view.
[Click on image for larger view.]
Figure 4. The Files service should be listed in the Microsoft Azure Dashboard view.
If you look at the bottom of Figure 4, you'll notice a Manage Access Keys icon. Click on this icon and you will see a pop-up listing the names of the keys that are associated with the storage account (see Figure 5).
 [Click on image for larger view.]
Figure 5. Azure Files Access keys.
[Click on image for larger view.]
Figure 5. Azure Files Access keys.
It's easy enough to replace the <account name> tag in the command with your storage account name, but the key tends to be really long, so it's best to copy and paste it into the command. Incidentally, the Ctrl+V command doesn't work in Windows PowerShell. You have to click on the icon in the upper left corner of the Windows PowerShell window and choose the Edit | Paste commands from the resulting menus. The resulting command will look something like this:
PS C:\azurestoragefile> $ctx=New-AzureStorageContext posey 5AGxQUFzPQmB9QTzs/4ew3RaVtL0gnP/P+OgRK0vu1qkxrkaVljwqf0gPKCDS0Q/BCB9Fa8ThkiBAzSHDqktw==
Just as the second command requires you to replace a tag with a value, so does the third command. In this case, however, the replacement is simple. You must replace the <share name> tag with the name of the SMB share that you want to create. In my case, I'm creating an SMB share named POSEYSMB, so the command looks like this:
$s = New-AzureStorageShare poseysmb -Context $ctx
As previously noted, the rest of the commands that Microsoft provides allow you to test the functionality of your SMB share by creating a test folder, uploading a file to it, verifying the file's existence and then removing the file.
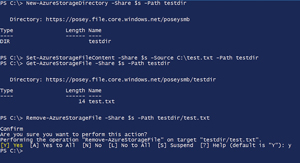
As you can see in Figure 6, I entered four different commands. The first command created a folder on the remote SMB share named Testdir. The second command copied a file named C:\test.txt from my local hard disk to the testdir folder I created on my Azure-based file share. The third command retrieved a list of the contents of the SMB share so I could verify that my file really was copied to Azure. The last command deleted the file from my Azure file share.
 [Click on image for larger view.]
Figure 6. In Windows PowerShell create a folder on the SMB share and copy a file to it.
[Click on image for larger view.]
Figure 6. In Windows PowerShell create a folder on the SMB share and copy a file to it.
Azure SMB File Share Limitations
It's relatively easy to get Azure Files up and running. But as I noted earlier, there are some limitations. For starters, Azure Files is based around the use of SMB 2.1. That should work out fine for most uses, but keep in mind that there are some circumstances (especially pertaining to Hyper-V usage of SMB file shares) in which SMB 3.0 is required. Microsoft does plan to add SMB 3.0 support in the future, but for right now it isn't available.
There are also some significant limitations pertaining to security. As I noted earlier, Azure Files is not a substitute for a file server. One of the reasons for this is that Azure Files doesn't support the use of Access Control Lists (ACLs) or Active Directory authentication. This means that you won't be able to apply file system level permissions to files stored within your SMB share. Microsoft might add this capability in the future, but it doesn't exist yet.
Recommendations
For right now the Azure Files service is of limited use. Even so, I think that Microsoft has taken a major step in the right direction. It will likely only be a matter of time before a much more full-featured SMB share is available for Azure.