Windows Server How-To
How To Rebuild a Failed RAID Array
Brien walks you through how to repair a failed drive within a storage pool to quickly get you up and running after an error occurs.
Over the past several months I have written quite a bit of information on setting up Windows storage pools, but there is one topic that I have never written about. What do you do when you have a drive failure within a storage pool?
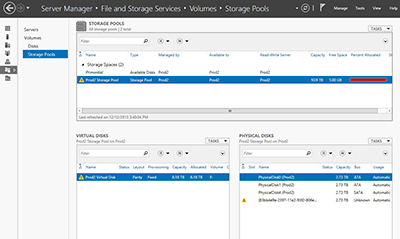
Last night I lost a drive in one of my storage pools. You can see how Windows reported the failure in Figure 1.
 [Click on image for larger view.] Figure 1. This is what it looks like when a drive fails.
As you can see in the figure, Windows identified the failed disk with a warning icon. I also have a parity virtual disk that is built on top of the storage pool. Because that virtual disk uses parity the disk remained functional, but there is a warning icon next to the virtual disk indicating that the virtual disk is impacted by the failed physical disk.
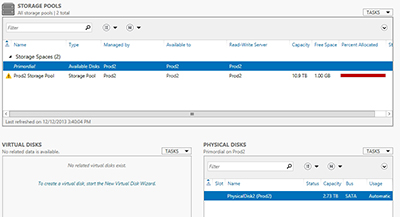
Obviously the first step in fixing the problem was to replace the failed drive. After doing so, I booted up the server and opened the Server Manager. You can see what the Server Manager looks like immediately after the boot process in Figure 2.
 [Click on image for larger view.] Figure 2. This is how Server Manager looked immediately after the drive was replaced.
As you can see in the figure above, Windows still reports the bad disk as being included in the storage pool, even though that particular disk has been physically removed from the server. Windows does, however, recognize the new hard disk. If you look at Figure 3, you can see that I have selected the Primordial pool and that my new physical disk is included in it. In case you are not familiar with the Primordial pool, it is Windows' default storage pool.
 [Click on image for larger view.] Figure 3. The new disk is included in the primordial storage pool.
So in order to fix the problem it is necessary to remove the bad disk from the storage pool and then move the new disk from the primordial pool into the storage pool.
At first it might seem that removing the listing for the bad disk from the storage pool is simple. As you can see in Figure 4, you can right-click on the bad disk and then select the Remove Disk command from the shortcut menu.
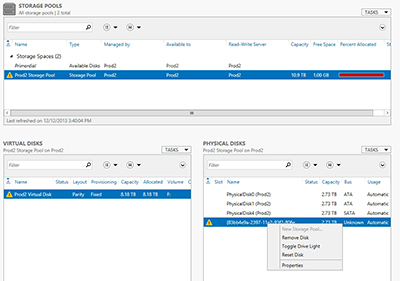 [Click on image for larger view.] Figure 4. Right-click on the bad disk and select the Remove Disk command from the shortcut menu.
Although this is the proper method for removing the disk, we can't remove the disk just yet. Think about it for a moment. We have a parity virtual hard disk that depends on all of the disks in the array. If we were to simply remove the physical disk then the virtual disk would lose its ability to tolerate a disk failure (thankfully Windows won't let you do this).
That being the case, we have to add the new disk to the storage pool first. To do so, click on the Tasks drop down located in the list of physical disks, and then choose the Add Physical Disk command, shown in Figure 5.
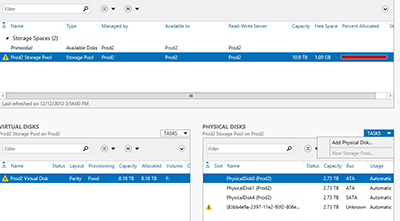 [Click on image for larger view.] Figure 5. Choose the Add Physical Disk command.
When you do, Windows will display the disks that exist within the primordial pool. Select the check box for the disk that you want to add to the storage pool. It is extremely important that the Allocation be set to Automatic, as shown in Figure 6.
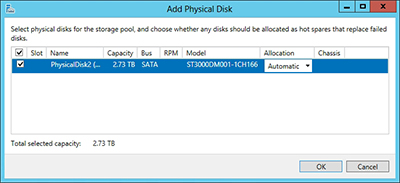 [Click on image for larger view.] Figure 6. The Allocation type must be set to Automatic.
Click OK and the new disk will be added to the storage pool. You should briefly see the bad disk's Usage change to Retired. The listing for the bad disk will disappear after a few seconds. You will then see a message like the one shown in Figure 7, indicating that the virtual disk is being repaired and that you should avoid making any changes to the storage pool or to the virtual disk until the repair is complete.
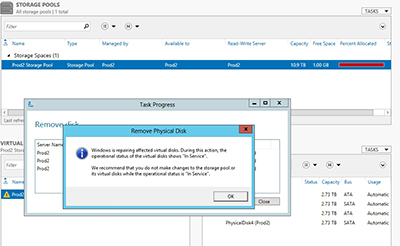 [Click on image for larger view.] Figure 7. Windows begins the repair process
On my server Windows did not appear to launch the virtual disk repair automatically. I had to right click on the virtual disk and choose the Repair Disk command from the shortcut menu. Upon doing so, the virtual disk's status changed to Repairing, as shown in Figure 8.
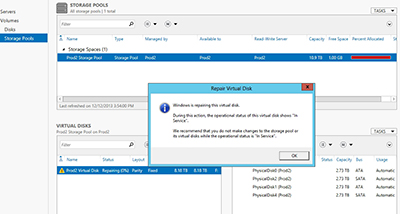 [Click on image for larger view.] Figure 8. Windows begins repairing the disk
As you can see, it is relatively simple to repair a virtual hard disk when a disk in a parity array goes bad. The key is to add the new disk to the storage pool before removing the old disk, and to set the new disk's Allocation type to Automatic.
About the Author
Brien Posey is a 22-time Microsoft MVP with decades of IT experience. As a freelance writer, Posey has written thousands of articles and contributed to several dozen books on a wide variety of IT topics. Prior to going freelance, Posey was a CIO for a national chain of hospitals and health care facilities. He has also served as a network administrator for some of the country's largest insurance companies and for the Department of Defense at Fort Knox. In addition to his continued work in IT, Posey has spent the last several years actively training as a commercial scientist-astronaut candidate in preparation to fly on a mission to study polar mesospheric clouds from space. You can follow his spaceflight training on his Web site.