In-Depth
Active Directory How To: Implementing the New Windows Server 2012 DAC
The process for implementing the new Dynamic Access Control feature will be a timely endeavor for enterprises. Here's how you get started.
Microsoft has identified Dynamic Access Control (DAC) as one of the most important new features in Windows Server 2012 because it's designed to provide better security, risk-management, and auditing policies in Active Directory by enabling more granular methods of authorization and authentication. DAC does this by providing more flexibility in how files are classified, secured, accessed, and governed, based on various attributes and conditions applied within Active Directory.
Despite these major improvements in how the new Windows Server can let you implement policies, DAC requires extensive changes, as noted in Redmond Editor Jeffrey Schwartz's January 2013 cover story, "Group Control". As a result, it will take time before many enterprises implement DAC widely due to the complexity and planning it requires.
However, DAC will become an important part of any Windows enterprise in the future for a number of reasons. The most obvious benefit to Active Directory admins is that it implements security without using security groups. As a result, I've spent a great amount of time exploring DAC, and I'll explain what you need to know to start implementing it.
Many organizations have a complex web of groups and nested groups, many of which they've forgotten about or ignored. I recall one company I worked with that said its proliferation of security groups became so difficult to manage that it didn't know who had domain admin rights -- and it was afraid to fix the situation because the whole infrastructure might come unraveled.
Authorization Enhancements
Microsoft identifies several feature enhancements in Windows Server 2012 to improve authorization management. Among them is new Kerberos support for user claims and device authorization, implemented through Group Policy, which I'll discuss later on. Windows Server 2012 also supports conditional expressions, which enhance permissions management and auditing.
DAC uses enhanced security descriptors introduced in Windows Server 2008 R2 and Windows 7 to allow conditional expressions in user and device claims and resource properties. This allows a file resource, for example, to be limited to members of the sales department who reside in Canada. The various attributes in User properties are used for these expressions such as the Department attribute (see Figure 1). DAC also uses conditional expressions via Global Object Access Auditing. (Note: Security Groups still work just fine in Windows Server 2012 and with DAC implemented.)
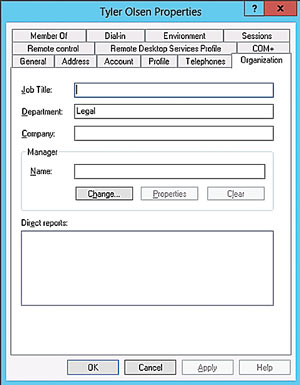 [Click on image for larger view.] Figure 1. Define basic attributes of an employee such as job title and department.
Central Access Policies (CAPs) now allow common management of all access policies via Active Directory and can be implemented across forests. File Classification Infrastructure (FCI), introduced in Windows Server 2008 R2 and Windows 7, allowed classification of data but without access control. DAC adds that missing component, making it "claims-aware."
Other additions to Windows Server 2012 include automatic Rights Management Services (RMS) extensibility to encrypt non-Microsoft files and access-denied assistance: When access to a remote file is denied, Windows Server 2012 provides additional information to the user to assist in problem resolution and reduce calls to the IT help desk.
Based on my research and work in my lab to try to figure this out, it's pretty clear that there isn't a lot of documentation, and DAC is a multi-headed beast that's somewhat difficult to understand. Even with virtual labs and demos, it's easy to run into trouble spots. Of course, I raised the difficulty level a couple of notches by implementing DAC in a multi-domain forest, where the root domain is a Windows 2003 forest functional-level domain but has Windows Server 2008, Windows Server 2003 and Windows Server 2008 R2 domain controllers, only one of which is physical.
I'll walk you through the process of implementing CAPs, including notes about important things to remember and some troubleshooting. I used the Microsoft virtual lab (go to the very last link, "Using Dynamic Access Control to Automatically and Centrally Secure Data"). I recommend doing the lab just to become familiar with everything, but also using the procedure here to set it up in your own lab.
First off, I need to define what a "claim" is. Microsoft defines it as "information a trusted source makes about an entity." Claims may include the user or computer Security Identifier Definition (SID), department classification of a file and other attributes of a file, user or computer. Claims can be used to grant access to resources. While Windows authorization was heretofore based on the SID of a security principal, Windows Server 2012 extends that authorization to be based on these claims, thus providing greater granularity in security and reducing the need for using groups for authorization to resources.
There are three types of claims: user, device and transformation. The example in this article uses the user claim.
Active Directory provides a way to have access policies in a central location that allow access to date on domain members and have that access centrally defined and managed. In the following example, I'll demonstrate how to configure DAC policies in Active Directory, including defining claims and policies. In a subsequent article, I'll illustrate the procedure to define file attributes to make this all work together.
Infrastructure Pieces
DAC requires you to configure certain infrastructure components. The infrastructure required to implement claims-based authorization in Active Directory includes at least one Windows Server 2012 DC in the domain where the user resides that will use this feature, one or more Windows Server 2012 DCs in each domain that will implement claims to another forest, and a Windows 8 client (for device claims). There's no requirement for forest functional level -- that is, no need to raise the forest functional level to Windows Server 2012.
DAC is managed via the Active Directory Administrative Center (ADAC), which requires the Active Directory Web Services (ADWS) provided in Windows Server 2008 R2 and later versions. In this instance, you can see the DAC tree node in the ADAC console (Figure 2). Note that DAC doesn't require any specific forest functional mode, and only requires one Windows Server 2012 DC in the domain.
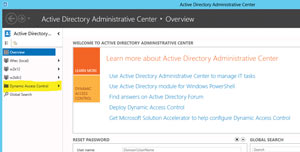 [Click on image for larger view.] Figure 2. Access Dynamic Access Control via the Active Directory Administrative Center.
If you have a test environment and want to add a Windows Server 2012 domain to an existing forest, there are additional prerequisites if the root domain doesn't have a Windows Server 2012 or Windows Server 2008 R2 DC.
The DAC for claims-based authentication in Active Directory requires the ADAC, which requires the ADWS. In a multi-domain forest where the root domain doesn't have a Windows Server 2012 or Windows Server 2008 R2 DC, the Active Directory Management Gateway Service will need to be implemented. This allows the ADAC to communicate with that domain. In my lab forest (see Figure 3), the WTEC root domain has only Windows Server 2008 and Windows Server 2003 DCs. The W2k12 and W2k8R2 domains can be managed from the ADAC, and problems such as a WTEC root domain with a red flag (error) are displayed.
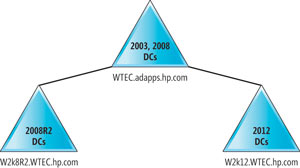 [Click on image for larger view.] Figure 3. Configuration of the lab forest.
Note that even with the Kerberos setting enabled, the DAC node doesn't show up in ADAC. This makes sense because ADAC can't see the WTEC domain (no ADWS), which holds the Configuration container.
I installed the Active Directory Management Gateway Service and the DAC node appeared in ADAC. This installation required some prerequisite hotfixes, so make sure to read the Knowledge Base details.
To successfully run forestprep for Windows Server 2012, the Claims Configuration container should be present. Open ADSI Edit, then browse the Claims Configuration container, as shown in Figure 4.
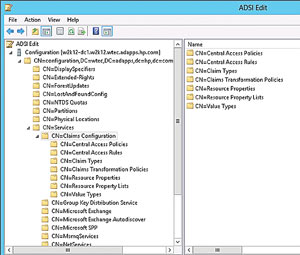 [Click on image for larger view.] Figure 4. A Claims Configuration container in the ADSI Edit configuration menu.
DAC Configuration
To configure DAC in Active Directory, there are seven basic steps. These steps are designed to configure DAC in any lab with either a single- or multiple-domain forest. But first, you should create some users with attributes used for claims. I've defined several users for this (see Table 1). Note that the country and department are defined in each user's user object properties. Once you've tied together users and attributes, you're ready to configure DAC.
|
Table 1. Users with attributes used for claims defined in the domain. |
1. Enable Kerberos Support
DAC only shows up in the ADAC module after the required Kerberos setting is enabled (refer back to Figure 2). Curiously, the Microsoft virtual lab (referred to previously) lists this as the last step in the Active Directory portion of the DAC configuration. When you go in:
- Edit the Default Domain Controllers Policy in the domain where the Windows Server 2012 DC resides.
- Go to Computer Configuration | Policies | Administrative Templates | System | KDC.
- Under KDC, enable the "KDC support for claims, compound authentication and Kerberos armoring" option (Figure 5).
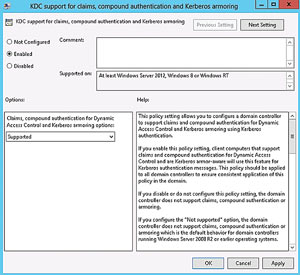 [Click on image for larger view.] Figure 5. A control to define Kerberos setting.
Note: If the domain with the Windows Server 2012 DC is a child domain in a multi-domain forest where the root domain doesn't have a Windows Server 2008 R2 or Windows Server 2012 DC, the DAC entry won't show up in the ADAC even after the Kerberos policy is enabled.
2. Configure User Claim Types
- First, open ADAC from Server Manager | Tools | Active Directory Administrative Center. Find the DAC item in the left pane (if it doesn't show up, see Step 1).
- Expand DAC and click Claim Types (either in the left pane or in the center), then go to the right pane and select New | Claim Type (Figure 6).
- In the Source Attribute, the existing Active Directory attributes will be listed. Select department, make sure User is selected at the right for Claim Type, and click OK.
- Repeat the previous step for the Country Attribute "c," and click OK to close the dialog.
 [Click on image for larger view.] Figure 6. Select new claim type.
3. Configure Resource Properties for Files
Resource properties will be used to classify files and are downloaded to the file servers for that purpose. Rules will later be set up to match the attribute values that you just defined to these resource properties. In this case, you need resource properties for Department and Country. Microsoft defined some resource properties as a start (such as Department), but because Country is not defined (see Figure 7), you'll have to define it:
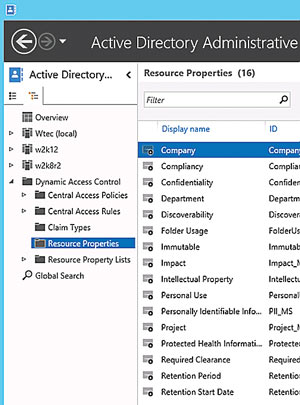 [Click on image for larger view.] Figure 7. Choose a Microsoft-defined resource property or add your own.
- Under DAC, go to Resource Properties, click New in the right pane (or right-click on Resource Properties) and click Resource Property.
- In the Display name, type Country, then click Add.
- In the Value field, enter US. In the Display name field, enter United States. Click OK.
- Click Add and enter UK in the Value and United Kingdom in the Display name fields. Click OK.
- Repeat this process to add all the countries in your list. In my example I added one more for Costa Rica. Note that you can edit this property later to add other countries, but you can't create another Country resource property.
- Locate the Department resource property (ID=Department_MS), right-click, and then click Enable. Repeat for the Country resource property:
- Note: If an error occurs when enabling a property, it's likely that the Suggested Values, such as the countries in the Country property, are not defined.
- These properties by default have the "Protect from Accidental Deletion" property enabled. This has to be cleared before deleting the resource property.
4. Add Resource Properties to Global List
Each resource property must be added to at least one resource property list. Each resource property list must then be downloaded to the file servers. The Global Resource Property List is downloaded by all servers, for properties required on all servers. Resource property lists can be downloaded to individual servers via Group Policy:
- In the ADAC DAC parent, go to Resource Property Lists.
- Click Add Resource Properties.
- Select Department and Country from the list and click the Add button, as shown in Figure 8.
- Click OK.
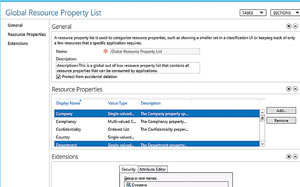 [Click on image for larger view.] Figure 8. Categorize resource properties in the Global Resource Property List.
5. Create a New Central Access Rule
This rule works similar to the access control list you're familiar with, and specifies conditions for file access to be granted to users or devices. This is possible due to the conditional expressions feature noted previously and is managed "centrally" through Active Directory. It will allow you to specify that, in this case, the department and country attributes match in order to grant access. This allows a conditional authentication so that the user would have to be from, say, the United Kingdom and department of Legal before access would be granted:
- In the DAC parent node in ADAC, right-click Central Access Policies and select New | Central Access Rule.
- In the Name field, enter Department-Country-Match-Required.
- Under Target Resources, click Edit.
- Click Add a condition.
- Add the condition Resource-Country-Exists.
- Click Add a Condition.
- Add the condition Resource-Department-Exists. Note: You can select other values (Figure 9).
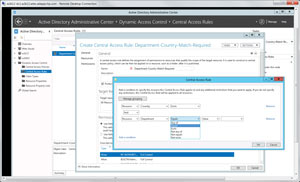 [Click on image for larger view.] Figure 9. Set up Central Access Rules in the Active Directory Administrative Center.
- In the Permissions section select "Use the following permissions as current permissions." (Note that this setting is required to enable DAC. Without this set, only audit log entries will be created for "what if" scenarios prior to implementation.)
- In Permissions click Edit, then Add. Select a principal. Select the user or groups that you want this rule to apply to. If you use Authenticated users here, all Authenticated users will have to have the department and country resources defined.
- Click OK, and in Permissions check the Full Control option (Figure 10).
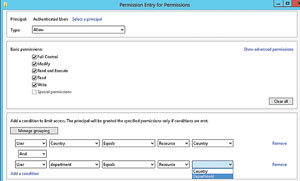 [Click on image for larger view.] Figure 10. Set the Dynamic Access Control Group Policy.
- Click Add a Condition and add the condition User-Country-Equals-Resource-Country.
- Click Add a Condition and add the condition User-Department-Equals-Resource-Department. (Note that Microsoft states in its virtual lab: "In creating this rule, the list of attributes for the user is generated by the list of attributes used for claim types. The list of attributes for the resource is generated by the list of enabled resource properties.")
The bottom line here is you need to make sure you entered everything correctly. A typo can cause a condition to be false and cause access to be denied.
6. Create a CAP
Now add the Central Access Rule you just created to a CAP, which is a collection of rules that are enforced together. Each CAP can be applied to a file or folder. Files and folders can only have one access policy applied, but, again, each policy can have several rules:
- In the ADAC, under the DAC parent node, right-click on Central Access Policies and select New | Central Access Policy.
- Enter Primary File Server Policy (or a name of your choosing) and click Add.
- Click Department-Company-Match-Required, then click the Add button.
- Click OK twice.
7. Publish the CAP
Finally, create a Group Policy Object (GPO) that will push the CAP you just created to the file servers. This only makes the policy available -- it doesn't enforce it on files or folders (that will be done at the file-server level):
- In Server Manager, open the Group Policy Management Console (GPMC).
- In the domain, create a GPO named Dynamic Access Control Policy.
- In the Security Filtering section, remove Authenti-cated Users.
- Limit the GPO to apply only to the file server (the file server in this example is W2K8R2-DACFS1) by clicking the Add button -- as shown in Figure 11 -- and finding the server. Obviously, how you apply the GPO is determined by your specific requirements:
- Edit the Dynamic Access Control Policy and go to Computer Configuration | Policies | Windows Settings | Security Settings | File System, then click Central Access Policy.
- On the Action menu click Manage Central Access Policies.
- Choose Primary File Server Policy and click Add.
- Click OK and close the GPMC.
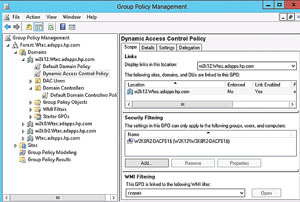 [Click on image for larger view.] Figure 11. Set basic access rights and specify conditions.
This is a fairly limited process to define the claims, resources, rules and policies at the Active Directory level. It's easy to see how this can be expanded to other types of rules for other attributes. It's also easy to see why companies are going to need some time to figure out how to implement the process and train the IT staff on how to do it, but it will come. Use this handy intro to get your feet wet and see how DAC can help your organization.
In the next installment on how to implement DAC, I'll explore how to deploy a file server with DAC.