In-Depth
Locating Documents in a SharePoint Library
Irrelevant SharePoint search results and lost documents can turn into a waste of time and money, but a few simple steps will help IT pros avoid these problems.
With SharePoint Server 2010 coming out this month, Microsoft will be talking up its new search and enterprise content-management capabilities. Nevertheless, if you're like many enterprises, you'll be grappling with SharePoint Server 2007 for the foreseeable future before making the leap. Although Microsoft Office SharePoint Server 2007 offers a variety of different capabilities, it seems to be used most often in the real world as a document repository. And, as with any other type of document repository, a SharePoint document library can become cluttered, which often makes searching for specific documents a cumbersome process.
SharePoint 2007 offers features such as document lifecycle management that help to keep the clutter under control, but ultimately users' ability to locate the documents that they need all comes down to SharePoint's search engine. Therefore, it makes a lot of sense to look at some ways in which SharePoint can be tuned to provide better search results.
Metadata Tags
When SharePoint indexes a document library, there are two distinct ways that can be performed. As you would expect, SharePoint indexes the content of each document in the library. The other thing it indexes are the document's metadata tags.
In case you aren't familiar with metadata tags, they're essentially attributes that are pinned to a document. For example, Microsoft Word 2007 automatically associates several metadata tags with its documents. If you click on the Microsoft Office Orb and then select the Prepare | Properties commands from the resulting menus, you can see several different document-attribute fields that can be populated. The contents of these fields become the document's metadata.
In my years of working with SharePoint, I've found that a lot of organizations don't bother using metadata tags with their documents. Although SharePoint doesn't force you to associate metadata with your documents, Microsoft designed SharePoint to index metadata tags for a reason. Experience has shown that populating metadata tags can go a long way toward improving search results.
In order for document metadata to play a useful role in the indexing process, we need to do two things. First, we need to require users to populate the various metadata fields. Second, we need to figure out which types of metadata are going to be the most useful given the organization's business needs, and then create custom metadata tags if necessary.
Requiring Metadata Tags for Users
The first thing I want to demonstrate is how to create custom metadata fields, and how you can require users to populate those fields when they upload a document to a SharePoint library. Begin by opening your SharePoint site and signing in as an Administrator. Now, click on the Site Actions button, and then choose the Site Settings | Modify All Site Settings options from the resulting menus. When SharePoint displays the Site Settings page, click on the Site Libraries and Lists link (it's located in the Site Administration column). Now, click on the Customize Documents link.
At this point, you should be looking at the Customize Documents page. About halfway down the page, you'll notice a section called Columns. SharePoint stores metadata in columns.
Although SharePoint only defines a few columns by default, you can use the Create Column link to define any additional metadata fields that you like. Creating a column involves assigning a name and a data type to the column. You must also decide whether or not you want to require users to populate the column by setting the Require That This Column Contain Information option.
Creating Custom Content Types
Although it's easy to require users to populate custom metadata fields, blanket requirements aren't always practical. The reason for this is the terms that users are likely to enter into a search query vary depending on the type of documents they're searching for. Furthermore, document libraries often contain multiple file types. For instance, a set of metadata tags that's perfectly suited to an accounting spreadsheet probably wouldn't be appropriate for use with a marketing proposal created in Microsoft Word.
It's therefore important to let SharePoint know that a document library is going to contain multiple types of documents and to define some metadata tags that are going to be specific to each custom content type that you define.
Defining Custom Content Types
To define a custom content type, click the Site Actions button and choose the Site Settings | All Site Settings options from the resulting menus. When you arrive on the Site Settings page, click on the Site Content Types link, located in the Galleries section. Clicking the link will take you to the Site Content Type Gallery page.
Click the Create link, and SharePoint will display the New Site Content Type page (Figure 1). Enter a name and an optional description for the content type that you want to create. You must also select a parent content type. Generally, you're going to want to Select the Parent Content Type from Document Content Types and set the Parent Content Type to Document. Click OK to create your new, custom content type.
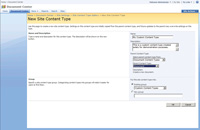
[Click on image for larger view.] |
| Figure 1. This is how you create a custom content type. |
At this point, SharePoint will display a page that allows you to customize the content type you've just created. You can add columns to the content type in the same way you added columns to your document library earlier. In this case, though, the columns you add should be specific to the content type you've just created. As you add columns to the custom content type, don't forget to require users to populate the various metadata fields whenever they upload a document.
Now that you've defined one or more content types, the next step in the process is to integrate those content types into your document library. To do so, click the Site Actions button, and then choose the Site Settings command from the shortcut menu. Once you arrive on the Site Settings page, click on the Libraries and Lists link, located in the Site Administration section. Now, click on the Customize Documents link.
While on the Customize Documents page, click the Advanced Settings link (located in the General Settings section). When you arrive at the Document Library Advanced Settings page, choose the Yes option in the Content Types section to allow the management of content types. Click OK, and you'll be returned to the Customize Documents page. You'll notice, however, that this page now contains a Content Types section (Figure 2).
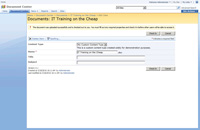
[Click on image for larger view.] |
| Figure 2. Metadata fields are displayed based on the selected content types. |
Now, click the Add From Existing Site Content Types link, located just beneath the list of content types. SharePoint will display a page that allows the document library to include the types of content you want to add. Select the content type that you've just defined and click the Add button, followed by OK. You'll now be returned to the Customize Documents page, and your custom content types will be listed in the Content Types section.
Now that you've added the custom content type to the document library, users are able to select the appropriate content type whenever they upload a document. You'll notice the document check-in page contains a Content Type drop-down list that users can use to specify the appropriate content type for the document. You'll also notice just beneath the Name field there are Title and Subject fields. These fields directly reflect the names of the columns that are bound to the selected content type. If I were to select a different content type, SharePoint would display a different set of fields.
Pre-Filtering Search Results
When you really stop and think about it, the ultimate goal behind optimizing SharePoint's search engine is to have it return exactly the document set that the user is searching for -- nothing more and nothing less. As I explained in the previous section, enforcing metadata usage will help to ensure that all of the relevant documents are returned among the search results. However, we haven't done anything to prevent SharePoint's search engine from returning irrelevant query results.
Back in the early days of the Internet, I remember watching someone do a search engine query on the term "angels." The search engine returned results such as Charlie's Angels, angel food cake, Hell's Angels, and angelfish. There was so much clutter among the search results that it made finding the requested pages difficult, even though the desired results were included among the billion or so other search results.
Even though a lot of time has passed since the incident that I just described, and search engines have improved a lot, I've found that SharePoint's search results can still be polluted with irrelevant data. To give you a more concrete example of what I'm talking about, let me tell you what happens when I enter the word "Quick" into the search field.
The search returns 10 results, as shown in Figure 3. However, a closer inspection reveals that none of those 10 results is a Microsoft Office document. Instead, the results you see in the figure are all .ASPX files. .ASPX files are Active Server Page files that are used internally by SharePoint. In other words, SharePoint is returning elements from the server's own file structure among the search results.
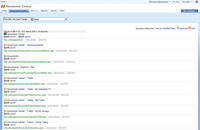
[Click on image for larger view.] |
| Figure 3. It's a good idea to exclude .ASPX files from search results. |
Because .ASPX files have nothing to do with what we're looking for, it would be prudent to configure SharePoint so that it doesn't display them among the search results. To do so, click the Site Actions button and then choose the Site Settings option. When you arrive on the Site Settings page, click the Search Visibility link, which is located in the Site Administration section. The Search Visibility page allows you to choose whether or not .ASPX files should be included within the search results.
Omitting Metadata Columns
Just as indexed .ASPX files are usually going to be irrelevant when included in search results, you may find that certain metadata tags also contribute to irrelevant results. Normally, it's advisable to allow SharePoint to index all of the metadata columns. If you begin to notice that certain columns contribute to the irrelevance of search results, however, it's possible to disable indexing on a per-column basis.
To disable indexing for a column, click on the Site Actions button and choose the Site Settings option from the resulting menu. When SharePoint displays the Site Settings page, click on the Searchable Columns link, which is located in the Look and Feel section. The resulting page allows you to select metadata columns that shouldn't be crawled. If the list appears blank, try going to the site's main page and then trying to access the Searchable Columns page again.
Smart Searching
Although the built-in search engine in SharePoint 2007 works relatively well straight out of the box, its performance is far from optimal. Microsoft has improved the search engine in SharePoint Server 2010, and while there are some similarities, these guidelines are focused around SharePoint 2007. By creating custom content types and specifying metadata types that are appropriate for each type of content, it's possible for users to receive better query results by searching on metadata fields. Omitting unwanted metadata columns and excluding .ASPX files from the indexing process also helps to fine-tune the query results.
About the Author
Brien Posey is a 22-time Microsoft MVP with decades of IT experience. As a freelance writer, Posey has written thousands of articles and contributed to several dozen books on a wide variety of IT topics. Prior to going freelance, Posey was a CIO for a national chain of hospitals and health care facilities. He has also served as a network administrator for some of the country's largest insurance companies and for the Department of Defense at Fort Knox. In addition to his continued work in IT, Posey has spent the last several years actively training as a commercial scientist-astronaut candidate in preparation to fly on a mission to study polar mesospheric clouds from space. You can follow his spaceflight training on his Web site.