Posey's Tips & Tricks
Migrating from Gmail to Exchange Online
A step-by-step guide to moving your organization's mailboxes from Google's cloud productivity suite to Microsoft's.
Microsoft provides tools that you can use to migrate mailboxes from Gmail to Office 365. Although the process is neither intuitive nor seamless, completing such a migration is easier than you might expect.
Preparing Exchange Online
There are two things that you will need to do to prepare Exchange Online to receive mailbox data from Gmail. First, you will need to create and license mailboxes for all of your Gmail users. These mailboxes should use the same name as what is currently being used on Gmail.
The other thing that you will have to do is link your domain to Office 365. It is important, however, that you do not change the MX DNS record to point to Exchange until after the migration is complete.
Compile a List of Gmail Mailboxes
This is usually the most tedious and time-consuming part of the entire migration process. You are going to need to create an Excel spreadsheet that lists the mailboxes that need to be migrated. This spreadsheet must contain three columns and the column names must be EmailAddress, UserName and Password. You must use these exact column names, and they need to be placed in columns A, B and C.
The EmailAddress column will store each user's Office 365 e-mail address. The UserName column needs to contain each user's Gmail login name, and the Password column must store each user's Gmail password.
When you are done, be sure to save the file in .CSV (not .XLSX) format, and keep the file someplace safe since it lists passwords in clear text.
Create a Migration Endpoint
The third step in the process is to create a migration endpoint. The migration endpoint is a temporary link between Exchange Online and Gmail that will be used by the migration process. To create this link, open the Exchange Admin Center, and then go to Recipients. Now, click on the Migration tab, then click on the icon that looks like three dots, and choose the Migration Endpoints option. This will cause Exchange Online to open the Migration Endpoints dialog box.
Now, click the New icon (+) to open the New Migration Endpoint dialog box. This dialog box, which you can see in Figure 1, asks what type of migration you want to perform. Choose the IMAP option and click Next.
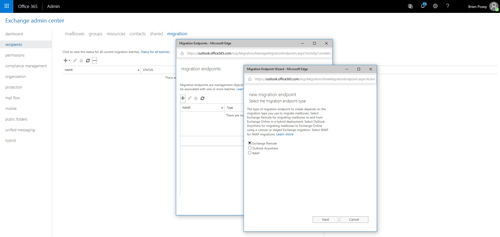 [Click on image for larger view.] Figure 1: Choose the IMAP option and click Next.
At this point, you will be taken to the IMAP Migration Configuration screen, which you can see in Figure 2. Enter imap.gmail.com as the IMAP server name. Leave the other fields set to their default values, as shown in the figure below.
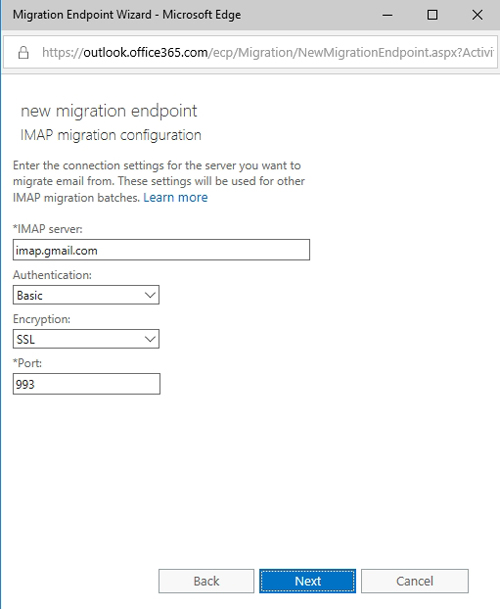 Figure 2: You will need to set the IMAP server to imap.gmail.com.
Click Next, and you will be taken to the Enter General Information screen. The only thing that you have to do on this screen is to provide a name for the migration batch that you are creating. You can call the endpoint anything that you want. When you are done, click New.
Perform the Migration
The last step is to perform the actual migration. This part of the process is simple. From the Exchange Admin Center's Migration tab (which you saw back in Figure 1), click New, followed by Migrate to Exchange Online. When prompted as to the type of migration that you wish to perform, select the IMAP Migration option and click Next.
At this point, the New Migration Batch wizard will prompt you for three pieces of information (on three separate screens). The first bit of information that you will have to provide is the names of the users that you want to migrate. You do this by specifying the .CSV file that you created earlier and clicking Next.
Next, you will be asked for the migration endpoint. Point the wizard to the migration endpoint that you previously created and click Next.
Finally, you will be taken to the Move Configuration screen. Here you will need to provide the name of the migration batch that you have created. When you are done, click Next and start the migration batch.
As you can see, migrating from Gmail to Exchange Online is a relatively easy process. If you need help, you can find Microsoft's documentation here.
About the Author
Brien Posey is a 22-time Microsoft MVP with decades of IT experience. As a freelance writer, Posey has written thousands of articles and contributed to several dozen books on a wide variety of IT topics. Prior to going freelance, Posey was a CIO for a national chain of hospitals and health care facilities. He has also served as a network administrator for some of the country's largest insurance companies and for the Department of Defense at Fort Knox. In addition to his continued work in IT, Posey has spent the last several years actively training as a commercial scientist-astronaut candidate in preparation to fly on a mission to study polar mesospheric clouds from space. You can follow his spaceflight training on his Web site.