Posey's Tips & Tricks
Microsoft's New SharePoint Web Parts: An Overview
Here's a quick survey of the newest Web Parts available for SharePoint, including Power BI, Planner and Office 365 Connectors.
In a recent installment, I explained how to add a Power BI report to SharePoint. In that column, I mentioned that Microsoft would soon be offering a Power BI Web Part that would greatly simplify the process.
Not only is this Web part now available, but Microsoft has also released a number of other new Web Parts for SharePoint. In this column, I want to take the opportunity to talk about a few of them.
Power BI
As mentioned above, the Power BI Web Part for SharePoint is finally available. When you add this Web Part to a page, SharePoint will prompt you to add a Power BI report. Clicking the big, red Add Report button reveals an interface on the right side of the screen that asks you to provide a link to the report and the report's page name. You can also set the report's aspect ration, and opt whether or not to display the navigation pane and the filter pane. You can see what these options look like in Figure 1.
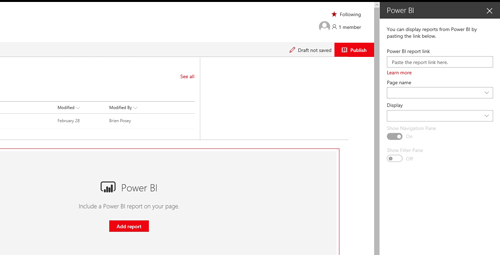 [Click on image for larger view.] Figure 1: The Power BI Web Part makes it a lot easier to display Power BI reports in SharePoint.
Figure 2 below shows what the Power BI report looks like, and what the Web Part's various options look like when filled in.
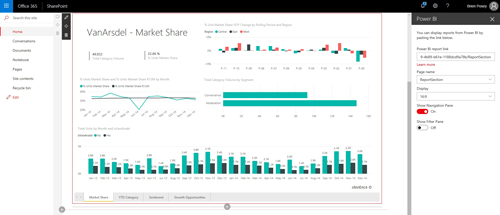 [Click on image for larger view.] Figure 2: SharePoint is now showing a Power BI report.
Planner
Power BI is not the only Office 365 application for which Microsoft has created a Web Part. Microsoft has also recently introduced a Web Part for Planner. If you are not familiar with Planner, it is a lightweight project management tool that is similar to Trello. Earlier this year, I began using Planner to keep up with my writing deadlines and have found Planner to be far more effective than my previous method.
When you add the Planner Web Part to a SharePoint page, you will initially see a Planner splash screen, indicating that you can show your team's plans and activities. There aren't initially any configuration options exposed, and clicking on the Web Part does not do anything. The trick to displaying a plan within SharePoint is to click on the Planner Web Part to expose the Edit, Move and Delete icons in the Web Part's upper-left corner. Clicking on the Edit icon exposes options for adding a plan to SharePoint. You can see the Edit icon (it looks like a pencil) and the Planner options in Figure 3.
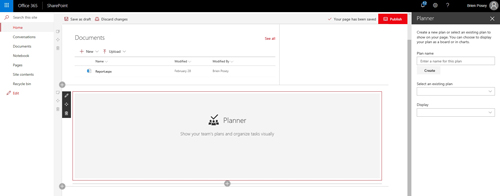 [Click on image for larger view.] Figure 3: This is how you add a plan to SharePoint.
Figure 4 shows a plan within a SharePoint site. Incidentally, this particular Web Part does seem to have a bug. Although the Planner options indicate that you can either create a new plan or select an existing plan, I found that I was not able to choose an existing plan.
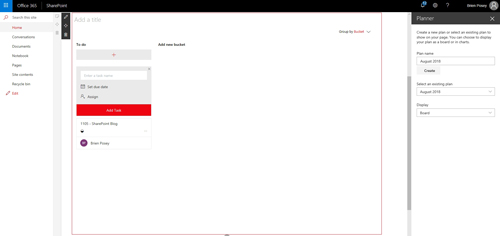 [Click on image for larger view.] Figure 4: This is what the Planner Web Part looks like when it is linked to a plan.
Office 365 Connectors
Of all the new Web Parts, the one that most people will probably find to be the most useful is the new Office 365 Connectors Web Part (abbreviated as "O365 Connectors" in SharePoint's list of Web Parts). This Web Part allows you to link SharePoint to dozens of online services, thus exposing those services through SharePoint.
As you can see in Figure 5, these services include things like Trello, Wunderlist and RSS.
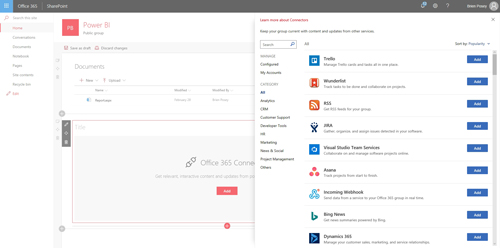 [Click on image for larger view.] Figure 5: The Office 365 Connectors Web Part lets you link SharePoint to a variety of online services.
Because this particular Web Part is brand-new, I haven't had much time to play with it. Even so, my initial impression is that because the Web Part exposes so many different services, it will likely prove to be extremely useful.
Other New Web Parts
So far, I have focused my attention on Web Parts that are related to Office 365. However, Microsoft has also created two new Web Parts that link to third party services: Twitter and Kindle. At the time of this writing, however, both of these Web Parts are in preview, which is kind of like a beta release.
As is the case with the other Web Parts that I have talked about, the Twitter and Kindle Web Parts are easy to configure. In the case of the Twitter Web Part, for example, I simply provided the Twitter handle (in this case, my own, @BrienPosey) for the Tweets that I wanted to display. You can see what this looks like in Figure 6.
 [Click on image for larger view.] Figure 6: This is the current preview of the Twitter Web Part.
About the Author
Brien Posey is a 22-time Microsoft MVP with decades of IT experience. As a freelance writer, Posey has written thousands of articles and contributed to several dozen books on a wide variety of IT topics. Prior to going freelance, Posey was a CIO for a national chain of hospitals and health care facilities. He has also served as a network administrator for some of the country's largest insurance companies and for the Department of Defense at Fort Knox. In addition to his continued work in IT, Posey has spent the last several years actively training as a commercial scientist-astronaut candidate in preparation to fly on a mission to study polar mesospheric clouds from space. You can follow his spaceflight training on his Web site.