Posey's Tips & Tricks
Making Power BI Reports Available in SharePoint Online
A close look at Microsoft's new Power BI Web Part, currently in preview, which expands your ability to publish and share Power BI data.
Over the past few years, one of the Office 365 applications that I have found to be most fascinating is Power BI, Microsoft's business intelligence tool. Simply put, Power BI lets you visualize your data by displaying it in a variety of really cool, graphical formats.
As great as Power BI may be, however, there is one thing that I have always felt was holding it back: The options for sharing Power BI data were somewhat limited.
Thankfully, that has recently changed. Microsoft has just come up with a new Web Part that makes it easy to publish Power BI reports in SharePoint.
Before I show you how this works, I need to point out that the Power BI Web Part is currently in preview. A preview is Microsoft-speak for a beta release. As such, the Web Part could potentially contain bugs. Microsoft has not yet made the Web Part available to everyone, however, so in this blog post, I want to show you how to display Power BI content in SharePoint without using the Web Part.
On an important side note, the technique that I am going to be covering only seems to work on classic sites, not on modern SharePoint sites.
The first step in the process is to open Power BI and then open the report that you wish to make available in SharePoint. Next, go to the File menu and choose the Publish to Web option, shown in Figure 1. Notice in the figure that this option indicates that it is suitable for public viewing of the report, so anyone with access to your SharePoint page should be able to view the Power BI report without needing any special permissions. Incidentally, when Microsoft does eventually make the Power BI Web Part for SharePoint available, this menu will contain a Publish to SharePoint option.
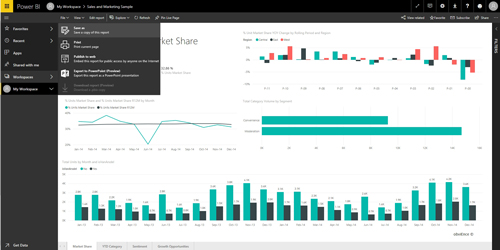 [Click on image for larger view.] Figure 1: Select the option to publish the report to the Web.
When you choose the Publish to Web option, Power BI will provide you with two URLs. One of these URLs is a link that you can send through e-mail, and the other is a link that you can embed into a Web page. Copy the e-mail link to the clipboard, and then open SharePoint.
Once in SharePoint, go to the site in which you wish to publish the Power BI report. There are a few different ways of publishing the report, but let's create a dedicated page. To do so, click on the Pages link, and then click New | Web Part Page, as shown in Figure 2.
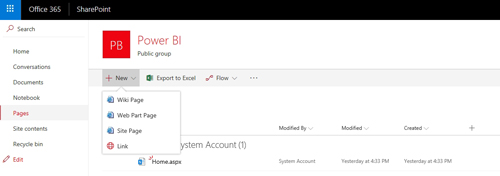 [Click on image for larger view.] Figure 2: Choose the New | Web Part Page option.
At this point, you will have to enter a name for the page that you are creating and choose a layout template. I'm just going to call my page Report, and I am going to go with the Full Page Vertical template, shown in Figure 3.
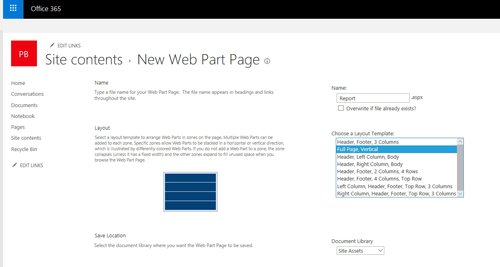 [Click on image for larger view.] Figure 3: Enter a page name and choose a layout template.
Click the Create button, and you will be prompted to add a Web Part. Choose Media and Content as the category, and then choose the Page Viewer part, as shown in Figure 4.
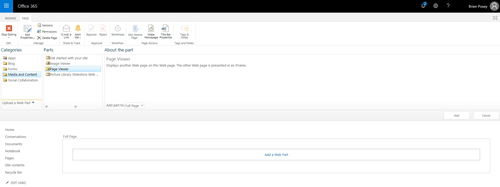 [Click on image for larger view.] Figure 4: Choose the Page Viewer Web Part.
Click Add, and you will see a prompt telling you that to link content, you will need to open the tool pane and type a URL in the link box. Click on the link within the message to open the tool pane, and then enter the URL in the place provided, as shown in Figure 5. You will notice in the figure that you can also customize the basic appearance and layout of the Web Part. When you are done, click OK, followed by Stop Editing.
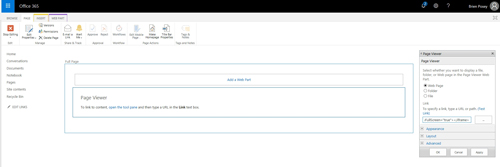 [Click on image for larger view.] Figure 5: Enter the URL in the place provided.
Hopefully, that will do the trick, but if not, there are some settings that you should check. First, make sure that the URL that you entered is in HTTPS (not HTTP) format. Next, open the SharePoint Admin Center and go to Settings, and look for the Custom Script section. Make sure that custom scripts are allowed. Incidentally, you should review the documentation here to make sure that you are familiar with the security implications of using custom scripting. It is also worth noting that when you enable custom scripting, it can take 24 hours for it to take effect.
Finally from your SharePoint site (not the SharePoint Admin site), go to Settings | Site Settings | Site Collection Admin | HTML Field Security, as shown in Figure 6. On the following page, you will need to tell SharePoint from which domains you wish to allow contributors to insert IFrames.
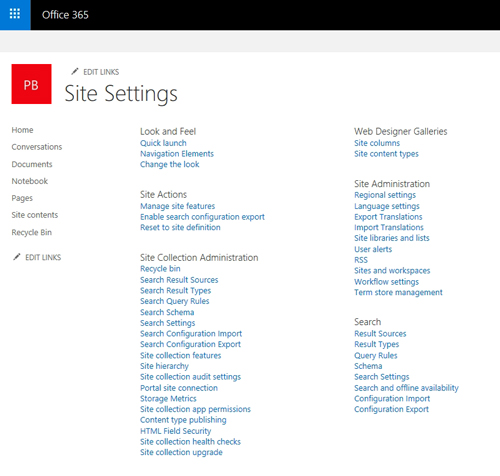 [Click on image for larger view.] Figure 6: You may need to edit the list of allowed domains.
About the Author
Brien Posey is a 22-time Microsoft MVP with decades of IT experience. As a freelance writer, Posey has written thousands of articles and contributed to several dozen books on a wide variety of IT topics. Prior to going freelance, Posey was a CIO for a national chain of hospitals and health care facilities. He has also served as a network administrator for some of the country's largest insurance companies and for the Department of Defense at Fort Knox. In addition to his continued work in IT, Posey has spent the last several years actively training as a commercial scientist-astronaut candidate in preparation to fly on a mission to study polar mesospheric clouds from space. You can follow his spaceflight training on his Web site.