In-Depth
How To Manage Active Directory Groups in Bulk
There's a slow way and a fast way to get this task done. Always go with the fast way.
- By Adam Bertram
- 04/12/2016
If you find yourself building, modifying or removing lots of Active Directory (AD) groups frequently, how are you doing that today? I hope you're not using Active Directory Users and Computers (ADUC) or the Active Directory Administrative Center (ADAC). If you are, you're wasting lots of time! It's time to show you how to save a lot of time and remove human error from this task by managing AD groups with PowerShell.
To get started, you'll first need to ensure you have the appropriate version of the Remote Server Administration Tools (RSAT) installed on your computer. I'm also assuming that you're on a domain-joined computer and you have at least one domain controller that is Windows Server 2012 or later. This will work if you don't have a Server 2012 or later domain controller but you'll need to be sure you have Active Directory Web Services installed on one manually.
Once you've met all of the prerequisites, you can then start seeing what AD group cmdlets are available to you from the Active Directory PowerShell module. To do this, you can use the Get-Command cmdlet.
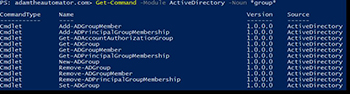 [Click on image for larger view.] Figure 1.
Creating Groups in Bulk
Creating groups in bulk requires two steps: getting the group information for each group and creating the group in AD. Using PowerShell, it doesn't matter where the group information is stored -- in a text file, in a SQL database, in an Excel spreadsheet, wherever. PowerShell can read it. But to keep it simple, let's assume that we have a bunch of groups in a CSV file.
In this CSV file, we have the group name and the type of group it is.
 Figure 2.
Now that we have the CSV file, we'll then need to read each row in that CSV converting each group into an object to process. To do that, we can use Import-Csv.
$rows = Import-Csv –Path C:\Groups.csv
This will place each CSV row into my $rows variable. Now we can easily loop over each of these groups by reading each one with a foreach loop.
$rows.foreach{New-ADGroup –Name $_.Name –GroupScope $_.Type }
There are a few different ways a foreach loop can be represented. I've chosen to use the foreach method that is on all arrays in PowerShell v4 and later. This way is the fastest.
Once created, you can get ensure the groups now exist with the appropriate scope.
$rows.foreach{Get-ADGroup –Identity $_.Name } | select name,groupscope
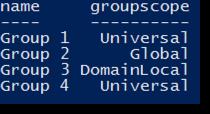 Figure 3.
Finding Groups
Once got some groups created your next task will be to selectively find them. You can easily get all groups in AD with Get-ADGroup but that's typically not too helpful. You need a way to filter that down to groups that you either have a list for or match a certain pattern.
The Get-ADGroup cmdlet has a few different parameters that allow you to narrow down which groups are found. One common occurrence I've always ran into is finding groups in a particular organizational unit (OU). To get all groups in a particular OU, you'd want to use the SearchBase parameter. Using this parameter, you can specify a distinguished name (DN) which will narrow down groups with that DN as a parent.
For example, if I was in a domain called mylab.local and all of my groups were in a OU at the root of mylab.local, this syntax would enumerate all of those groups.
Get-AdGroup –SearchBase 'OU=Groups,DC=mylab,DC=local' –Filter *
Notice the Filter parameter as well. This is another way to find particular groups. If all of the groups you'd like to find have an attribute that matches a specific pattern you'd use the Filter parameter. There's a lot to the Filter. If you'd like to learn about all of the conditions you can apply, it has it's own about topic in the help system you can view.
Get-Help about_ActiveDirectory_Filter
Modifying Groups
Finally, once you've found the groups you can get easily pass them to Set-ADGroup to do a number of different changes.
Perhaps you'd like to change the description for each group found above.
Get-AdGroup –SearchBase 'OU=Groups,DC=mylab,DC=local' –Filter * | Set-AdGroup –Description 'Access group'
You'll notice this time I used the pipeline rather than a foreach loop. Although this method is usually slower, it's easier to read and the time difference is negligible for only a few groups.
If you'd like further examples, always be sure to check out the help for each cmdlet by running Get-Help <CmdletName> -Examples. The help provides many different examples of how to use each of the cmdlets and will gives you more ideas on how to successfully manage your AD groups with PowerShell.
About the Author
Adam Bertram is a 20-year veteran of IT. He's an automation engineer, blogger, consultant, freelance writer, Pluralsight course author and content marketing advisor to multiple technology companies. Adam also founded the popular TechSnips e-learning platform. He mainly focuses on DevOps, system management and automation technologies, as well as various cloud platforms mostly in the Microsoft space. He is a Microsoft Cloud and Datacenter Management MVP who absorbs knowledge from the IT field and explains it in an easy-to-understand fashion. Catch up on Adam's articles at adamtheautomator.com, connect on LinkedIn or follow him on Twitter at @adbertram or the TechSnips Twitter account @techsnips_io.