In-Depth
13 Steps To Move Files Off Windows Server 2003
Microsoft is set to end support for the aging server OS in July, but this migration process should ease the move.
- By John O'Neill Sr.
- 06/24/2015
Support for Microsoft Windows Server 2003 is set to end this month and if you haven't started moving your applications to a newer version of the OS, time is running out. One of the key considerations when migrating from Windows Server 2003 is the issue of transitioning existing Active Directory domain controllers to DCs running on Windows Server 2012 R2.
I explained how to do that earlier this year (you can read that article here). Once that issue is resolved, it's time to tackle one of the smaller elephants in the room: migrating Windows Server 2003 file servers, and the shares they host, to Windows Server 2012 R2.
Migrating file shares correctly isn't just a matter of cutting and pasting folders and files from one server to another. Proper migration requires preserving share permissions, NTFS access control entries, and minimizing downtime when the shares are unavailable. Microsoft provides two excellent utilities for share migration; the older File Server Migration Toolkit and the newer Windows Server Migration Tools. I'll explain both methods, beginning with the FSMT approach.
1. Download and Install the File Server Migration Toolkit (FSMT)
Logged in with administrative credentials on the destination Windows Server 2012 R2 server, download the File Server Migration Toolkit version 1.2. Microsoft offers both 32-bit and 64-bit versions of the utility, but because all Windows Server 2012 R2 installs are 64-bit, download the fsmigrate_x64.msi file. The setup wizard is a straightforward affair, but make things even simpler by installing the complete toolkit rather than going the custom route.
2. Complete the FSMT New Project Wizard
Open the Search Charm, type File Server Migration Wizard, then press Enter to run the tool. From the Welcome dialog, click the New button to create a new migration project. After the New Project Wizard opens, click the Next button.
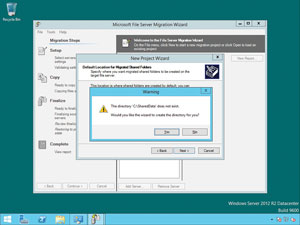
Migration projects are made up of settings, logs and report files. Choose a name for the project, set the location for storing the project files and then click the Next button. If the storage location doesn't exist, the system will prompt you to create a new folder, as shown in Figure 1. Click Yes.
 [Click on image for larger view.]
Figure 1. The system will prompt you to create a new folder if the storage location doesn't exist.
[Click on image for larger view.]
Figure 1. The system will prompt you to create a new folder if the storage location doesn't exist.
The wizard then requests Distributed File System (DFS) settings. In this example, a DFS server isn't deployed in the domain. Clear the Use the following DFS root server checkbox, leave the Server textbox blank and click Next.
The wizard asks for a default location to create migrated shared folders. Keep everything nice and clean, avoiding future problems, by selecting an empty folder. As usual, a Browse button is available and non-existent folders are created automatically. Click Next.
Click Finish to complete the wizard. The new migration project is created and opened.
3. Select Shares to Migrate
From the FSMT main project window, find and click the Add Server button located near the bottom, center of the screen.
When prompted, enter the fully qualified domain name of the source server. In this example the old Windows Server 2003 file server's name is w2k3fs1.redmonddemo.com. Click OK.
At this point, the source server is added to the project and displayed in the main project window. Click the plus sign (+) next to the server name. A list of shares available for transfer from the source server displays. By default, all available shares are selected for migration. Perfect for this scenario because the ultimate goal is complete decommissioning of the old Windows Server 2003 file server.
Notice the migration options to stop sharing source folders, copy security settings, and resolve invalid security descriptors. All are selected by default and should remain selected for most scenarios.
Tip: By default after the FSMT completes, there's one small wrinkle. The share names are concatenated with the original server FQDN. For example, PublicShares becomes PublicShares_w2k3fs1.redmonddemo.com. This isn't optimal for permanent use when the goal is migration. After all, migrate typically means move, not change! Luckily, this is an easy problem to fix.
4. Change Project XML to Disable Concatenating Old Server Name onto Share Name
Click File, then click Close. When prompted to confirm, click Yes.
Open File Explorer. Navigate to the directory selected earlier for storing the migration project files. In this example, the directory is C:\FileServerMigration\RedmondMigration1.
Right-click the project XML file, then click Edit. The XML file opens in Notepad, looking a bit intimidating.
Click Edit, then click Find. The search string to find is <TargetShare>ShareName_SourceServerName</TargetShare>,
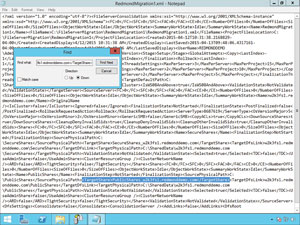
where ShareName_SourceServerName are unique to each share and server being migrated. In this example, two shares are being migrated from one server. The first entry to find is <TargetShare>PublicShares_w2k3fs1.redmonddemo.com</TargetShare>
. Enter this in the Find what textbox then click Find Next. Notepad quickly finds, and highlights, the specified text, as shown in Figure 2. Click Cancel on the Find dialogbox.
 [Click on image for larger view.]
Figure 2. Using Notebook to disable concatenating old server name onto share name.
[Click on image for larger view.]
Figure 2. Using Notebook to disable concatenating old server name onto share name.
Remove the _SourceServerName from the found text, leaving just the share name. In this example, <TargetShare>PublicShares_w2k3fs1.redmonddemo.com</TargetShare>becomes <TagetShare>PublicShares</TargetShare>.
Complete the find-and-edit process for each unique share and server combination. This example has another share from the same Windows 2003 Server, so I'll find "<TargetShare>SecureShares_w2k3fs1.redmonddemo.com</TargetShare">and modify it to "<TargetShare>SecureShares</TargetShare>."
Note, the find direction may have to be changed from Down to Up in order to find the text. If at first you don't succeed, try and try again!
Click File, then click Save. Click File again, then click Exit.
Close File Explorer and return to the FSMT project window. Click File, then click Open. Browse to the location of the FSMT project files, click the project XML file, and then click Open. The project opens, appearing just as before. Don't worry, thanks to the XML editing just completed, the migrated file shares won't have the concatenated name.
5. Migrate!
Click the Continue button near the bottom of the window. A quick validation of the selected server, shares and settings will ensure everything is ready to go. Click Continue again to perform the initial shares copy from the old server to the new. Click Continue a third and final time to finalize the migration. Click Yes to confirm, understanding this is the point of no return. At this stage the old shares are disabled and the new shares enabled!
6. Review Migration Report
When completed successfully, the FSMT prompts that everything went well. Click OK.
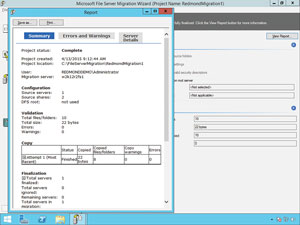
Click the View Report button in the upper right corner for the main project window. A report displays details about the migration process. Everything from the number of files copied to any errors encountered are available (see Figure 3). Review the report, then use the Save as button to save a copy. The report may come in handy later. If nothing else, it provides excellent audit trail documentation.
 [Click on image for larger view.]
Figure 3. The File Server Migration Toolkit migration report.
[Click on image for larger view.]
Figure 3. The File Server Migration Toolkit migration report.
When done with the report, click the X in the upper-right corner of the report window to close it out.
Click File, then click Exit to close the FSMT.
7. Verify Migration Success
The shares are now available from the new server complete with their original access rights and permissions! Open up File Explorer, browse to the new server and confirm that indeed the new shares are present.
The old server maintains a copy of the original data, but the shares are no longer present.
Windows Server 2012 R2 includes robust migration tools right out of the box. As opposed to the FSMT, these Window Server Migration Tools don't require a separate Internet download. These tools rely on Windows PowerShell cmdlets, forgoing the GUI utilized by the FSMT.
8. Install the Windows Server Migration Tools (WSMT) and Prerequisites on the New Server
Tip: Temporarily disable Windows Firewall on both the old server and the new. Reenable once migration completes. This ensures important network communications aren't blocked. At minimum, enable traffic to and from UDP port 7000 because it's used by the Send-SmigServerData and Receive-SmigServerData cmdlets.
Log into the destination Windows Server 2012 R2 file server using an account with domain admin privileges. Run Server Manager, click Manage, and then click Add Roles and Features.
The Add Roles and Features Wizard launches to the Before You Begin screen. Click Next.
Click the radio button for Role-based or feature-based installation, then click Next.
Click the server name in the Server Pool list. Click Next.
On the Server Roles screen simply click Next.
On the Features screen scroll through down to find Windows PowerShell. Expand the Windows PowerShell category to display all sub-features. If not already selected, click both Windows PowerShell 4.0 and Windows PowerShell ISE so that these required features install as part of the feature installation process.
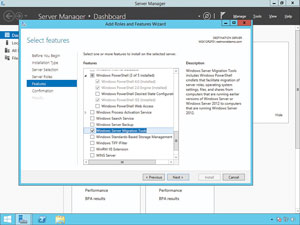
Find Windows Server Migration Tools in the Features list, then click its checkbox to select it for installation (see Figure 4). Click Next.
 [Click on image for larger view.]
Figure 4. Selecting the Windows Server Migration Tools feature for installation.
[Click on image for larger view.]
Figure 4. Selecting the Windows Server Migration Tools feature for installation.
Installation may require rebooting the server. If desired, select the checkbox to Restart the destination server automatically if required. If rebooting the server demands scheduling and coordination with users, clear the checkbox.
Click Install and the wizard goes to work!
Click Close. Exit Server Manager.
9. Generate Deployment Tools for the Old Server
Of course, Windows Server 2003 doesn't include the WMST because they weren't developed until well after the release of Windows Server 2003. Preparing the Windows PowerShell cmdlets for the old server involves generating them on the Windows Server 2012 R2 server and then transferring them to the Windows Server 2003.
Open an elevated Windows PowerShell prompt on Windows Server 2012 R2.
Change to the WSMT folder by typing cd $Env:WinDir\System32\ServerMigrationTools\ and then pressing Enter.
Use the SmigDeploy.exe utility to create the necessary deployment tools folder. The command syntax is SmigDeploy.exe /package /architecture <source server architecture> /os <source server OS> /path <deployment folder path>. The <source server architecture>is replaced by either X86 or amd64, depending on if the Windows Server 2003 is running a 32-bit or 64-bit version of Windows. The <source server OS> is replaced by WS03, and <deployment folder path> is either a local folder on Windows Server 2012 R2 or a network path that Windows Server 2012 R2 can access. If a local folder is used, it can be shared later so the Windows Server 2003 can copy the files. Alternatively, a USB flash drive is an option for transferring files via the old SneakerNet approach.
For this example, type .\SmigDeploy.exe /package /architecture amd64 /os WS03 /path C:\DeploymentTools and then press Enter.
The SmigDeploy.exe utility will create a subfolder under the <deployment folder path> using the convention smt_<source server OS>_<source server architecture>. In this example, the folder created is C:\DeploymentTools\SMT_ws03_amd64\.
10. Install, Register and Run the Deployment Tools on Windows Server 2003
Log on to Windows Server 2003 using an account with domain admin privileges.
Copy the deployment tools folder just created on Windows Server 2012 R2 to the Windows Server 2003 file server. The folder name on Windows Server 2003 doesn't matter, but it's critical to ensure the architecture and OS of the tools match the Windows Server 2003. Don't accidently copy deployment tools created for 64-bit Windows Server 2008 R2 onto a 32-bit Windows Server 2003. The results later aren't exactly pretty.
Once copying the deployment tools completes, verify that the Windows Server 2003 has the Microsoft .NET Framework 2.0 and Windows PowerShell 1.0 or later installed. These are prerequisites that must be present before running the deployment tools.
Open a Command Prompt. Switch to the deployment tools folder created during the copy operation and then run SmigDeploy.exe.
When SmigDeploy.exe runs on the Windows Server 2003, it registers the WSMT cmdlets and then opens a new Windows PowerShell window ready to run them. Although they may appear similar, don't confuse this new Windows PowerShell window with the Command Prompt opened earlier.
In the newly opened Windows PowerShell window type .\ServerMigration.psc1 and then press Enter. Yet another Windows PowerShell window will open.
11. Use the Receive-SmigServerData Cmdlet on the New Server
Leave everything running on Windows Server 2003 and go back to Windows Server 2012 R2. This server should still be logged on and running an elevated Windows PowerShell window.
In the Windows PowerShell window type Add-PSSnapin Microsoft.Windows.ServerManager.Migration and then press Enter.
Type Receive-SmigServerData and then press Enter. The cmdlet will prompt for a password. Enter any password desired, but don't forget it. The password will be required later in the migration process.
12. Run the Send-SmigServerData Cmdlet on the Old Server
Leaving everything running on Windows Server 2012 R2, go back to the Windows Server 2003 file server. The server should still be logged on with a Windows PowerShell window open and ready to run the deployment tools cmdlets.
The Send-SmigServerData cmdlet syntax is Send-SmigServerData -ComputerName "<Windows Server 2012 R2 server name>" -DestinationPath "<migration data path on new server>" -Include All -SourcePath "<path of share to migrate on old server>" –Recurse. Before running the cmdlet, verify <migration data path on new server> exists. Run the cmdlet once for each share being migrated.
For this example, two shares are being migrated. Migrate the first share by typing Send-SmigServerData –ComputerName "W2K12R2FS1.redmonddemo.com" –DestinationPath "C:\PublicShares" –Include All –SourcePath "C:\PublicShares" –Recurse and then press Enter.
Important: when prompted for a password, enter the exact same password specified when running the Receive-SmigServerData cmdlet on Windows Server 2012 R2.
The cmdlets will establish an encrypted connection and then copy the data. Results will display in the Windows PowerShell window. When complete, both cmdlets will terminate.
On the Windows Server 2012 R2 server, in the same Windows PowerShell window used previously, type Receive-SmigServerData and then press Enter. The cmdlet will prompt for a password. Enter any password desired, but once again, don't forget it.
On the Windows Server 2003 file server migrate the second share by typing Send-SmigServerData –ComputerName "W2K12R2FS1.redmonddemo.com" –DestinationPath "C:\SecureShares" –Include All –SourcePath "C:\SecureShares" –Recurse in the same Windows PowerShell window as before. Press Enter. When prompted, enter the same password used when starting the Receive-SmigServerData cmdlet on the Windows Server 2012 R2 server.
13. Remove Migrated Shares from Windows Server 2003
The shares, and their data, have successfully migrated and are available on the network from the Windows Server 2012 R2 server. However, the tool didn't disable the original shares on the Windows Server 2003, which can cause confusion. Easily disable the shares using Windows Explorer on the Windows Server 2003.
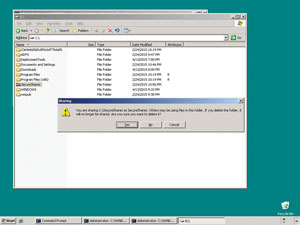
Open Windows Explorer. Navigate to the share's folder, right-click the folder name, and click Delete.
Click Yes to confirm deleting the folder.
Click Yes to confirm that deleting the folder will also, obviously, delete the share, as shown in Figure 5.
 [Click on image for larger view.]
Figure 5. Deleting the original share from Windows Server 2003.
[Click on image for larger view.]
Figure 5. Deleting the original share from Windows Server 2003.
Repeat for each share migrated from Windows Server 2003 to Windows Server 2012 R2.
That's it! The shares no longer run on the soon-to-be-unsupported Windows Server 2003. Instead, they run on a fully supported Windows Server 2012 R2 box, leaving the Windows Server 2003 box one step closer to decommissioning.
Both the File Server Migration Toolkit and the Windows Server Migration Tools from Microsoft provide straightforward, supported and -- best of all -- free mechanisms to move network file shares from Windows Server 2003 to Windows Server 2012 R2. If Windows Server 2003 file servers still exist on your network, don't wait! Pick a tool and have some fun. Until next time, see you in the trenches!