Windows Server How-To
How To Deploy Microsoft IP Address Management Server
While the process to get up and running may not be the most intuitive, its worth the effort to take advantage of Microsoft's IPAM.
One of the more useful features included in Windows Server 2012 and 2012 R2 is the IP Address Management Server, or IPAM. Although Microsoft IPAM doesn't provide as comprehensive of functionality as some of the third-party IPAM solutions, it is included with the Windows operating system (which means that you already have it) and it is vastly superior to tracking IP addresses on a spreadsheet. In this post I will show you how to get Microsoft IPAM up and running.
For the purposes of this article, I am going to be deploying IPAM on a server running Windows Server 2012 R2. The most important thing to know prior to deploying IPAM is that IPAM will not work correctly on a domain controller. It has to be installed on a member server.
Begin the installation process by opening the Server Manager and selecting the Add Roles and Features command from the Manage menu. This will cause Windows to launch the Add Roles and Features Wizard. Click Next to bypass the wizard's Welcome page and you will be taken to the Installation Type page. Select the Role Based or Feature Based Installation option and click Next. You should now arrive at the Server Selection page. Make sure that the correct server is selected and click Next.
At this point you will be taken to the wizard's Server Roles page. You don't have to do anything here besides clicking Next. Upon arrival at the wizard's Features page, you will need to select the IP Address Management (IPAM) Server feature, as shown in Figure 1. Upon doing so, you will likely see a prompt telling you that other features need to be added. If this happens then click the Add Features button. When the installation completes, click Close.
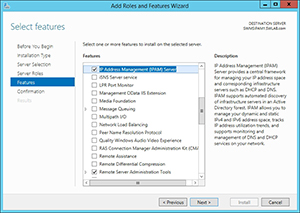 [Click on image for larger view.] Figure 1. Select the IP Address Management (IPAM) Server feature.
Click Next and you will be taken to the wizard's Confirmation page. Take a moment to verify that the correct features are about to be installed and then click the Install button.
After the IPAM feature has been installed, you will need to configure it to monitor your DNS and DHCP servers. It is worth noting that Microsoft IPAM cannot cross forest boundaries. It is only able to monitor Microsoft DNS and DHCP servers within its own Active Directory forest.
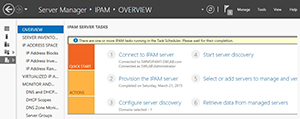
To begin the configuration process, open Sever Manager and select the IPAM option from the dashboard. This will cause Windows to display the IPAM overview screen. As you can see in Figure 2, there are six IPAM Server tasks that need to be completed.
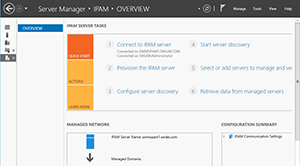 [Click on image for larger view.] Figure 2. There are six IPAM tasks that need to be completed.
The first of these tasks is to connect to an IPAM server. If you click the Connect to IPAM Server link, Windows will display a listing for your newly installed IPAM server. Select this server and click OK.
The second task is to provision the IPAM server. Click on the Provision the IPAM server link to launch the Provision IPAM wizard. This wizard is relatively self-explanatory and walks you through database connectivity and selecting a provisioning method.
The third step in the process is to configure server discovery. Clicking the Configure Server Discovery link causes the Configure Server Discovery dialog box to be displayed. As you can see in Figure 3, you will need to select a domain within which to perform discovery. You can also choose which roles to discover. By default, domain controllers, DNS servers and DHCP servers are selected.
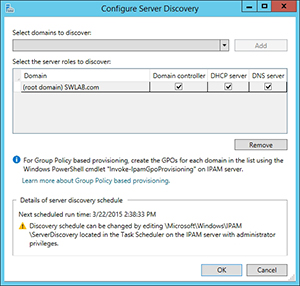 [Click on image for larger view.] Figure 3. You must choose which domains to include in the discovery process.
The fourth step in the configuration process is to initiate the discovery. You can do this by clicking on the Start Server Discovery link. Depending on the size of your network the discovery process can take a while to complete and IPAM displays a message telling you that you will need to wait for the discovery to complete, as shown in Figure 4.
 [Click on image for larger view.] Figure 4. The discovery process can take a while.
When the discovery process completes, you can move on to the fifth step which is to select or add servers to manage. Click the Select or Add Servers to Manage and Verify IPAM Access link and Windows will display a list of the servers that have been discovered.
 [Click on image for larger view.] Figure 5. These are the servers that have been discovered.
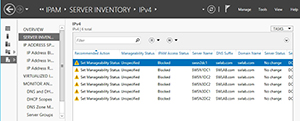
As you can see in Figure 5 above, the IPAM access is blocked. This can happen if Active Directory synchronization has not yet occurred. If you wait for Active Directory synchronization to occur, you refresh the server access status, and access is still blocked then you may need to use PowerShell to invoke IPAM. The command for doing so is:
Invoke-IPAMGPOProvisioning –Domain <your domain> -GPOPrefixName <your GPO prefix name> -IPAMServerFQDN <your IPAM server's fully qualified domain name> -DelegatedGPOUser <the name of a delegated user>
The other thing that you will notice is that the manageability status is currently unspecified. You will need to right click on each server and select the Edit Server command from the shortcut menu. When Windows displays the Add or Edit Server dialog box, set the Manageability Status to Managed, as shown in Figure 6.
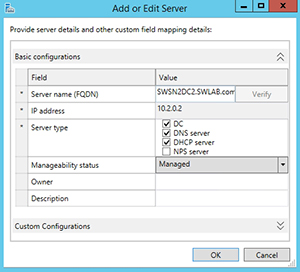 [Click on image for larger view.] Figure 6. Set the Manageability Status to Managed.
The last step in the process is to retrieve data. Simply click on the Retrieve Data From Managed Servers link and Windows will begin the data collection process. Once again, this process can take some time to complete depending on the size of your network. When the data collection completes, you should be able to browse your IP address information. For instance, Figure 7 shows the available IP address blocks on my network.
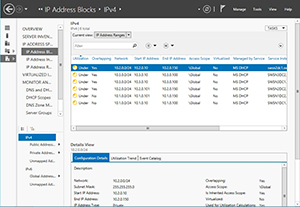 [Click on image for larger view.] Figure 7. IPAM displays IP address information for your network.
Admittedly, IPAM can sometimes be a little bit tough to set up. Once it is up and running however, it generally does a good job.
About the Author
Brien Posey is a 22-time Microsoft MVP with decades of IT experience. As a freelance writer, Posey has written thousands of articles and contributed to several dozen books on a wide variety of IT topics. Prior to going freelance, Posey was a CIO for a national chain of hospitals and health care facilities. He has also served as a network administrator for some of the country's largest insurance companies and for the Department of Defense at Fort Knox. In addition to his continued work in IT, Posey has spent the last several years actively training as a commercial scientist-astronaut candidate in preparation to fly on a mission to study polar mesospheric clouds from space. You can follow his spaceflight training on his Web site.