Spike on SharePoint
Creating Service Application Group Memberships
Get the job done quickly with both SharePoint and PowerShell.
- By Spike Xavier
- 02/17/2015
I love PowerShell. It is fun to write and it is an amazing language. When working with SharePoint 2010 or 2013 in the Administrator role it makes one's job exponentially easier and allows greater flexibility in Architecture choices due to its speed and efficiency. When given a choice between the GUI and PowerShell, I will generally use PowerShell. Except when I need to create new Service Application Proxy Groups and add existing Windows Service Applications to those groups (to be perfectly honest, I normally use Central Administration to add SPWebApplications as well). In this entry I will demonstrate a quick and easy way to do this using a combination of the GUI and PowerShell.
In production scenarios where the environment is entirely scripted this is not going to be an option, unless in the documentation it clearly includes the step of adding existing Service Applications to the Service Application Proxy Groups.
In this scenario there are three distinct needs for specific Managed Metadata Service Applications:
- The Intranet with all its Collaboration Site Collections will use the default Service Application Group.
- The Sales Group will have its own dedicated SharePoint Web Application. This will consume a Sales Service Application Proxy Group, which will have all the same Service Applications in it with the exception of the Managed Metadata Service Application (Sales will have a dedicated one that can be connected to a Sales Content Type Hub).
- The Finance Group will be exactly like the Sales group except they will have a Finance Managed Metadata Service Application.
To test this all out in my development environment, I have three SharePoint Web Applications all listening on port 80 so I'm using the following host headers:
http://sharepoint.local
http://sales.sharepoint.local
http://finance.sharepoint.local
To create the new Service Application Proxy Groups, use the SharePoint 2013 Management Shell. This is the only way I am aware that you can create new Service Application Groups (other than default).
Once you have the new Service Application proxy groups (Sales, Finance), go into Central Administration and configure the Service Applications that each group will use. This is much easier and faster than associating the Service Applications and their proxy's or connections through PowerShell in most cases.
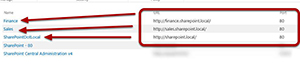
This is a shot of Central Administration Showing the SharePoint Web Applications:
 [Click on image for larger view.]
Each of these SPWebApplications will need their own Service Application Proxy Group. SharPointDotLocal (http://sharepoint.local) already uses default so that will stay the same.
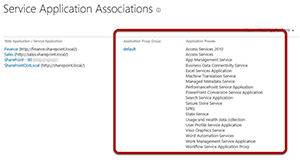
This is a shot of the default Service Application Proxy Group and its members:
 [Click on image for larger view.]
At the present time they are all using the same Service Application Proxy group called default. Here you can see all of the Service Applications that are members of this group, it's quite a few.
Here's a screen grab of the Service Application Management Page in Central Administration:
 [Click on image for larger view.]
Of particular note are the two Managed Metadata Service Applications I created but did not add to the default group: one for Sales and one for Finance. As you can see there is also one that IS in the default group simply called Managed Metadata Service.
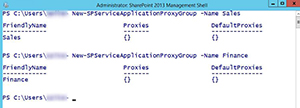
Next, create the Sales and Finance Service Application Proxy Groups in the SharePoint 2013 Management Shell:
 [Click on image for larger view.]
Use the commandlet New-SPServiceApplicationProxyGroup and include the -Name parameter, one for Sales and one for Finance. As you can see by the following image, they are empty and have not actual proxies in them. If I wanted to I would begin writing the PowerShell to add each Service Application to the group (or its proxy / connection) but I am going to do it an easier way.
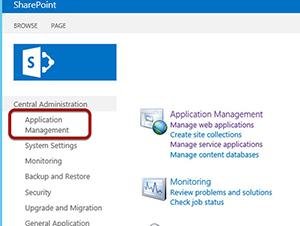
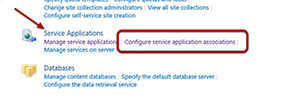
The next step is to go back to Central Administration and click the Application Management Link in the Quick Launch:
 [Click on image for larger view.]
I click the Configure service application associations link in the Service Application Section:
 [Click on image for larger view.]
Then, click the Finance link:
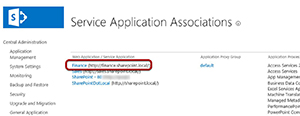 [Click on image for larger view.]
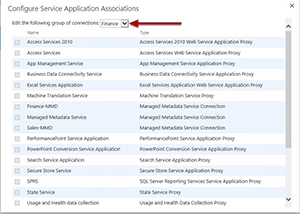
This will allow me to choose which Service Application Proxy Group to associate with
the Finance Web Application. Follow this by changing the group from default to Finance with the drop down menu:
 [Click on image for larger view.]
As you can see there are still no actual Service Applications associated with the Finance Service Application Proxy Group, but that's OK for now. I scroll down and click OK. Do the same thing for the Sales Web Application:
 [Click on image for larger view.]
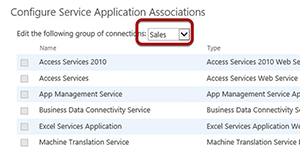
Click on the Sales Web Application link just like I did for the Finance Web Application and set the Service Application Proxy Group to Sales:
 [Click on image for larger view.]
As you can see there are currently no Service Applications associated with the Sales Service Application Proxy Group (as indicated by the lack of any checked boxes). I now click on Sales in the Service Application Associations page:
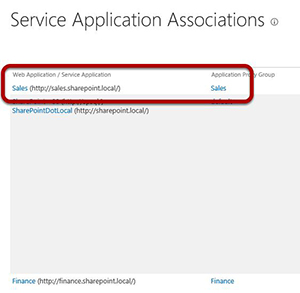 [Click on image for larger view.]
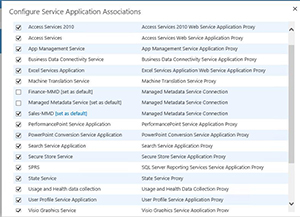
Now I can easily add any Service Applications I want to the Sales Service Application Proxy Group by checking the boxes:
 [Click on image for larger view.]
I check them all except for the Finance-MMD and the Managed Metadata Service Application that is in the default group. This is much easier than all the PowerShell I would have had to write to do this, especially with all of these Service Applications. I click OK at the bottom and do the same thing for Finance by clicking the Finance link:
 [Click on image for larger view.]
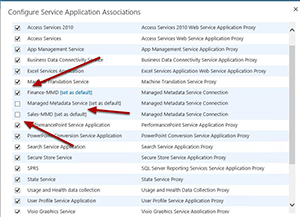
Next, add all the Service Applications except for the Sales-MMD and the Managed Metadata Service Application used in the default group:
 [Click on image for larger view.]
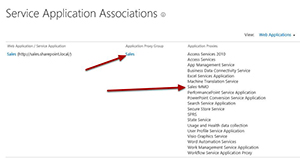
The Service Application Associations page now shows the Service Applications associated with Sales:
 [Click on image for larger view.]
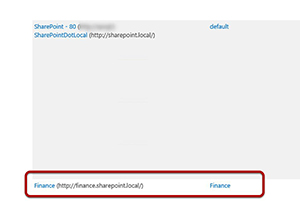
The Sales Service Application Proxy Group has the Sales-MMD Service Application in it, as well as Finance:
 [Click on image for larger view.]
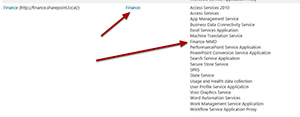
The Finance Service Application Proxy Group has the Finance-MMD in it.
The Service Application Architecture introduced in SharePoint 2010 and carried into SharePoint 2013 allows for tremendous flexibility in architecture. The SharePoint 2010 and 2013 Management Shell and all the supported Commandlets allow for fast and powerful implementations. In most cases I choose to utilize it, but every once in a while as in this situation I find it easier to combine the GUI of Central Administration with the fun and speed of PowerShell. Enjoy!
About the Author
Spike is a full-time trainer and consultant with Transmission I.T. He began his career in computers in the early 1980s with Fortran IV. Sometime in 2007, he found SharePoint and has been working with it ever since. His interests are SharePoint, HTML 5, JavaScript and ASP.NET. He was the head of the Arizona SharePoint Pros user group for the last few years and speaks at conferences and user groups.