In-Depth
System Center 2012 R2: Manage VMware VMs and Hyper-V Together
You can administer both virtualization platforms through a single pane of glass using Microsoft System Center 2012 R2.
Until recently, when it came to complex datacenter virtualization tasks, most enterprises have turned to VMware Inc. tools. Lately, though, many have questioned whether Hyper-V is a viable alternative to VMware. This is especially true because Hyper-V is included in Windows Server. Hyper-V has become appreciably more competitive with VMware, whose licensing costs are generally more expensive.
Now that Hyper-V has matured and matches or exceeds most of the capabilities of VMware, many are taking a second look at it. This naturally raises the question of how to transition between the two environments. In most cases, you may want to consider using Hyper-V in new deployments, instead of discarding existing VMware-based systems.
The recent release of System Center 2012 R2 Virtual Machine Manager (VMM) lets you manage VMware and Hyper-V through a single pane of glass. You can also use VMM to migrate virtual machines (VMs) from VMware to Hyper-V.
The Setup
For this evaluation, I deployed a VMware vSphere 5.5 server. That server is hosting two VMs called VMware-VM1 and VMware-VM2. Both VMs are running Windows Server 2012 R2 as a guest OS and have the VMware tools installed.
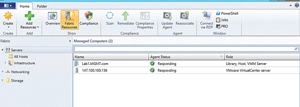
A second server is running VMware vCenter Server. VMM can't manage VMware VMs unless it's connected to vCenter. A third server is running Windows Server 2012 R2 and System Center 2012 R2 Virtual Machine Manager. That server is doubling as a Hyper-V host.
Microsoft recommended best practices state you should run Hyper-V on a dedicated machine. As such, you should never run System Center and Hyper-V on the same physical box unless System Center is running within a VM. However, because this is a lab deployment and I have limited hardware, I installed Hyper-V and System Center on the same server out of necessity.
The Hyper-V server I'm using contains two VMs, each running Windows Server 2012 R2. The VMs are named HyperV-VM1 and HyperV-VM2. I chose this particular naming convention so it would be easy to distinguish between the VMs that started out running on VMware and those that ran on Hyper-V from the beginning.
Adding a Hyper-V Host
There are two things I want to accomplish. The first is to manage Hyper-V and VMware through a single pane of glass. The second is to migrate the VMware VMs off vSphere and onto Hyper-V. Because the first goal is to manage both environments through a single pane of glass, you need to make VMM aware of the Hyper-V environment.
Open the VMM Administrator Console and select the VMs and Services workspace. Next, right-click the All Hosts container and select the Add Hyper-V Hosts and Clusters command from the shortcut menu (see Figure 1).
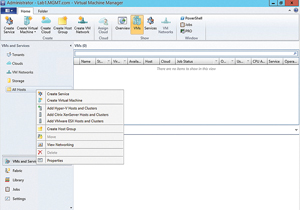 [Click on image for larger view.]
Figure 1. Choose the Add Hyper-V Hosts and Clusters command.
[Click on image for larger view.]
Figure 1. Choose the Add Hyper-V Hosts and Clusters command.
At this point, VMM will launch the Add Resource Wizard. You'll need to answer the wizard's prompts in a manner that's appropriate for your own organization. Generally, adding a Hyper-V host is simply a matter of specifying the host's name, location and a user account with administrative host access. You would typically do this using a Run As account.
Once you've added the Hyper-V host to VMM, you might need to right-click on the host and choose the Refresh Virtual Machines command from the shortcut menu before the Hyper-V VMs show up in the VMM Administrator Console.
Create a Run As Account
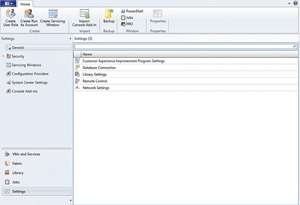
VMM will need a Run As account to facilitate communications with the hosts it will manage. To create a Run As account, go to the Settings workspace and click on the Create Run As Account option found on the toolbar (see Figure 2). When prompted, enter a name and credentials for the Run As account. The Run As account you specify must be an existing Active Directory or local user account.
 [Click on image for larger view.]
Figure 2. Click on the Create Run As Account icon.System Center 2012 R2 Virtual Machine Manager lets you manage VMware and Hyper-V through a single pane of glass.
[Click on image for larger view.]
Figure 2. Click on the Create Run As Account icon.System Center 2012 R2 Virtual Machine Manager lets you manage VMware and Hyper-V through a single pane of glass.
It's extremely important to enable Active Directory authentication for vCenter and to add the Run As account to the vCenter environment with administrative permissions. Otherwise, you won't be able to add the vCenter Server to VMM. To add Microsoft Active Directory delegation to vCenter, open the vSphere Web Client and log in as [email protected]. Next, click on the administration tab. Then click on Single Sign On | Configuration.
When you reach the Configuration screen, click on the green plus sign to add an identity source. Upon doing so, the Web client will display the Add Identity Source dialog box. Choose the Active Directory (Integrated Windows Authentication) option and specify the Windows domain name in the provided field. If vCenter is running on a Windows Server that has been domain joined, then the domain name will be picked up automatically. Click OK to add the domain to the Identity Sources list.
Now, go back to the VMM Administrator Console Home screen and click on the vCenter tab. Then click on vCenter Servers. Select your vCenter server and click on the Manage tab. Then select the Permissions category. Click on the green plus sign to access the Add Permission dialog box.
Click on the Add button, then select your Run As account. If the Run As account isn't listed, then make sure you've selected the correct domain (Windows domains aren't displayed by default). Now, select your Run As account and click Add followed by OK.
You should now see the Run As account listed on the Add Permissions dialog box. Use the Assign Role drop down list to grant the Run As account Administrator permissions. Click OK to complete the process.
Adding a vCenter Server to VMM
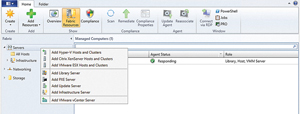
If you want to add a vCenter Server to VMM, open the VMM Administrator Console Fabric workspace. Next, right-click on the Servers container and select the Add VMware vCenter Server option from the shortcut menu (see Figure 3).
 [Click on image for larger view.]
Figure 3. Right-click on the Servers container and select the Add VMware vCenter Server option.
[Click on image for larger view.]
Figure 3. Right-click on the Servers container and select the Add VMware vCenter Server option.
At this point, VMM will display the Add VMware vCenter Server dialog box. Enter the name or IP address of your vCenter Server. Then click Browse and select your Run As account. Click OK to continue.
After clicking OK, you might see an Import Certificate dialog box. If this dialog box is displayed, click the Import button. After doing so, the vCenter Server will be added to VMM (see Figure 4).
 [Click on image for larger view.]
Figure 4. The vCenter Server is added to VMM.Once you've connected VMM to your vCenter Server, you can begin specifying individual hosts or host clusters for management.
[Click on image for larger view.]
Figure 4. The vCenter Server is added to VMM.Once you've connected VMM to your vCenter Server, you can begin specifying individual hosts or host clusters for management.
Adding vSphere Servers
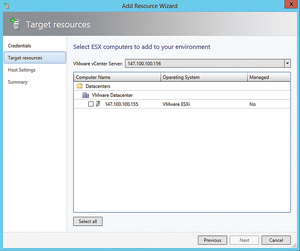
Once you've connected VMM to your vCenter Server, you can begin specifying individual hosts or host clusters for management. To do so, make sure to select the Fabric workspace. Then click on the Add Resources icon, which you'll find on the toolbar. Choose the VMware ESX Hosts and Host Clusters option from the drop down list. Unless you've properly linked VMM to vCenter, you'll receive an error message when you attempt to connect to a VMware host.
At this point, you should see the Add Resource Wizard. On the wizard's initial screen, click the Browse button and then select a Run As account. This must be the same Run As account you used when you connected VMM to vCenter. After selecting a Run As account, click Next. You should now see a listing of all of the vSphere servers about which vCenter knows (see Figure 5). Select the VMware servers you want to manage and click Next.
 [Click on image for larger view.]
Figure 5. The VMware servers will be listed.If you want to move existing VMs from VMware to Hyper-V, that's now possible with VMM.
[Click on image for larger view.]
Figure 5. The VMware servers will be listed.If you want to move existing VMs from VMware to Hyper-V, that's now possible with VMM.
The next screen will prompt you to specify the host group to which you want to add the VMware servers. Make your selection and click Next. You'll see a summary screen. Take a moment and make sure the information displayed on the summary screen appears correct. Click Finish to complete the process. When you do, the host list should contain your VMware servers.
Although your VMware host servers are listed in the VMM Administrator Console, the VMware VMs won't be listed initially. To view the VMware VMs, select the VMs and Services workspace, right-click on the VMware host and choose the Refresh Virtual Machines option from the shortcut menu.
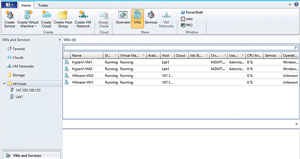
The All Hosts container (see Figure 6) now shows VMware and Hyper-V VMs. As this point, the first objective of being able to manage both environments through a single pane of glass has been achieved.
 [Click on image for larger view.]
Figure 6. VMware and Hyper-V VMs now appear in the VMM Administrator Console.
[Click on image for larger view.]
Figure 6. VMware and Hyper-V VMs now appear in the VMM Administrator Console.
Migrate VMware VMs to Hyper-V
If you want to move existing VMs from VMware to Hyper-V, that's now possible with VMM. It's important to know that System Center doesn't support converting VMware VMs stored on an IDE bus.
To convert your VMs, select the VMM Administrator Console VMs and Services workspace. Next, click on the Create Virtual Machine icon in the toolbar. Then choose the Convert Virtual Machine option from the drop down list. This will cause VMM to launch the Convert Virtual Machine Wizard.
The wizard's initial screen asks you which VM you'd like to convert. Click the Browse button to reveal the Select Virtual Machine Source dialog box. Make sure the dialog box's Virtualization Platform column is set to VMware ESX Server. Then select the VM you want to convert and click OK.
Click Next and you'll be taken to the Specify Virtual Machine Identity page. You'll have the option of renaming the VM or adding a description. After doing so, click Next. The next screen you'll see is the Virtual Machine Configuration screen. This lets you configure the number of virtual processors and the amount of memory you want to assign to the VM. Then click Next. Then you'll see the Select Host screen. Select the Hyper-V host on which you want to place the VM and click Next.
You should now see the Select Path screen. Here you can specify the path your VM storage will use. After doing so, click Next. The following screen lets you specify the network to which you want to connect the VM after migration is complete. The VM must be connected to a Hyper-V virtual switch in order to establish network connectivity. Make your selection and click Next.
The next screen you'll see is the Add Properties screen. Go ahead and make any adjustments you want to the various settings and click Next. You'll then see a summary of the options you've chosen. Take a moment to make sure the summary information is correct. After doing so, click the Create button to begin the conversion process.
Certain Limitations
As you can see, you can use System Center Virtual Machine Manager to manage VMware VMs and even to convert them to Hyper-V. However, there are limits to the management capabilities. If your ultimate goal is to use System Center 2012 R2 Orchestrator to automate your VMware environment, you should download the System Center 2012 R2 Integration Pack for VMware vSphere. This will help you overcome the various limitations and let you fully manage your VMware environment.