In-Depth
Connecting Active Directory To Windows Azure
Microsoft MVP Brien Posey outlines what it takes to extend your datacenter in Microsoft's cloud.
Editor's note: An earlier version of this article, both in the July print issue and online, erroneously described how to connect an on-premise instance of Windows Server Active Directory to Windows Azure Active Directory. It actually explains how to connect Windows Server Active Directory as a VM in the new Windows Azure Infrastructure Services.
Although it's possible to use the new Windows Azure Infrastructure Services to build a datacenter that resides completely in the cloud, it's also well-suited to acting as an extension to your on-premises datacenter (or as a secondary datacenter). However, these types of deployments require special planning, especially when it comes to utilizing Active Directory for authentication and authorization.
Microsoft has offered Windows Azure since early 2010. But the April release of Windows Azure Infrastructure Services now allows IT to use the cloud service to deploy VMs and apps designed to run on Windows Server, including SQL Server, SharePoint, and other apps and infrastructure (see the June 2013 feature, "Deploy VMs in Windows Azure," for more on Windows Azure Infrastructure Services).
If you're planning to use Windows Azure as an extension of your datacenter, it makes sense to create a hybrid Active Directory forest in which domain controllers exist on-premises and in the cloud. The reason for this is many server applications require Active Directory access, and you really don't want apps running in the cloud to have to consult an on-premises DC every time they need to perform an operation. Not only is doing so inefficient, but a WAN failure could cause an app to malfunction due to its inability to contact an on-premises DC. As such, it's important to extend your Active Directory to the cloud.
On the surface, the idea of extending your existing Active Directory forest to Windows Azure seems deceptively simple. After all, Windows Azure makes use of VMs running exactly the same Windows OSes that can be run on-premises. Besides, organizations routinely extend Active Directory forests to off-site datacenters all the time, so why should extending an Active Directory forest to a Windows Azure cloud be any different?
Creating a hybrid Active Directory by using a mixture of on-premises and cloud-based DCs is no different than building a multi-site Active Directory forest. As is the case with many things in IT, the devil is in the details.
Prerequisites to Deployment
As I guide you through the process of extending your Active Directory to the cloud, I'll presume you already have an on-premises directory in place. I'll also assume you have a basic working knowledge of Active Directory and DNS.
Just as important, your on-premises network must include an externally accessible VPN server. You should provision this VPN server with a static IP address that's publicly accessible. It requires a VPN in order to establish connectivity between the servers that are hosted on Windows Azure and your on-premises servers.
Throughout the course of my deployment evaluation, I established a virtual network on Windows Azure, but this virtual network wasn't externally accessible. The easiest way to establish connectivity between the on-premises network and the Windows Azure virtual network is to make use of your on-premises VPN.
Set up a Hybrid Active Directory
The first step in the process is to open the Active Directory Sites and Services tool and create a new cloud site. To do so, right-click on the Sites container and choose the New Site command from the shortcut menu. When the New Object - Site dialog box appears, enter "Azure" as the site name, select the DEFAULTIPSITELINK and click OK (see Figure 1). Upon doing so, you should see a message indicating the new site has been created. Click OK to clear this message.
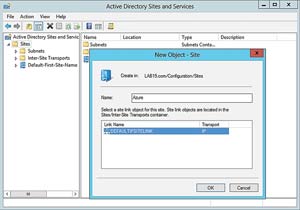 [Click on image for larger view.] Figure 1. Enter "Azure" as the name of the new site.
Build a replica DC on a VM running on top of Windows Azure. Set this up with the presumption that Windows Server is already installed on the replica DC and the replica DC has been assigned an IPv4 address. Make note of the address that you're using for your replica DC.
Go back to the on-premises DC and, from within the Active Directory Sites and Services console, right-click on the Subnets folder and choose the New Subnet command from the resulting shortcut menu. When the New-Object Subnet dialog box appears, enter the subnet in the Prefix dialog box. The prefix must be entered in Classless Inter-Domain Routing (CIDR) notation (for example, 157.54.208.0/20). Select the Azure site object before clicking OK.
So far you've configured the on-premises Active Directory forest to recognize a new site, but haven't yet established communication between the two sites. Furthermore, the cloud based Active Directory components are dependent on DNS. Typically the on-premises DNS server used by Active Directory isn't externally accessible. This is a problem because the replica DC hosted on Windows Azure will need access to the on-premises DNS.
The first step in making the server externally accessible is to register the on-premises Active Directory-integrated DNS server with Azure. This allows you to associate the DNS server with the Windows Azure virtual network. To accomplish this, you can open the Windows Azure Management Portal and click on the Networks link found in the navigation pane. Then click the New button and select the Networks | Virtual Network | Register DNS Server options (see Figure 2). Enter the name of your on-premises DNS server into the name field and then enter the DNS server's IP address into the DNS Server IP Address field.
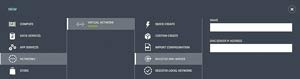 [Click on image for larger view.] Figure 2. You'll need to register your on-premises, Active Directory-integrated DNS server.
You're also going to need to register your DNS with Windows Azure. Therefore, click the New button and navigate to Networks | Virtual Network | Register DNS Server. Now, enter the name and IP address that you'll use for your cloud-based DNS server.
Establish Connectivity
Once you've registered the on-premises and the cloud-based DNS servers, the next task is to provide connectivity between the two networks. This is done by establishing site-to-site VPN connectivity between the on-premises network and the Windows Azure virtual network.
From the Windows Azure Management Portal, click on the Networks link and then click on the New button. Next, click on Networks | Virtual Network | Custom Create. Windows Azure will launch the Create a Virtual Network Wizard. Enter a name for the virtual network and then select the appropriate affinity group.
At this point, you must click the arrow icon to move to the Address Space and Subnets page. Click on the CIDR button and then use the Add Address Space button (and, optionally, the Add Subnet button) to define the address space and any required subnets for the virtual network (Azure, which you named earlier).
Click the arrow icon to move on to the next page, where you can define DNS servers and the local network. Here you must select your on-premises DNS server as the first DNS server and your cloud DNS server as the secondary DNS server. The interface doesn't explicitly list the DNS servers as primary and secondary. The only way to ensure that your on-premises DNS server is treated as the primary DNS is to select it first.
After specifying your DNS servers, select the Configure a Connection to the Local Network checkbox. Upon doing so, you must use the Gateway Subnet field to enter the gateway subnet for the on-premises network. You must enter this subnet using CIDR notation.
Click the arrow icon and you'll land on the Specify a New Local Network page. You must now enter a name, VPN device IP address, and address space for your local network. Once again, the address space must be entered in CIDR format. Once you've finished entering your address space details, click the checkmark icon.
The next step in the process is to establish the site-to-site VPN gateway. To do so, click on Networks and then click the New button. Now, click on your virtual network. This will cause the virtual network's dashboard page to display. Click the Create Gateway button and, when prompted, click on the Yes button to create a site-to-site gateway. It's worth noting that it can take Windows Azure several minutes to create the gateway, and you'll have to wait until the creation process completes before continuing.
Once you've created the gateway, you must establish site-to-site connectivity. The exact process for this can vary widely depending on the type of VPN you're using. However, Windows Azure does provide a couple of resources to help you through the process.
Windows Azure Gateway
The first of these resources is a Manage Key button located at the bottom of the screen. The Windows Azure gateway is designed to use pre-shared keys for connection authentication. Clicking the Manage Key button retrieves the managed shared key. The resulting dialog box also contains a Regenerate button that you can use to create a new key.
The toolbar at the bottom of the screen also contains a Download button (see Figure 3). When you click the Download button, you're directed to the Download a VPN Device Config Script page (see Figure 4). Microsoft has provided configuration scripts for a number of different VPN devices. You can select your VPN vendor, platform, and OS and then download a script that's designed to automate the configuration process.
 [Click on image for larger view.] Figure 3. The toolbar at the bottom of the screen contains a Manage Key and a Download button, both of which are useful during the configuration process.
  [Click on image for larger view.] Figure 4. You can download a VPN device configuration script from Windows Azure.
Build a Domain Replica
Once you've established the necessary site-to-site VPN connectivity, the last step in the process is simply to build a replica DC on a Windows Azure-hosted virtual server. This process is really no different from that of setting up any other VM, except that you'll need to make sure the VM is connected to the virtual network you created earlier.
Once the VM is up and running, you'll also need to make sure that the new virtual server has been assigned an IP address that conforms to the range used by the virtual network. If not, then you'll need to manually assign an appropriate IP address to the VM.
At this point, you should be able to verify that the newly created virtual server is able to communicate with your on-premises servers. Assuming that you're able to verify connectivity and you're able to resolve the DNS names of the on-premises servers, then you can make the new virtual server a replica DC. Doing so involves joining your on-premises domain, using Server Manager to install the Active Directory Domain Services, and then promoting the server to DC status.
Active Directory Cloud-Enabled
As you can see, the overall process of building a hybrid Active Directory deployment is relatively straightforward. The only real ambiguity in the process is in establishing site-to-site connectivity, but the downloadable VPN configuration scripts should greatly help reduce the complexity of this process.
About the Author
Brien Posey is a 22-time Microsoft MVP with decades of IT experience. As a freelance writer, Posey has written thousands of articles and contributed to several dozen books on a wide variety of IT topics. Prior to going freelance, Posey was a CIO for a national chain of hospitals and health care facilities. He has also served as a network administrator for some of the country's largest insurance companies and for the Department of Defense at Fort Knox. In addition to his continued work in IT, Posey has spent the last several years actively training as a commercial scientist-astronaut candidate in preparation to fly on a mission to study polar mesospheric clouds from space. You can follow his spaceflight training on his Web site.