In-Depth
Secure Files in Windows Server 2012 with Active Directory RMS
How to install and configure Active Directory Rights Management Services to lock down your organization's files and shares.
As locking down information becomes a more critical priority for IT organizations, securing individual files or shares is completely dependent on effectively setting up security groups. Because security is tied to the user, an individual can open a file from within the intranet or a public kiosk. This causes the infamous security group bloat from which many organizations suffer, in an attempt to get granular permissions on file shares.
Microsoft has added some nice features in the file system of Windows Server 2012 and using Active Directory Rights Management Services (AD RMS) with other features, you can apply file classification so the file carries the rights without having to apply security groups. Windows Server 2012 includes a new security wizard as well as new device permissions.
In this article, I'll examine the new security permissions wizard in Windows Server 2012. I'll also explore AD RMS, including installation and configuration.
Windows Server 2012 Security Permissions Wizard
Unlike configuring central access policies with the new Windows Server 2012 Dynamic Access Control (DAC) (see my August 2013 article, "Implement the New Windows Server 2012 DAC"), AD RMS is an additional component to more effectively secure files in Windows Server. Note that AD RMS was introduced in Windows Server 2008 and the file classification features and other components of DAC have existed for some time now. Windows Server 2012 puts them all together for an extremely granular application of permissions.
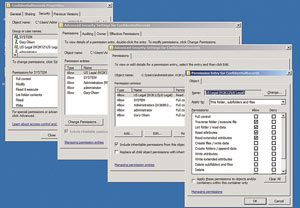
One of the new features in AD RMS is the conditional security permissions that add Boolean conditions to security principal permissions. While the options in Windows Server 2008 and Windows Server 2012 are the same -- Folder/Share Properties | Security Tab | Advanced | Add (to add a user or group) | Edit (to edit permissions on a user or group) -- the last screen on Windows Server 2012 is different. You can select the principal to edit at the top of the screen and set advanced permissions similar to Windows Server 2008 and previous versions. The big difference is the conditional statement at the bottom in Windows Server 2012 (see Figure 1).
 [Click on image for larger view.]
Figure 1. Advanced permissions in Windows Server 2008 are shown on top, while the newer advanced permissions in Windows Server 2012 are shown on bottom.
[Click on image for larger view.]
Figure 1. Advanced permissions in Windows Server 2008 are shown on top, while the newer advanced permissions in Windows Server 2012 are shown on bottom.
The conditions available depend on what you've already configured. Out of the box you can set User and Device permissions and apply them to a single user or group. One new feature, Device permissions, will permit access to a share only if the user connects from a computer in the group granted the permissions. However, I haven't been successful in getting this feature to actually work.
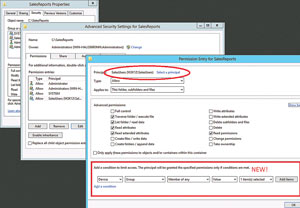
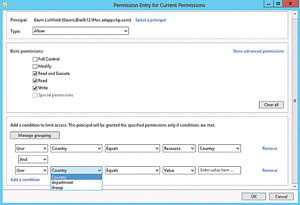
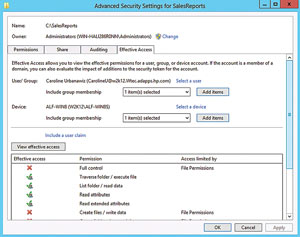
When I examined DAC, I configured it to have additional resources such as country and department to add additional filtering (see Figure 2). In addition, you can define multiple conditions for a single principal (also shown in Figure 2). The Effective Access tab is a new take on the old Effective Permissions in previous Windows Server versions. By setting a Device permission you can restrict a user to access a share only when logged in to computers in certain group. As shown in Figure 3), Caroline (the user) is being added to a group membership and the device selected is the Windows 8 PC ALF-WIN8. The Effective Access tab shows the permissions she'll be granted if logged on to ALF-WIN8, which is a member of the SalesPC group that was given the permission restriction. This makes it easy to do what-if testing for users on various machines.
 [Click on image for larger view.]
Figure 2. You can select the level of permissions granted to a user.
[Click on image for larger view.]
Figure 2. You can select the level of permissions granted to a user.
 [Click on image for larger view.]
Figure 3. You can restrict how a user can access a share.
[Click on image for larger view.]
Figure 3. You can restrict how a user can access a share.
It's important to note that these new permission features can only be set on shares, folders and files on Windows Server 2012, though the permissions will apply to all users. DAC also requires a Windows Server 2012 domain controller, though there's no requirement for a specific Domain or Forest Functional Level to be set. Again, some of these features are available in Windows Server 2008, but Windows Server 2012 is the ideal environment to put it all together.
AD RMS is an important component to secure sensitive information such as health records. Any company that handles and stores health information should be aware of the severe penalties provided in HIPAA. Obviously, other data such as personnel records and finance data including credit card information has similar requirements for protection. AD RMS can protect information produced by word processors, e-mail and other applications. Using AD RMS, users can define access to the files that remains with the data no matter where it's moved. This is a significant improvement over the old default Windows file security, and it's more flexible. Custom usage policies can be created to force compliance with company policy.
AD RMS Requirements
AD RMS requires a Windows Server 2008 or Windows Server 2012 system with the AD RMS server role installed. In addition, AD RMS requires IIS, a database such as Microsoft SQL Server and it must be run on a member of an Active Directory Domain Services forest. The AD RMS installation will install a single instance of a Microsoft SQL database if there's no SQL database available.
Note that AD RMS installation makes reference to an AD RMS cluster being required. This is not a Windows cluster as you might assume, but simply a term that refers to one or more AD RMS servers and a single-node cluster is permitted. You don't need to install this on a Windows cluster.
AD RMS Installation and Configuration
Prerequisites to installing AD RMS include:
- Domain user account to be used for AD RMS service account (no special permissions needed). In this example I used ADRMSsvc and added it to the local administrators group.
- Domain user account to be used for AD RMS installation (different from the service account). My account is ADRMSAdmin and is a member of the domain administrators group. This account must have access to the SQL database if an external database is used. (In this example AD RMS will create the database.)
- URL (FQDN) for the AD RMS cluster to be used during AD RMS installation. This URL is not the same as the computer name.
- If you're upgrading from RMS to AD RMS, see considerations noted on the TechNet Library page. For this example, the machines listed in Table 1 are used.
Machines, OSes and roles used for deploying Active Directory Rights Management Services
| Computer Name |
OS |
Role |
| W2k12-DC1 |
Windows Server 2012 |
Domain controller |
| Win2012Svr1 |
Windows Server 2012 |
AD RMS server, DB host |
| Alf-Win8 |
Windows 8 client |
client |
|
AD RMS was available for Windows Server 2008, but the setup is much improved in Windows Server 2012. Therefore, this example is based on using Windows Server 2012.
Install AD RMS Role
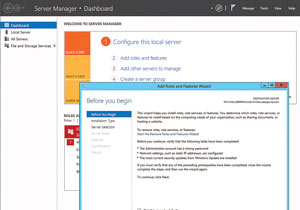
The Windows Server 2012 Server Manager is a bit different than the one in Windows Server 2008 (see Figure 4). Choose Add roles and features from the Dashboard or from the Tools dropdown menu.
 [Click on image for larger view.]
Figure 4. The Windows Server 2012 Server Manager wizard enables you to create or add server roles.
[Click on image for larger view.]
Figure 4. The Windows Server 2012 Server Manager wizard enables you to create or add server roles.
- Skip past the intro screen and select Role-based or feature based installation.
- Select Destination Server (select the VHD or server to which you want to install).
- Select Server Roles | Select Active Directory Rights Management. This will pop up a list of prerequisite services to install (.NET 4.5, IIS and so on). Click the Add Features button, then click Next.
- Select Features | Select Windows Internal Database. Click Next.
- Web Server Role (information only). Click Next.
- Role Services (AD RMS is selected) Click Next.
- Confirmation (click Install). No need to check the box to restart the server automatically as AD RMS does not require a reboot for installation or removal.
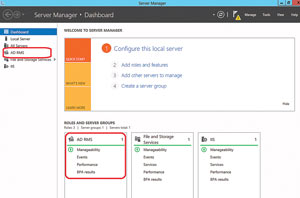
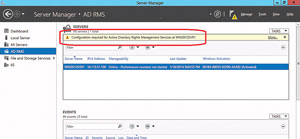
Following the installation, Server Manager will show AD RMS in the menu (see Figure 5). Once you select it, you'll notice it needs configuration (see Figure 6).
 [Click on image for larger view.]
Figure 5. The Windows Server 2012 Server Manager Menu showing AD RMS available for selection.
[Click on image for larger view.]
Figure 5. The Windows Server 2012 Server Manager Menu showing AD RMS available for selection.
 [Click on image for larger view.]
Figure 6. The Windows Server 2012 Server Manager alerting that additional configuration is needed.
[Click on image for larger view.]
Figure 6. The Windows Server 2012 Server Manager alerting that additional configuration is needed.
Configure AD RMS Role
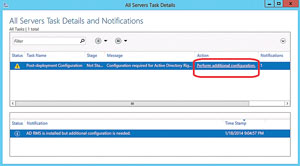
In the yellow notification box "Configuration required for Active Directory Rights Management Services at WIN2012SVR1" click More and the All Servers Task Details window will appear. Click the Perform Additional Configuration link (see Figure 7).
 [Click on image for larger view.]
Figure 7. The Windows Server 2012 Server Manager post-deployment configuration alert.
[Click on image for larger view.]
Figure 7. The Windows Server 2012 Server Manager post-deployment configuration alert.
- AD RMS Intro Page: click Next.
- Select Create or join an AD RMS Cluster. Note: There's a lot of information about the AD RMS Cluster that's beyond the scope of this article. Suffice it to say this is not a Windows Failover Cluster as you might assume, but a cluster of AD RMS servers. Initially you must create a new AD RMS root cluster for certification and licensing, then you can join others to it or create other clusters for licensing only.
- Select Create a new AD RMS root cluster. Note: In my testing I initially put AD RMS role on my Windows Server 2012 DC, but didn't configure it. Later I decided to create a server to use for AD RMS. I uninstalled AD RMS from the DC but when I installed it on the server (Win2012svr1) and tried to configure it, this step failed. The Create a new AD RMS root cluster was greyed out and an error appeared: "The SCP is registered but the root cluster cannot be contacted." Following a suggestion from the AD RMS forum, I deleted the SCP attribute from the AD RMS object, then re-ran the configuration for AD RMS and the option was available.
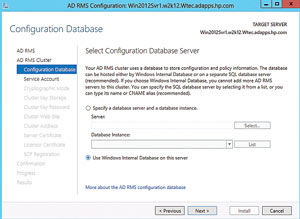
- Configuration the AD RMS Cluster Database. If you have a SQL instance, specify it here. But this is just a lab so I'm going for the easy way and selecting Use Windows Internal Database on this server. (See Figure 8). Click Next. Note: Windows Internal Database was installed as a role when the AD RMS role was installed.
 [Click on image for larger view.]
Figure 8. Configuring the database system for the AD RMS cluster.
[Click on image for larger view.]
Figure 8. Configuring the database system for the AD RMS cluster.
- Service Account. Enter the username and password of the previously created service account (I'm using ADRMSsvc), which is a member of the Administrators group. Click Next.
- Specify Cryptographic Mode. I accepted the default, Cryptographic Mode 2. Click Next.
- Cluster Key Storage. This key is used to sign certificates and licenses the cluster issues. Because this is just a lab, I used the default AD RMS centrally managed key storage. If you have a CSP in production you can opt for that. Click Next.
- Cluster Key Password. This password is used to encrypt the cluster key. This is required to join other AD RMS servers to this cluster or to restore the cluster from backup. Note: this password isn't stored in AD RMS and is unrecoverable. Keep it somewhere you can find when needed. Enter the password and confirm. Click Next.
- Cluster Web Site. Select a Web site for the virtual directory. For this exercise I just used the Default Web Site but in production you could create an original site to use. Click Next.
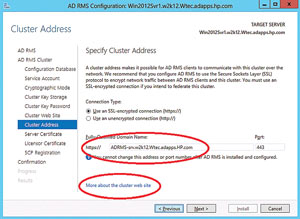
- Cluster Address. Like any cluster, you must have a cluster address to permit communication among nodes. Enter an FQDN in the box (see Figure 9) -- make it unique and easy to remember because you cannot change the FQDN or the port. My domain is W2K12.Wtec.adapps.HP.com. Click Next. Note that at the bottom of the screen on each of these dialog pages, there's a link to additional information on each step.
 [Click on image for larger view.]
Figure 9. You can specify a cluster address, which lets AD RMS clients link to the cluster.
[Click on image for larger view.]
Figure 9. You can specify a cluster address, which lets AD RMS clients link to the cluster.
- Server Certificate. For this exercise I have no certificate authority set up so I'll use the self-signed option. Click Next. Note: Do not use the self-signed certificate for production for obvious security reasons.
- Licensor Certificate. Use the default name (or change it if you want). Click Next.
- SCP Registration. As noted previously, this is an Active Directory attribute on the RMS object in Active Directory. Choose the Register the SCP now option. Note: This page states the account you're using must be a member of the Enterprise Admins (EA) domain. If your account isn't an EA account, just continue. You can go into the AD RMS console and created the SCP later.
- Confirmation. Review the answers and Click Install.
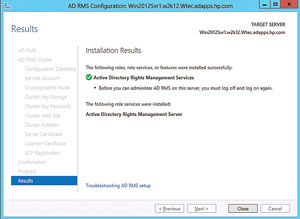
- Results. Success or failure of AD RMS configuration will be indicated here. Click Close. Note the Troubleshooting
AD RMS setup link at the bottom of the Installation Results screen (see Figure 10).
- Close the All Servers Task Details dialog. In the Server Manager, Click AD RMS. Note AD RMS is online and there are no errors.
 [Click on image for larger view.]
Figure 10. The results of the installation, success or fail, appear and enable troubleshooting if necessary.
[Click on image for larger view.]
Figure 10. The results of the installation, success or fail, appear and enable troubleshooting if necessary.
The Active Directory Rights Management Console is now available from Server Manager. Opening this console you can see an expected security alert due to the self-signed certificate that was used. Select Yes to continue and the cluster will be added.
Using AD RMS
Of course, AD RMS is just the security engine that can be used in conjunction with applications as noted previously. Each application -- Word, SharePoint, Exchange and others -- each require configuration, which is beyond the scope of this article. Permissions can be set on a Word document by a user to restrict access to users or groups.
Windows Server 2012 has vastly improved many aspects of file security and management, including advanced security permissions and improved setup of AD RMS. Dynamic Access Control ties into these two features to make significant improvements in file security and removing the old clunky method of building security groups. Security can now be set by users on the file itself without an administrator creating specialized security groups and managing access. This is done on a granular level and allows the security to follow the file. While this is generally viewed as being the future in Windows, it's quite complicated and will take some effort to understand how to apply it in any enterprise. Now is the time to see how these new features can be implemented to make your enterprise and your files more secure