In-Depth
Manage Groups with Windows Azure Active Directory Upgrade
Microsoft moves to make the cloud version of its Active Directory service more appealing by letting you create and edit groups.
Windows Azure Active Directory (WAAD) has only seen a modest level of adoption so far. Although it was a useful addition to the Microsoft cloud service when it was released nearly a year ago, there seems to be a general perception that it isn't yet a mature product. Perhaps the best evidence supporting the need for further development is the lack of support for security groups in WAAD.
Microsoft is addressing this key issue with plans to offer group management support. The company recently released a preview available to Windows Azure subscribers. Subscribers don't have to do anything to enable the group feature preview, because it's available by default. In this article, I'll evaluate the preview, and explain how to create and manage groups. Because it's a preview, keep in mind that Microsoft could change or remove features in the final release.
Group Benefits
WAAD Groups really aren't that different from normal Active Directory group objects. Both are logical collections of user objects and you can use both for access control purposes.
Although the WAAD Groups interface will let you create, edit and delete groups, that's not the only purpose of the interface. Keep in mind WAAD was designed as a mechanism for facilitating directory synchronization. These directory synchronization capabilities are enabled for groups as well.
When you create a group in your local Active Directory or Office 365, those groups will appear in the Windows Azure Management Portal -- assuming the environments are synchronized. You can only use the Windows Azure Management Portal to edit groups created through Windows Azure. Although the Windows Azure Management Portal can display (and even use) groups created locally or through Office 365, you can't edit those groups through Windows Azure.
This doesn't mean you can't put groups created in Windows Azure to work elsewhere. Among other things, you can use a group created through Windows Azure to control access to an Office 365 SharePoint site.
Create a New Group
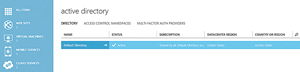
Creating a group in Windows Azure is simple. Start by signing into Windows Azure and locating the directory to which you want to add the group (see Figure 1).
 [Click on image for larger view.]
Figure 1. Locate the directory in which you want to create a group.
[Click on image for larger view.]
Figure 1. Locate the directory in which you want to create a group.
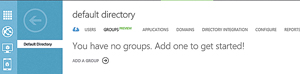
When you click on the directory, you'll be taken to a screen that gives you various directory configuration options. There are a number of tabs that appear along the top of this screen. To create a group, click on the GROUPS tab (see Figure 2).
 [Click on image for larger view.]
Figure 2. Active Directory groups are exposed through the GROUPS tab.
[Click on image for larger view.]
Figure 2. Active Directory groups are exposed through the GROUPS tab.
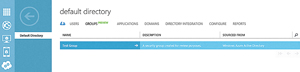
You can create a new group by clicking ADD A GROUP. When you do, you'll be prompted to enter a name and a description for the group you're creating. Take the time to choose a descriptive group name and to enter a detailed description. The very nature of Windows Azure often leads to deployments scaling much more quickly than you may anticipate. Taking the time to enter descriptive information now can help you to avoid growing pains later. After you enter this information, the group, its description and the corresponding directory will be displayed in the Windows Azure interface (see Figure 3).
 [Click on image for larger view.]
Figure 3. The newly created group appears in the Windows Azure Management Portal.
[Click on image for larger view.]
Figure 3. The newly created group appears in the Windows Azure Management Portal.
Edit Group Properties
Now that you've created a new group, take a look at the group's properties. As you can see in Figure 3, one of the properties is displayed. You'll notice the group's corresponding directory is listed in the SOURCED FROM column.
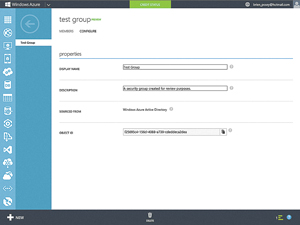
To view some of the group's other properties, click on the group and then the CONFIGURE tab (see Figure 4). You can use the configuration screen to modify the group name or its description. You can see the Object ID is listed among the group's properties.
 [Click on image for larger view.]
Figure 4. The group's properties are listed under the CONFIGURE tab.
[Click on image for larger view.]
Figure 4. The group's properties are listed under the CONFIGURE tab.
The Object ID can be useful if you're writing a Windows PowerShell script or if you happen to be developing an application and you want to use the group as a mechanism for controlling access to that application. If you look just to the right of the Object ID, you'll notice a Windows Phone 8-style Copy icon. Click this icon to copy the Object ID to the local clipboard so you can reference the Object ID in your script or application without having to type it again.
The Delete icon is in the task bar at the bottom of the screen. If you create a group and then later decide you don't need it, clicking this icon is the easiest way to get rid of the group. Of course, you're also free to create, edit and delete groups through Windows PowerShell.
Add Members to the Group
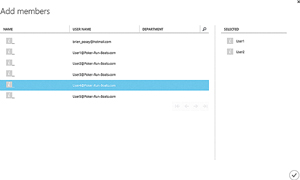
Once you've created a group, you'll need to add some members to the group. To add members to the group, click on the group and then click the MEMBERS tab. Next, click on the Add Members link to display the Add members screen (see Figure 5). You can then click on users to add them to the group.
 [Click on image for larger view.]
Figure 5. You can click on individual users to add them to the group.
[Click on image for larger view.]
Figure 5. You can click on individual users to add them to the group.
As you select users, they appear on the SELECTED list on the right side of the window. The selected users will become group members as soon as you click the Done icon.
Remove a User
What do you do if you need to remove a user from a group? Although the current interface doesn't make user removal obvious, the technique is actually quite simple. If you click on a user within the SELECTED list, that user will be removed from the list.
As it stands now, the Windows Azure Management Portal doesn't let you create nested groups. There are a number of rumors circulating that Microsoft plans to offer the ability to create nested groups later, but it remains to be seen if or how such a capability will be implemented.
Group to Control Access
So far, you've created a new security group and added some members, but the group really doesn't do anything yet. The group is nothing more than a logical collection of users at this point.
You can use Windows Azure groups as an application access control mechanism. While this probably sounds like a really simple function, it actually needs a bit of explaining. A few months ago, Microsoft announced its vision for the cloud that consisted of three tiers. These tiers include private clouds that use on-premises hardware, public clouds based on Windows Azure and services clouds that offer Software as a Service (SaaS). One example of a service cloud is Office 365.
The Microsoft cloud roadmap includes establishing a high degree of interoperability between the three types of clouds. The idea is to make it easy for customers to mix and match cloud components on an as-needed basis. This cloud roadmap plays directly into the way you can use WAAD groups to control application access.
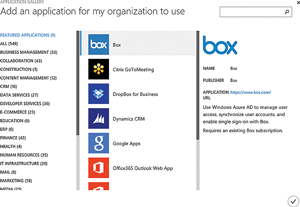
In an effort to establish cloud interoperability, Microsoft made certain SaaS applications are made available through Windows Azure in such a way that lets the application use the Windows Azure directory. In fact, the Windows Azure Management Portal makes hundreds of applications available for use with Windows Azure (see Figure 6).
 [Click on image for larger view.]
Figure 6. Windows Azure makes hundreds of applications available.
[Click on image for larger view.]
Figure 6. Windows Azure makes hundreds of applications available.
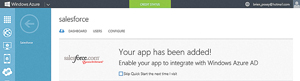
Managing groups is critical for using third-party applications and SaaS apps such as the Salesforce.com CRM suite (see Figure 7). After deploying Salesforce.com and integrating with WAAD, the dashboard will display the "Your App Has Been Added" message. This also displays a USERS and CONFIGURE tab. However, there's no GROUPS tab. So how can you use groups to control application access?
 [Click on image for larger view.]
Figure 7. The Salesforce.com app has been installed through Windows Azure.
[Click on image for larger view.]
Figure 7. The Salesforce.com app has been installed through Windows Azure.
It doesn't display references to groups is because Microsoft is treating group-based application control as a premium feature that won't be available with a basic Windows Azure subscription. Microsoft recently said it would soon offer a premium version of WAAD, called Windows Azure AD Premium. One of the key features of this premium subscription is the ability to use WAAD groups to control access to integrated SaaS applications. With a premium level Windows Azure subscription, the USERS tab in Figure 7 would be listed as USERS and GROUPS.
Some of the other features that will be available with Windows Azure AD Premium include self-service password resets, company branding of the Windows Azure interface and some additional security reports. You can read more about Windows Azure Active Directory Premium.
The ability to create and manage groups will be a welcome addition to WAAD. It's surprising Microsoft didn't include that from the beginning, but better late than never.
About the Author
Brien Posey is a 22-time Microsoft MVP with decades of IT experience. As a freelance writer, Posey has written thousands of articles and contributed to several dozen books on a wide variety of IT topics. Prior to going freelance, Posey was a CIO for a national chain of hospitals and health care facilities. He has also served as a network administrator for some of the country's largest insurance companies and for the Department of Defense at Fort Knox. In addition to his continued work in IT, Posey has spent the last several years actively training as a commercial scientist-astronaut candidate in preparation to fly on a mission to study polar mesospheric clouds from space. You can follow his spaceflight training on his Web site.