Windows Server How-To
How To Interact With Virtual Disks Through PowerShell
Here's how to differentiate between OS virtual disks and virtual machine virtual disks.
One aspect of Windows Server 2012 and 2012 R2 that seems to confuse people is the concept of virtual disks. While virtual disks are certainly not new, Windows Server uses virtual disks in two different ways. Virtual disks are used by Hyper-V virtual machines, but they are also used by the Windows operating system. In this article, I want to show you how to differentiate between virtual machine virtual disks and operating system-level virtual disks through PowerShell.
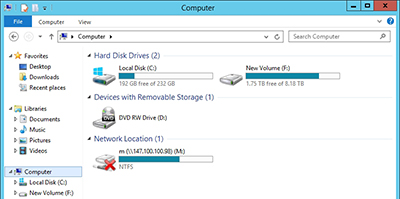
If you look at Figure 1, you can see that I have created a virtual disk on top of a Windows storage pool. This virtual disk appears to the operating system as if it were a physical disk. If you look at Figure 2, you can see that Windows does not differentiate between disk C: (which is a physical disk) and disk F: (which is a virtual disk).
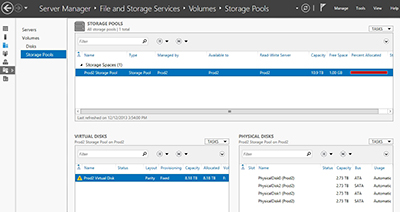 [Click on image for larger view.] Figure 1. A virtual disk is built on top of a Windows storage pool.
 [Click on image for larger view.] Figure 2. The operating system does not differentiate between physical and virtual disks.
The server shown in the figures above is a Hyper-V host and the virtual machines on the host each have their own virtual hard disks. These virtual hard disks are stored on volume F: which is an operating system level virtual disk. So how does Windows differentiate between a Window virtual disk and a Hyper-V virtual disk?
Even though both forms of logical storage are referred to as virtual disks, Windows treats them differently. In fact, there are completely separate sets of PowerShell cmdlets that are used for interacting with the virtual disks.
As you probably know, PowerShell cmdlets are made up of verb-noun combinations. The noun used for virtual hard disks that are associated with Hyper-V virtual machines is VMHardDiskDrive. For example, suppose that you wanted to see all of the virtual hard disks that are associated with a VM named Mirage. The command for doing so is:
Get-VMHardDiskDrive –VM Mirage
You can see what this command looks like in Figure 3.
 [Click on image for larger view.] Figure 3. The Get-VMHardDiskDrive cmdlet lists virtual hard disks for Hyper-V virtual machines.
In contrast, the noun that is used for retrieving information about Windows virtual disks is VirtualDisk, Therefore, if you wanted to see a listing of the virtual disks that are associated with a local storage pool then you could use this command:
Get-VirtualDisk
You can see this command in action in Figure 4.
 [Click on image for larger view.] Figure 4. The Get-VirtualDisk cmdlet retrieves information about virtual disks built on top of a local storage pool.
If you look back at Figure1, you will notice that the virtual disk was named Prod2 Virtual Disk. This is the same virtual disk that is listed through PowerShell in Figure 4.
One thing that you might have noticed in Figure 1 is that there is a warning message associated with the virtual disk. That warning exists because a disk failed in the storage pool. The virtual disk's parity structure was being rebuilt at the time that the screen capture was taken. Even so, this raises an interesting idea. The Server Manager really doesn't report on the progress of the rebuild, so how can you use PowerShell to report on the virtual disk's health?
If our goal is to determine a virtual disk's health then there are a few key pieces of information that would be nice to have such as the name of the virtual disk, perhaps its description, the virtual disk's health status, and its operational status. We can retrieve all of this information through PowerShell. The command for doing so is:
Get-VirtualDisk | Select-Object FriendlyName, OtherUsageDescription, HealthStatus, OperationalStatus
As you can see in Figure 5, this disk is now healthy:
 [Click on image for larger view.] Figure 5. PowerShell can report on a virtual disk's health.
In case you are wondering, there are a number of other attributes that you can view. You can see the full list of attributes by using the following command:
Get-VirtualDisk | Select-Object *
If you have multiple virtual disks then the results of using this command can be somewhat overwhelming. In those situations it might be better to specify the disk's friendly name. For example, my disk is named Prod2 Virtual Disk. If I wanted to see the full attributes of that specific virtual disk, I could use the following command:
Get-VirtualDisk –FriendlyName "Prod2 Virtual Disk" | Select-Object *
You can see the output of this command in Figure 6.
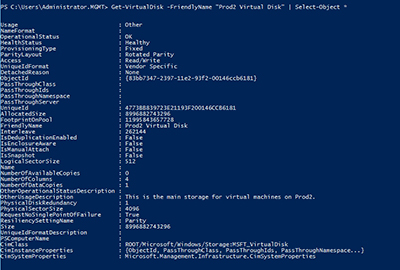 [Click on image for larger view.] Figure 6. There are a number of attributes that you can view for a virtual disk.
As you can see, Windows treats Hyper-V virtual disks differently from Windows virtual disks. In either case however, you can fully interact with the virtual disks through PowerShell.
About the Author
Brien Posey is a 22-time Microsoft MVP with decades of IT experience. As a freelance writer, Posey has written thousands of articles and contributed to several dozen books on a wide variety of IT topics. Prior to going freelance, Posey was a CIO for a national chain of hospitals and health care facilities. He has also served as a network administrator for some of the country's largest insurance companies and for the Department of Defense at Fort Knox. In addition to his continued work in IT, Posey has spent the last several years actively training as a commercial scientist-astronaut candidate in preparation to fly on a mission to study polar mesospheric clouds from space. You can follow his spaceflight training on his Web site.