Windows Server How-To
How To Make Use of Hyper-V Replicas
Besides using replicas as protective backups, they can be used for testing purposes.
The Hyper-V replica feature is primarily thought of as a protective mechanism for organizations that lack the budget for a full-blown Hyper-V server. The replica feature maintains a nearly up-to-date virtual machine copy on a secondary Hyper-V server. That way, if something were to happen to the primary virtual machine copy the administrator can activate the virtual machine replica.
Even though the replica feature was designed as a protective mechanism, it is actually possible to use a replica virtual machine for various testing purposes. For example, you might use a replica VM for patch management testing or for application upgrade testing.
Of course this raises the question of how you can get away using your replica for testing purposes without impacting the replica's integrity in the process. After all, you created the replica for a reason. It exists to protect you against data loss.
The reason why it is possible to use a replica for testing is because the replica itself is not actually overwritten during the testing process. Instead, Hyper-V actually creates a brand-new virtual machine that is based on one of the replica's recovery points.
If you want to use a replica VM to test something (or if you just want to confirm the integrity of the replica), open the Hyper-V Manager on the replica server and then choose the Replication | Test Failover commands from the shortcut menus, as shown in Figure 1.
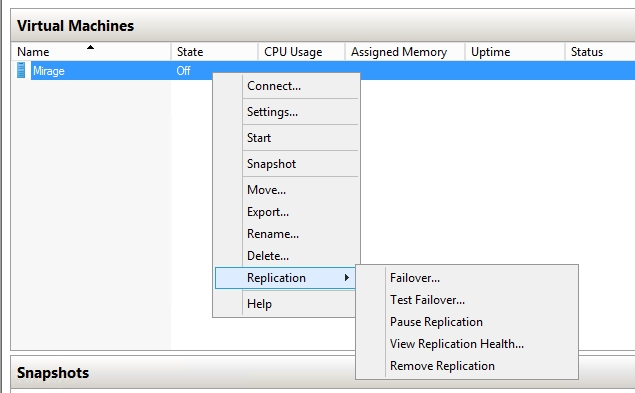 Figure 1. Right-click on the replica VM and choose the Replication | Test Failover commands from the shortcut menu.
At this point, you will see a dialog box similar to the one that is shown in Figure 2. As you can see in the figure, Windows asks you to select the recovery point from which you wish to create the new virtual machine. Normally you would use the most recent recovery point unless your goal is to verify the contents of an older recovery point. With the desired recovery point selected, click the Test Failover button.
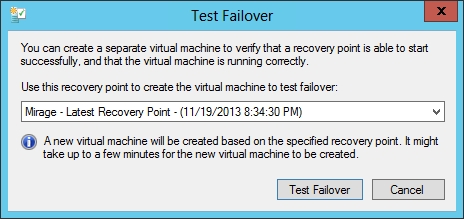 Figure 2. Select the recovery point from which you want to base the new virtual machine and click the Test Failover button.
You should now see the replica virtual machine's status indicator change to Test Failover. After a brief delay you will see a brand new virtual machine. This new virtual machine will have the same name as the old virtual name, except that the word Test will be appended to the virtual machine name. For example, in Figure 3 the original replica virtual machine is named Mirage and the new virtual machine is named Mirage – Test.
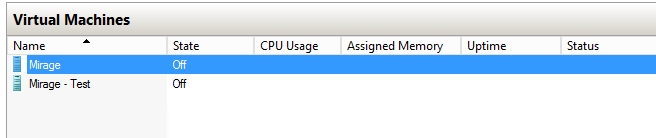 Figure 3. A brand new virtual machine replica will be created.
The new test virtual machine is actually based on a snapshot of the original replica virtual machine. This snapshot is actually shared among the two virtual machines. The replica virtual machine and the test virtual machine also make use of a differencing disk. The replica virtual machine's differencing disk allows changes to continue to be replicated, even while you are performing the replica tests. The test virtual machine's differencing disk is used to intercept any write operations that are made to the test machine during the testing process. This means that you can do anything that you want inside of the test VM without having to worry about overwriting important data.
To use the test VM, you would simply start it just as you would any other VM. It is worth noting however, that the test virtual machine has no network connectivity. The lack of connectivity is a safety feature that is designed to protect against having duplicate VMs with duplicate IP addresses. If you want to connect the test VM to the network then you will have to use the virtual machine Settings page to connect the virtual machine to a virtual switch and then assign the VM an IP address.
When you are done with the testing process, shut down the test virtual machine. Next, right click on the replica virtual machine and select the Replication | Stop Test Failover commands from the shortcut menu. When you do, you will see a warning message telling you that the test VM is about to be deleted and that the test VM's contents will be discarded. To acknowledge the warning, click the Stop Test Failover button. Upon doing so, Hyper-V will delete the test VM and put everything back to normal. The replica VM will then merge all of the replicated data that has accumulated since the test began, bringing the replica VM into a current state.
About the Author
Brien Posey is a 22-time Microsoft MVP with decades of IT experience. As a freelance writer, Posey has written thousands of articles and contributed to several dozen books on a wide variety of IT topics. Prior to going freelance, Posey was a CIO for a national chain of hospitals and health care facilities. He has also served as a network administrator for some of the country's largest insurance companies and for the Department of Defense at Fort Knox. In addition to his continued work in IT, Posey has spent the last several years actively training as a commercial scientist-astronaut candidate in preparation to fly on a mission to study polar mesospheric clouds from space. You can follow his spaceflight training on his Web site.