In-Depth
How To Work with RD Gateway in Windows Server 2012
Here's a breakdown of what's new with RD Gateway and how you can use it paired with Windows Server.
- By Kristin Griffin , Freek Berson
- 12/24/2013
Not everyone works from the office all the time -- people want to connect to corporate resources from home, on the road, or pretty much anywhere with Internet access. Now that you can build an RDS Session Collection, and you can manage your VDI deployment using RDMS, it's time to make these resources available to a broader audience -- to users located outside the corporate network. The RD Gateway role service helps you do this securely.
If you're familiar with RD Gateway in Windows Server 2008 R2, its job is still the same. However, many improvements have been made to RD Gateway in Windows Server 2012. In this article we will explain what's new for RD Gateway in Windows Server 2012 and why this is important to you. We will walk through the new way to install RD Gateway for a standard or quick VDI deployment. To finish, we will show you how to manage RD Gateway.
The Big Picture: How RD Gateway Works
This is how RD Gateway works. When a client initiates a connection, RD Gateway first establishes SSL tunnels between itself and the external client. Next, RD Gateway vets the client's user (and optionally the computer) credentials to make sure that the user / computer are authorized to connect to RD Gateway. Then RD Gateway makes sure the client is allowed to connect to the requested resource. If the request is authorized then RD Gateway sets up an RDP connection between itself and the internal resource. All communication between the external client and the internal endpoint goes through RD Gateway (shown in Figure 1).
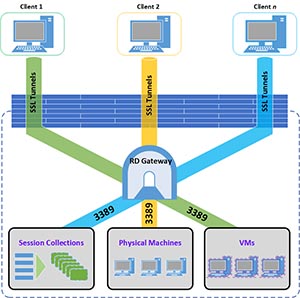 [Click on image for larger view.] Figure 1. RD Gateway proxies data between external clients and internal resources
What's new for RD Gateway in Windows Server 2012
The biggest changes to RD Gateway are:
- It accommodates more simultaneous connections on the same hardware than WS08 R2
- It can use UDP as a transport protocol
- You can change the default HTTP and UDP port numbers
- The load balancing architecture has changed and DNS RR is no longer supported
In the following section we will discuss these changes in more detail.
More RDP Sessions, Same Hardware
RD Gateway is now capable of handling more connections than in Windows Server 2008 R2. To understand why you can get this capacity increase, you need to understand more about how the client establishes connections to RD Gateway and how data flows between the client and RD Gateway.
Connections to RD Gateway use the RDGSP protocol. RDGSP creates two SSL tunnels (one for incoming data and one for outgoing data) from the external client to RD Gateway. Once the tunnels are established the client and RD Gateway establish a main channel over each tunnel (shown in Figure 2). Data between client and the destination machine is sent over the channels and RD Gateway sits in the middle proxying the data back and forth.
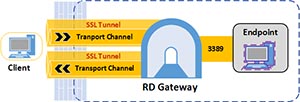 [Click on image for larger view.] Figure 2. The RDGSP protocol creates two SSL tunnels and transport channels per client connection – one for incoming data and one for outgoing data.
RDGSP uses a transport to create the channels. In Windows Server 2008 R2, RDGSP used the RPC over HTTP transport. RPC over HTTP is still available for down-level RDP clients, but whenever available, RDP 8.0 clients will use the new and much more efficient HTTP transport. The difference is this: RPC over HTTP makes RPC calls for every data transfer to and from the client. This adds significant CPU overhead. The new HTTP transport does not have this overhead so it's possible to accommodate up to twice as many RDP sessions on the same hardware.
To use the HTTP transport, the client needs to be running and RDP 8.0 capable remote desktop client. Refer to the RDS Team blog article What's new in Windows Server 2012 Remote Desktop Gateway for a client OS/RDP client to RD Gateway transport matrix.
Added UDP Support
In Windows Server 2012, RemoteFX uses UDP to optimize the transport of data over wide area networks (and over the internet). RD Gateway now also supports UDP connections when the HTTP transport is used, as shown in Figure 3.
 [Click on image for larger view.] Figure 3. RD Gateway will support UDP connections if the client connects to the RD Gateway server using the HTTP transport
Once the HTTP transport channels are enabled, UDP sets up two side channels that can be used to provide both reliable (RDP-UDP-R) and best-effort (RDP-UDP-L) delivery of data (TCP can only provide reliable delivery). The UDP tunnel uses DTLS to secure its communications so will also utilize the SSL certificate in place on the RD Gateway server.
Ability To Change Transport Port Numbers
New in RD Gateway on Windows Server 2012 is the ability to change the default port that RD Gateway uses for HTTP and UDP communication. By default RD Gateway uses port 443 and port 3391 respectively to handle the communication between the RD Gateway server and the client. You might change these port numbers if you only have one public IP address and want to NAT the same type of data from the one public IP address to multiple internal servers. For example, you could have a web server that uses port 443 for a secure website and then an RD Gateway server that uses port 444 (Figure 3) and both servers will receive HTTPs data.
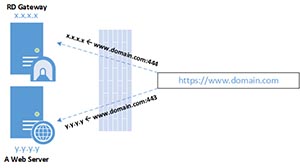 [Click on image for larger view.] Figure 4. You can send HTTPs data to an RD Gateway server on a non-standard port
Clients will connect to RD Gateway specifying the new port number and the NAT device will be able to correctly translate this to the internal IP address of your RD Gateway server. We will discuss how to change transport port numbers later in this article.
Load Balancing Connections in RD Gateway
RD Gateway is essential for providing connections to remote clients, so more than one RD Gateway is a good idea to ensure that the gateway is neither overloaded nor goes offline. In Windows Server 2008 R2, you could load balance using Round Robin DNS (RR DNS) (although it was not recommended even then). But now Microsoft no longer supports using RR DNS when used with the new HTTP transport. Here's why: As we showed you earlier, a client connection to RD Gateway is actually comprised of two connections. In the RPC over HTTP Remote Desktop Gateway scenario, if those two connections get split onto two different RD Gateway servers, the second RD Gateway server will route the data to the first RD Gateway server using RPC, if they are members of the same farm (shown in Figure 5.)
 [Click on image for larger view.] Figure 5. RD Gateway connections using RPC over HTTP will route split connection data from one RD Gateway server to the other using RPC.
Because the new HTTP transport does not use RPC, it can't redirect the split traffic to one server from the other.
Even if your connections use the RPC over HTTP transport, you should implement another load balancing mechanism (NLB or another hardware load balancer) for your RD Gateway farm, instead of DNS RR. Here's why:
- DNS RR cannot tell when an RD Gateway farm member goes offline. It will continue to route connection requests to the offline server even though the server cannot fulfill them.
- Having one RD Gateway server route connections from one client to two different RD Gateway servers is inefficient, as multiple Remote Desktop Gateway servers are now handling traffic for one connection.
Deploying RD Gateway
In Windows Server 2012, you deploy RD Gateway in Windows Server 2012 like you do other RDS role services – using RDMS on your designated deployment server. But you manage RD Gateway using RD Gateway Manager located on the RD Gateway server.We will walk through a typical RD Gateway deployment and then we will discuss how to tweak the default setup for a production environment.
To add RD Gateway to your VDI deployment, open RDMS and click the Remote Desktop Services section. In the Deployment Overview pane click the RD Gateway symbol (a green plus sign). This will start the Add RD Gateway Servers wizard. Choose a server from the server pool to which to add RD Gateway and click Next.
On the Name The SSL Self-Signed Certificate screen provide the FQDN that end users will use to connect to RD Gateway (the DNS name should be externally resolvable and opened up in your firewall(s) on port 443). The wizard will use the FQDN to create a self-signed certificate for use with RD Gateway.
The wizard will install the RD Gateway role service to the server you selected, and perform a default configuration including:
- Creating default Client Authorization Policy (RD CAP) and Resource Authorization Policy (RD RAP) policies to allow basic access to RD Gateway and internal resources
- Adding RD Gateway to the VDI deployment in RDMS, so published RemoteApps and Desktops can use it
- Configuring RD Gateway server to use a self-signed SSL certificate with the name specified during the installation
Managing RD Gateway
To manage RD Gateway you use the RD Gateway Manager tool located on the RD Gateway server. RD Gateway Manager itself hasn't changed much since Windows Server 2008 R2. RD Gateway Manager can be used to:
- Create RD CAPs to control which users and computers are allowed to connect to RD Gateway
- Create RD RAPs to controls what resources authorized users may access
- Set up an RD Gateway farm for high availability
- Change HTTP and UDP transport ports
- Centralize the RD CAP store
- Enable system messages
- Limit the number simultaneous connections to RD Gateway
- Enabling/disabling logging
- Enabling SSL bridging
- Enabling / disabling request that client's send State Of Health information before RD Gateway will complete the connection.
Once RD Gateway is deployed, you will most likely want to adjust some of the default settings right away. Detailed instruction on configuring most of the bulleted items above is available in the Windows Server 2008 R2 Remote Desktop Services Resource Kit (the information is still valid for 2012). Microsoft has also published a good guide on configuring RD Gateway.
Adjusting the following items is different or new in RD Gateway for 2012 and we will talk about them in more detail below:
- The default RD CAP and RD RAP policies now allow users listed in the Domain Users group to connect to computers listed in the Domain Computers group. It is likely that you will want to narrow the scope of access for production environments. Refer to the links above for instruction on configuring RD CAPs and RD RAPs.
- Changing the HTTP and UDP transport port numbers that RD Gateway uses is new in this version and there are some "gotchas" to implementing this. We spell those out below.
- The wizard-generated self-signed SSL certificate is selected to secure connections with clients. You should use self-signed certificates only for testing, not for production, so we will talk about how to replace this certificate with a real one.
Changing HTTP and UDP Transport Ports
To change the default HTTP and UDP port, open RD Gateway Manager on the RD Gateway server. On the left hand side right click the name of your RD Gateway server and choose Properties. Then choose the Transport Settings tab shown in Figure 6.
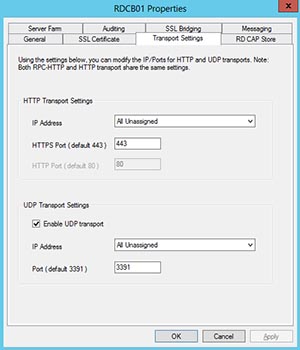 [Click on image for larger view.] Figure 6. Choose the Transport Settings tab
Change the default numbers to ones you want to use and click OK.
Note: When you change the HTTP and/or UDP transport port number the listener rules within the Windows Firewall will be modified, all active sessions will be disconnected and the RD Gateway service will be restarted.
Be careful when changing the port. First, to use a different port for the RD Gateway you at least need an RDP 8.0 client (Windows 2012, Windows 8 or Windows 7 SP1 with the RDP 8 Protocol update). Second, if you decide to change the port numbers, RDMS will not recieve this change. RemoteApps and Desktops you may have published will no longer work because they are still trying to connect to RD Gateway on its default port 443. They will result in the error shown in Figure 7.
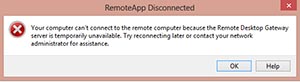 [Click on image for larger view.] Figure 7. If you change the HTTP port in RD Gateway Manager, RemoteApps and Desktops will no longer work because they are still trying to connect to RD Gateway via port 443
In case you wondered, it doesn't work to add the port to the end of the RD Gateway server name (ie. rdgateway-name.domain.com:xxx) in RDMS. The supported way to change the RD Gateway port for your published Remote Apps and Desktops is to use the PowerShell command Set-RDSessionCollectionConfiguration to add a CustomRdpProperty like this:
Set-RDSessionCollectionConfiguration –CollectionName "Your Session Collectionnam" -CustomRdpProperty " gatewayhostname:s:<RDGW-FQDN>:<yourport>" -ConnectionBroker <Your RD ConnectionBroker>
Once you do this, your published Remote Apps and Desktops will use the changed port as shown in Figure 8 below.
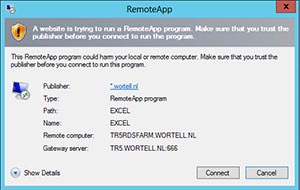 [Click on image for larger view.] Figure 8. The new port number for RD Gateway will appear on the RemoteApp Connect screen.
You can change the UDP port within the RD Gateway Manager without taking any additional actions RDMS. The newly changed RD Gateway UDP port is automatically added to the Windows Firewall rules, and the session through the RD Gateway will start using that port.
Installing An SSL Certificate On RD Gateway
Unless this is only a test environment you need to replace the self-signed SSL certificate generated and put in place during the initial RD Gateway deployment with a real SSL certificate. The name on the certificate should reflect the externally resolvable name of your RD Gateway server (rdg.comany.com) or it can be a wildcard certificate containing your public domain name (*.company.com). The certificate should come from your company CA (if you maintain your own PKI infrastructure) or from a public CA.
We told you to use RD Gateway Manager to manage your RD Gateway deployment, but here is one exception. To configure RD Gateway to use a new SSL certificate in most cases you will need to use RDMS. This is because when you deploy VDI using RDMS, certificates are considered a deployment level setting. Add the certificate using RDMS and the certificate will be put in place on all RD Gateway servers. If you change the SSL certificate in RD Gateway Manager instead, RDMS (and thus your published RemoteApps and Desktops) will not see the change.
Note: You can still change the SSL certificate in RD Gateway Manager even though it will not propagate to RDMS for two reasons:
- It enables you to configure RD Gateway certificates when the deployment is not managed wholly by RDMS (e.g. a complex deployment wherein different RD Gateway servers have access to different resources, or one where you have multiple Remote Desktop Gateway farms, etc.).
- RD Gateway can be used independent of other RDS role services (e.g. a simple scenario where a corporation wants to allow users access to their desktop PCs from home).
For these reasons RD Gateway Manager provides the ability to change the certificate for each RD Gateway independent of what the Deployment level settings in RDMS dictate.
To change the certificate that RD Gateway uses to create secure connections:
- Open RDMS and navigate to Server Manager \ Remote Desktop Services \ Overview section.
- From the Tasks pull-down menu in the Deployment Overview section and choose Edit Deployment Properties.
- On the Deployment Properties screen click Certificates and then highlight RD Gateway in the Manage Certificates window.
- Scroll the windows down and click the Select Existing Certificate button
- Pick the Choose a Different Certificate option and then browse to your certificate PFX file and click Open.
- Enter the certificate file password.
- Check the box next to "Allow the certificate to be added to the Trusted Root Certification Authorities certificate store on the destination computers". Then click OK.
After reading this article you should now understand the new features of RD Gateway in Windows Server 2012 and how to use these changes in your deployment. You should also know how to deploy and manage RD Gateway in Windows Server 2012. In our next article we will discuss how to leverage RD Web Access to provide easy access to your RDS resources.