In-Depth
Use Windows Azure as a Backup Target
Here's how to connect four backup and recovery software tools to the Microsoft public cloud to protect and archive your data.
Nothing will cut your career short more quickly than losing critical data because it wasn't properly backed up. And of course having that data properly backed up assumes it can be easily recovered. It doesn't matter if it's lost to disaster or inadvertently deleted. Data must be backed up.
Now that many organizations are backing up or archiving their data to public cloud services, users expect to recover data more quickly than they could when it was stored on tape. Amazon Web Services Inc. (AWS) is the most widely used and dispersed cloud storage provider with its Simple Storage Service (Amazon S3) and Glacier archive offerings. There's no shortage of other services providers of all sizes. Microsoft Windows Azure has become one of the most formidable alternatives to Amazon, now that its long-awaited infrastructure services are available.
Windows Azure infrastructure services are especially appealing to those looking to augment their Windows Server-based applications. Support for Linux instances also makes Windows Azure infrastructure services an attractive target for backup and recovery. Analysts and ISVs alike say many enterprises are already using it for backup and recovery or are planning to do so.
Several leading backup and recovery solutions now support Windows Azure as a target, although you must have a Microsoft account to set up a storage bucket. You can set up an account at windowsazure.com. The key backup and recovery solutions designed to natively use Windows Azure as a target include CA ARCserve, CommVault Simpana, Veeam Backup & Replication Cloud Edition and Vision Solutions Double-Take 7.0. Listed here in alphabetical order is how to configure each solution for Windows Azure.
CA added a file copy component to its ARCserve Disk-to-Disk (D2D) software. This allows off-site file replication based on policies and filters configured against your servers. Using the application in a test environment has proven quite effective.
Using the Web interface to configure the application (which runs on your local ARCserve server) was a nice change from other "Application Windows." ARCserve D2D interacts with Windows Azure, but not in a way I had expected. When configuring backups, the target is traditional and can be locally attached or networked. Where Windows Azure comes to the table is on file copy. ARCserve D2D uses a configured policy to send data to the offsite container in Windows Azure once you have it configured. To get D2D and Windows Azure communicating, follow these steps:
- Log in to the ARCserve D2D Web console with a user account in the domain or on the server.
- Select settings from the Getting Started console (or the navigation bar on the right).
- Under Backup Settings, select the backup target location.
- Select the amount of information to back up (the entire machine or specific files), the compression level and the number of recovery points to retain.
- Click the Schedule button to specify a schedule for the backup, including when to run full and incremental backup jobs.
- For advanced options such as specifying administrator credentials for the likes of SQL Server or Exchange, select the Advanced button to configure specific items related to these applications.
- On the Pre/Post Backup Settings page, you can specify any commands to run before or after the backup job.
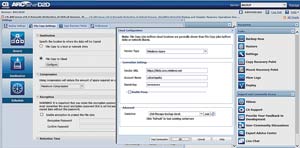
- Once the backup job configuration is complete, click the File Copy Settings tab at the top of the Web dialog (see Figure 1).
 [Click on image for larger view.]
Figure 1. The ARCserve Cloud Configuration Web dialog will let you connect to Windows Azure for file copy.
[Click on image for larger view.]
Figure 1. The ARCserve Cloud Configuration Web dialog will let you connect to Windows Azure for file copy.
- Check the Enable File Copy box to turn the feature on.
- Click Add to create a file copy policy. From there, you specify a source drive and a filter criteria to determine which files get copied to Windows Azure (*.dll to copy all of the DLL files from the source to the Windows Azure cloud).
- When this is configured, click Destination. This is where you point the ARCserve D2D application at a storage bucket in Windows Azure.
- Select File Copy to Cloud and click the Configure Button. Note: ARCserve D2D preconfigures the Windows Azure URL when you choose Windows Azure as the provider. Do not change the URL because the configuration won't if the URL isn't correct.
- Enter your Account name as configured in Windows Azure.
- Enter the Secret Key for the specified Windows Azure account.
- Click the Add button next to the dropdown for a container. Here, you specify the name of the container that will be created to hold your data. The name will be prepended with text to help ARCserve D2D recognize the container.
- Click Test Connection to validate your settings.
- Click OK to save the file copy configuration for Windows Azure.
- Click Schedule to specify the number of backups to perform before the copy is performed.
- Click Save Settings to save the backup job.
The file copy process isn't immediate. It's configured to happen after a specified number of backups have run. So if you specify this to happen after one backup, then it would happen right away. ARCserve D2D doesn't care if backups are full or incremental, just that the specified number of backups have occurred.
Once that threshold is met, files meeting the specified policy are pushed off to the container in Windows Azure. This works more like a replication or traditional copy offshoring than using Windows Azure as a direct backup target. For organizations looking for both local and cloud backup, though, this might be a really good fit.
Using Windows Azure as a native backup target requires a version of ARCserve running on Windows Server. If you're using ARCserve on Linux, you can create a Common Internet File System (CIFS)/Network File System (NFS) share with help from a third party where a user can back up his data to Windows Azure.
CommVault Simpana uses libraries and policies to manage backup jobs and data. When using a cloud provider, these concepts remain in place, but the endpoint in this case is a container within Windows Azure. Simpana relies on the media agent to manage backup jobs, so you'll need to configure at least one media agent component, but it supports multiple components.
To connect Simpana to Windows Azure, complete the following steps:
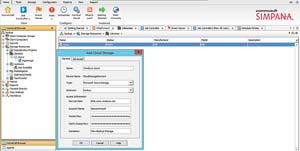
- Configure a library to point to Windows Azure by right-clicking Libraries in the console navigation pane and selecting Add (see Figure 2). Choose Cloud Storage Library.
 [Click on image for larger view.]
Figure 2. The Simpana Add Cloud Storage dialog box lets you configure a library residing in Windows Azure.
[Click on image for larger view.]
Figure 2. The Simpana Add Cloud Storage dialog box lets you configure a library residing in Windows Azure.
- Enter a name for the library and Click OK. Right-click the New Library to add a disk component.
- In the Add Cloud Storage dialog box, specify a display name, the Windows Azure account, the secret key (with confirmation) and a container name.
- Click OK. If the container doesn't already exist in your Windows Azure environment, Simpana will create one.
- Create (or assign) a storage policy for the media agent.
- Create (or assign) a scheduling policy for the media agent.
The last step involves creating a sub-client policy to specify what data you want a particular job to backup:
- Expand Policies.
- Right-click Sub-client Policies.
- Select New Sub-client Policy.
- Specify a name for the set of files to be backed up.
- Specify options based on the features installed (Windows file system, for example).
- Click the Add button.
- On the Content tab, click Add and browse to the folders or files to include.
- On the Filters tab, specify exclusions (if any).
- On the Storage Device tab, select the configured storage policy to use for this file set.
- Click OK on the properties dialog.Now that the backup configuration is completed, jobs assigned a scheduling policy will run according to this schedule.
To run a created job immediately, complete the following steps:
- Expand Client computers.
- Expand the computer you wish to back up.
- Expand the item to be backed up (such as the File system).
- Right-click the sub-client displayed and select Backup.
Once the job is running, you can view progress and task completion on the Job Controller tab. Simpana works in a modular fashion. You can add each piece of the application as needed. That way it can grow as your organization's needs increase. This overview discusses options to connect to Windows Azure and add simple backup data, but Simpana also supports advanced features like deduplication and replication to another server, which may live in Windows Azure. Many of the modules used by Simpana are referred to as "policies." The two policies mentioned in this section (Storage and Scheduling) are basic components to help get your information backed up. For more information about other components, check out CommVault Books Online.
The storage policy determines available options for storing backed up data. You can also configure retention, encryption and compression options in a storage policy. A scheduling policy handles the type of backup being performed and when a job should be executed.
CommVault uses separate policies to manage each stage of configuration. This allows for more modular design and reusing certain features across the entire application. With a schedule policy created to execute on Fridays at 5:52 p.m., for example, this abstracts the schedule from the backup job and lets that schedule apply to many other media agents.
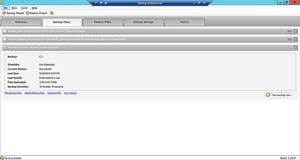
Veeam Backup & Replication Cloud Edition is an add-on component to Veeam Backup & Replication. Veeam added Windows Azure support as a target by licensing the backup engine from CloudBerry Lab. This has its own set of tools to back up data to multiple cloud services, as well as directly from PCs to Windows Azure. You'll have to install Veeam Backup & Replication version 7 before the Cloud Edition will function. Once you have the installer downloaded and the license key, installation follows the expected Windows Installer wizard path. To configure it with Windows Azure (see Figure 3), complete the following steps:
 [Click on image for larger view.]
Figure 3. Implement and manage a backup plan in Windows Azure with the Veeam backup product.
[Click on image for larger view.]
Figure 3. Implement and manage a backup plan in Windows Azure with the Veeam backup product.
- Select Set up Backup Plan.
- Select Windows Azure as the cloud provider, choose Create New Account (or select an existing account if you have an account already) and click Next.
- Enter a name for the backup plan and click Next.
- Select a backup mode for the backup plan and click Next. Options include:
Advanced: lets you store and access encryption and multiple file versions with third-party tools.
Simple: lets third-party solutions access backup files without encryption or multiple file version support.
Custom: stores backup files in the specified folder.
Force Using VSS: should be used when third-party tools will access files while a backup job is in process.
- Select the drives to back up.
- Specify filtering options for the backup plan, which are fairly straightforward and offer options to include and exclude file types, skip entire folders, and back up files that have changed since a specified date and time. After selecting an option, click Next.
- Specify to use compression and the algorithm to use when compressing data. If using compression, specify and confirm a password and click Next.
- Specify the data purging/retention options for the backup plan and click Next.
- Provide information for scheduling the job to run once or have recurrence and click Next.
- If necessary, provide any pre- or post-command-line options for the backup and click Next.
- Provide any notification options, from mail server names to recipient addresses, and click Next.
- Once the backup plan is saved, you can select it in the main backup window and click the Run Link to kick off the job immediately. If you specified a schedule you can also wait for the next runtime for the job to run. You can monitor job progress in the Backup Plans tab of the main cloud backup window.
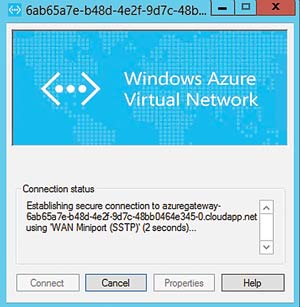
Double-Take 7.0 uses an interesting approach to backup as far as Windows Azure is concerned. To use this product with Windows Azure, you'll have to use a VPN connection to the Windows Azure cloud (see Figure 4). Once the VPN exists and the infrastructure is on your local network, you need a target to support replication between the on-premises site and the Windows Azure cloud. While Double-Take 7.0 does allow replication to Windows Azure, the solution works much more like site-to-site replication than a typical backup or disaster recovery solution.
 [Click on image for larger view.]
Figure 4. When using Double-Take 7.0, you must connect the source server to a VPN in order to use Windows Azure as a target.
[Click on image for larger view.]
Figure 4. When using Double-Take 7.0, you must connect the source server to a VPN in order to use Windows Azure as a target.
To get stated with Double-Take, you'll need to configure the following in your Windows Azure portal:
- A local network with site-to-site VPN
- A VM at the same level of Windows as the server at your local site
Once these are configured, you're ready to configure the Double-Take application to push data to Windows Azure. At installation, be sure to choose the Move application, which is used for server migrations. On the local server, complete the following steps:
- From the Double-Take console, select Add Server and specify the name and credentials for your server.
- Select the Getting Started page of the console and choose Double-Take Availability to begin configuring protection plans.
- Select the task "Protect Files, folders, an application or an entire server."
- Choose the source server from the list of Double-Take servers.
- Select the workload for your protection job. This can include SQL Server, Files and Folders, Full Server, or Full Server to VMware ESX or Hyper-V. Use the Full Server ESX/Hyper-V job is used to migrate an entire server to a VM within Windows Azure.
- Specify the Replication rules for the protection job. This lets you decide which files (or types of files) to include or exclude.
- Because the destination was added to your network through a VPN connection to Windows Azure, it will appear locally. Without this, there's no way to see the destination server.
- Choose the server in Windows Azure to use as your destination server.
- Configure the options for the protection job including scheduling, compression, bandwidth limitations and a name for the job.
- Review the configuration and correct any issues, and click Finish to save the job.
Once the configuration is complete and scheduled, the job can move the data to your new site in Windows Azure. Though the setup is more like a site-to-site configuration than a typical backup to a cloud target, this might fit your needs.
Considerations for Choosing Cloud Backup Software
Each of these applications lets you connect to Windows Azure to store your data. Configuration for each was straightforward and didn't take too much to get working. Using Windows Azure with your backup product is often a matter of digging into what you have and determining if there's available support.
While all the products mentioned here are capable of working with Windows Azure, there are other solutions that haven't implemented these features yet. For example, Symantec Corp. is readying a version of its Storage Foundation High Availability for Windows and its Veritas Replicator disaster recovery for Windows Azure, which is in private beta now. If you use another product, check with your vendor to see if support is available or planned for a future release.
If your organization uses a smaller backup application, you might be able to get Windows Azure support from those vendors as well. Some solutions -- such as those provided by Cloudberry Lab -- are capable of working with many cloud providers, including Windows Azure.
To use these products with the Windows Azure service, you'll need an active subscription from Microsoft. Once your service is configured, you can enter your security information into any of the applications and begin backing up your data to the Windows Azure cloud.
CA ARCserve D2D
CA Technologies
ca.com
Workstation pricing starts at $445.20 (for a five pack). Windows Server and Linux server pricing starts at $732. Per-socket pricing (which also includes CA ARCserve Backup and file-only replication) starts at $795. Per-terabyte pricing (which includes CA ARCserve D2D, CA ARCserve Backup and file-only replication) is also available.
CommVault Simpana
CommVault
commvault.com
$25,000 with 32TB of archive capacity, one year of support and one day of professional services.
Veeam Backup & Replication Cloud Edition
Veeam
veeam.com
Subscription of $449 per socket per year, which includes all the features of the on-premises product.
Vision Solutions Double-Take 7.0
Vision Solutions Inc.
visionsolutions.com
Physical server pricing starts at $1,995 per server. Virtual servers start at $259 per VM.