In-Depth
A Hyper-V Admin's Guide to VMware
IT professionals who work with Hyper-V on a regular basis might feel lost in a VMware environment, but some key similarities between the two offerings can provide a welcome sense of familiarity.
Even though Hyper-V has always been my server virtualization platform of choice, there's simply no denying that VMware Inc. is the dominant player in the server virtualization market. As such, I've occasionally had to perform tasks using VMware ESX or ESXi when I would've preferred to use Hyper-V.
The first time this happened, I felt like a fish out of water. I floundered around in VMware wishing I had a clue as to what I was doing. But after a while, I began to notice that although VMware and Hyper-V are different products, there are some underlying similarities.
After struggling with VMware, I wanted to write a sort of beginner's guide to VMware for Hyper-V administrators. While it's impossible for me to cover every aspect of VMware within the confines of an article, I want to focus on how VMware and Hyper-V differ, as well as cover some of the similarities. More importantly, I want to give you some hints about getting VMware up and running.
There are many flavors of VMware. For the purposes of this article, I'll be discussing VMware ESXi 4.0.0.
The Initial Installation
If you're used to working with Hyper-V, then getting VMware up and running can be an extremely frustrating experience. Don't get me wrong: There's nothing inherently difficult about installing VMware. The process is actually quite simple. The reason why deploying VMware can be so frustrating is because VMware isn't nearly as lenient as Hyper-V when it comes to server hardware.
For me, the most problematic limitation was the fact that VMware doesn't support SATA drives. Earlier this year, I wrote a review on a product that was designed for VMware. The review had to be completed quickly. Even so, I spent a full two days trying to get VMware up and running.
The problem was that most of my lab servers are really just high-end PCs, and they all have SATA drives. Given the circumstances, there simply wasn't enough time to order a "real server" for my review. Over those two days, I tried everything I could think of to get VMware to install. Ultimately, I was able to remove all of the SATA drives from one of my servers and then attach one of the drives to the server using a USB interface. Believe it or not, VMware installed to that drive. It wasn't exactly an ideal solution, but it worked in a pinch.
Interacting with the Hypervisor
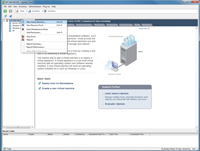
In Hyper-V, you can interact with the Hypervisor directly from the server console. Hyper-V contains a tool called Hyper-V Manager. This tool allows you to create and manage all of your virtual machines (VMs) from one window (see Figure 1). You can even access a VM by double-clicking on a listing for it within the console. When you do, the Hyper-V Manager will display that VM within a separate window.
[Click on image for larger view.] |
| Figure 1. The Hyper-V Manager allows you to create and manage virtual machines. |
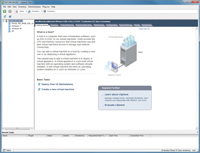
VMware takes a different approach to VM management. The VMware console is minimal, to say the least. The main VMware console screen provides you with a handful of diagnostic options and displays the IP address that's used for managing the server.
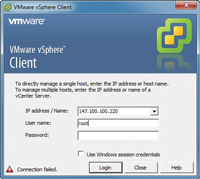
Because you can't really do a lot from the server console, VMware requires you to use a tool called the vSphere Client for management. This tool runs on a Windows desktop and allows you to create and manage VMs in a similar manner to the Hyper-V Manager console. When you open the vSphere Client, it asks for the server name or IP address and for the credentials that you want to use when you log in. vSphere displays the server IP address on the console screen. By default, the administrative account that VMware uses is named Root, and there's no password until you assign one (see Figure 2).
[Click on image for larger view.] |
| Figure 2. The VMware vSphere Client sign-in screen uses "root" as the administrative account user name with no password set. |
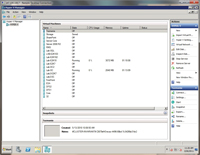
On the main vSphere Client screen, the column on the left displays the server IP address and all of the VMs running on the server. A series of tabs on the top is used to configure the server and the VMs running on it (see Figure 3).
[Click on image for larger view.] |
| Figure 3. The main VMware vSphere Client screen, where you can select from a series of tabs to configure your server and the virtual machines running on it. |
Storage
Both Hyper-V and VMware require you to have sufficient storage for creating VMs. VMware is far more restrictive than Hyper-V. In Hyper-V, you can place a virtual hard drive (VHD) file onto any NTFS volume. It doesn't seem to matter where that volume is located. You can create a VHD file on direct-attached storage (DAS), network-attached storage (NAS) or on a storage-attached network (SAN). You can even create a VHD on the Hyper-V server's C: drive (assuming that you're running Windows Server with the Hyper-V services installed rather than a standalone Hyper-V server).
Obviously, you must take certain best practices into account. (Note: Normally you would never create a VM whose VHD files resided on the C: drive, and I'm certainly not recommending that practice. I only mention the possibility as a way of underscoring the fact that Hyper-V doesn't care what you use for storage so long as sufficient disk space is available.)
VMware is quite the opposite. Earlier, I discussed the problems that I ran into with just getting VMware to install. Once VMware is up and running, you have to provide it with an acceptable storage pool that you can use for your VMs. Remember, VMware can't use SATA drives, and I was only able to install VMware by using an external USB drive.
My next dilemma was that VMs couldn't be installed on the boot drive, and VMware doesn't seem to allow for the use of multiple external USB drives. I didn't have a server with acceptable storage, so my only option was to create an iSCSI connection to a SAN I had previously set up to test Microsoft Storage Server 2008. Surprisingly, setting up SAN connectivity was quite easy, and you can do it directly from the VMware console.
When you create a new VHD in Hyper-V, all you really have to do is provide a wizard with information about the new location and desired size of the VHD. The process works similarly in VMware, but there's an extra step that you must complete. Before you can create any VHDs in VMware, you must create a datastore. A datastore is nothing more than a disk (or storage mechanism such as a LUN or a disk array) that has been provisioned for use with VMware.
You can create a datastore at any time by clicking the Add Storage link and then choosing the Disk/LUN option on the following screen. After doing so, you'll see a list of the available storage devices from which you can pick. If you're planning on connecting to a storage mechanism via iSCSI, then you'll have to establish the iSCSI connection before you attempt to create the datastore. You can configure iSCSI connections through the vSphere Client's Storage Adapters screen.
Creating a VM
Creating a new VM in VMware shouldn't feel completely foreign to Hyper-V administrators because there are some similarities. In Hyper-V, creating a new VM involves right-clicking on the listing for the server (within the Hyper-V Manager) and choosing the New | Virtual Machine commands from the shortcut menus. After doing so, the Hyper-V Manager launches the New Virtual Machine Wizard (see Figure 4). This wizard walks you through the creation process by asking you to provide a name and location for the new VM, then asking you a few simple questions about the hardware resources that you want to allocate to the VM.
[Click on image for larger view.] |
| Figure 4. The Hyper-V New Virtual Machine Wizard walks you through creating a new virtual machine. |
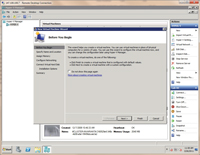
The process is similar in VMware. Simply right-click on the listing for the server and then choose the New Virtual Machine command from the shortcut menu (see Figure 5). After doing so, VMware launches a wizard that asks you the same types of questions as the Hyper-V wizard. Some of the questions are worded a bit differently, but you're still required to provide the same type of information.
[Click on image for larger view.] |
| Figure 5. In the vSphere Client, you can right-click on the listing for the server and choose New Virtual Machine from the shortcut menu to create a new virtual machine. |
Connecting to a VM
After creating a VM, you'll need to connect to it so you can install and configure a guest OS. In Hyper-V, you can do this by double-clicking on the listing for a VM. In VMware, you can connect to a VM by right-clicking on it (in the vSphere Client) and choosing the Open Console command from the shortcut menu.
The VM console looks remarkably similar to the Hyper-V console. Both consoles contain icons for starting and stopping the VM and for managing snapshots. Likewise, both consoles provide the capability to capture host resources such as a DVD drive or a floppy drive.
Enlightening a VM
In a Hyper-V environment, administrators typically enlighten VMs that are running Windows by installing Integration Services. Integration Services is a set of drivers that gives the VM direct access to the Hyper-V bus, thus allowing the VM to perform much better than it could without the drivers.
VMware provides a similar set of drivers for VMs, but uses a different name for those drivers. VMware calls its drivers VMware Tools. You can install VMware Tools by right-clicking on the listing for a VM within the vSphere Client and choosing the Guest | Install/Upgrade VMware Tools option from the shortcut menu.
Editing VM Settings
Regardless of which virtualization platform you're working with, it may occasionally be necessary to adjust the resources allocated to your VMs. Both Hyper-V and VMware allow this task to be performed in a similar way. Just right-click on the VM, then choose either Settings (Hyper-V) or Edit Settings (VMware) from the shortcut menu. Both hypervisors provide access to a similar set of settings, although VMware also provides some advanced options for which there's no Hyper-V equivalent. It's worth noting that both virtualization platforms require you to shut down a VM before you'll be allowed to adjust certain settings (such as the number of virtual processors that are allocated to the VM).
About the Author
Brien Posey is a 22-time Microsoft MVP with decades of IT experience. As a freelance writer, Posey has written thousands of articles and contributed to several dozen books on a wide variety of IT topics. Prior to going freelance, Posey was a CIO for a national chain of hospitals and health care facilities. He has also served as a network administrator for some of the country's largest insurance companies and for the Department of Defense at Fort Knox. In addition to his continued work in IT, Posey has spent the last several years actively training as a commercial scientist-astronaut candidate in preparation to fly on a mission to study polar mesospheric clouds from space. You can follow his spaceflight training on his Web site.