Practical App
SharePoint 2010 Workflows: Going with the Flow
Using workflows in SharePoint 2010 is a good way to automate complex business processes.
Many of the applications organizations use today automate complex business processes. Automating electronic processes, like automatically routing an e-mail to the correct recipient, is fairly straightforward. It's much more difficult to automate processes involving manual interaction.
As far back as Microsoft Office SharePoint Server (MOSS) 2007, Microsoft sought to resolve this problem with SharePoint workflows, which are essentially approval-routing mechanisms. Suppose someone in your marketing department came up with a new advertisement. They wouldn't just send the advertisement directly to an ad agency. There's a whole chain of requisite internal approvals.
The ad would have to go to an editor, through the company's legal department, and possibly to a senior executive before it's ever sent to the outside world. The problem with such approval requirements is that people are busy. Tasks like this can slip through the cracks. Any number of human errors could derail the approval routing process.
SharePoint workflows are designed to automate such processes. You can even design a workflow to send a reminder or automatically contact a manager when someone neglects a task.
Workflows played a prominent role in MOSS 2007, but as great as they were, they tended to be a bit rigid. For the most part, administrators were forced to work within the confines of the SharePoint GUI when creating workflows.
Microsoft has built much more flexibility into the process of creating workflows in SharePoint 2010. Although you can still use the SharePoint GUI to associate a workflow with a list or library, you'll have to create the workflow outside of SharePoint (unless you use one of the built-in workflows).
Consequently, Microsoft gives you several different tools for creating workflows. If you're a professional developer, your tool of choice will likely be Visual Studio 2010. If you're not into writing code, you'll be better off using Visio 2010 and SharePoint Designer 2010.
Venturing Forth with Visio
The thought of using Visio 2010 to create SharePoint workflows seemed a bit strange at first. Visio is widely used for creating network diagrams, but most wouldn't consider it a development tool. However, one of the primary features of Visio is creating flowcharts, so it makes perfect sense. Anyone who's taken an introductory computer programming class knows one of the first lessons is how to create a flowchart. That's because creating a flowchart is often the first step in writing a program. Because SharePoint workflows are really nothing more than simple programs, is it really such a stretch to use an application that's designed to create flowcharts to facilitate the creation of SharePoint workflows?
Before using Visio 2010 to create a SharePoint workflow, there are two important things you need to know. First, you won't be using Visio 2010 to create the workflow in its final form. Instead, you'll use Visio to create a reusable workflow template you can then import into SharePoint Designer where you'll complete the workflow. Second, this will only work if you have Visio 2010 Premium. The Standard and Professional editions of Visio 2010 don't include any SharePoint-specific features.
Developing a Workflow
To create a workflow, open Visio 2010 and select the File tab. When you do, you'll be prompted as to what type of diagram you want to create. Choose the Flowchart option, then double-click the Microsoft SharePoint Workflow option.
At this point, you'll be taken to the main Visio screen. Here you can actually begin developing your workflow. If you've never used Visio, you'll have to get used to the process of creating a workflow. The left side of the screen contains several collections of icons. These icons are grouped into collections of Actions, Conditions and Workflow Terminators. Drag the icons onto the Visio drawing and arrange them in such a way that facilitates your workflow.
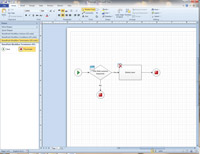
For a visual example, take a look at the Visio drawing in Figure 1. It shows a simple SharePoint workflow template, which begins with the Start terminator (the green triangle). After that, there's a condition that checks to see if a certain field contains keywords. The field name or the list of keywords doesn't matter for now. We won't be able to provide specific keywords or field names until later. For now, we just need to establish the workflow logic.
[Click on image for larger view.] |
| Figure 1. A basic SharePoint workflow ceated in Visio. |
You'll notice in the figure that the condition branches depending on whether key words were detected. Visio requires that you create a Yes path and a No path for each condition you use in your workflow. This particular workflow ends with the Terminate object, if no keywords are found (the No path). If the keywords are found, the item is deleted and the workflow terminated.
You'll also see that each object is connected to at least one other object (as shown by the arrows between the objects). These connections are required, but do not happen automatically. To create a connection, click on an object to select it. There should be some arrow icons displayed around the outer edges of the object. Clicking on the arrow icon makes a connection to the nearest object in the direction of the arrow.
After you've created your workflow, you should validate all the steps. Validating a workflow ensures there aren't any problems that will prevent SharePoint from using it successfully. For example, the validation process will tell you if you've disconnected objects within the workflow, or if you've forgotten to terminate the workflow.
To validate your workflow, go to the Process tab, and click the Check Diagram button. Hopefully, Visio won't find any problems with your diagram. If it does, those problems are usually pretty easy to solve.
Simply double-click on the problem listing, and Visio will select the object related to the problem.
The last step in the process is to export your Visio diagram. Go to the Process tab, and click the Export button found on the ribbon. You should now see a dialog box into which you can specify a filename for the drawing you're exporting. Enter a filename, select the path to which you want to save the exported file. Verify that you're exporting the file in the Visio Workflow Interchange (*.VWI) format, and click Save.
Introducing the SharePoint Designer
Now that you have a workflow template, we're ready for the second part of the workflow-creation process. Import the template into SharePoint Designer and turn it into a SharePoint workflow.
SharePoint Designer 2010 designs and customizes SharePoint sites, which are actually designed to be highly customizable. However, there's only so much customization you can do from within the SharePoint Web interface. The SharePoint Designer takes SharePoint site customization to the next level.
SharePoint Designer is available for free (download the 32-bit and the 64-bit version).
Using SharePoint Designer
Once you've downloaded and installed the SharePoint Designer, open it and attach it to the SharePoint site you want to modify. To do so, launch the SharePoint Designer, and then click the Open Site button.
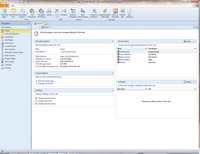
You'll be prompted to specify the site you want to open. Enter your SharePoint site URL and click the Open button. When you do, you'll be taken to the main SharePoint Designer screen, shown in Figure 2.
[Click on image for larger view.] |
| Figure 2. The SharePoint Designer main screen. |
You'll notice that the list of Site Objects on the left side of the screen contains an object called Workflows. When you click on the Workflows object, you will see a listing for the three built-in workflows.
The built-in workflows are nice, but we need to import the workflow template we created in Visio 2010. To do so, click the Import from Visio button located on the Workflows ribbon. You'll be prompted to select a Visio drawing to import. Click the Browse button, and then select the drawing that you created earlier and click Open, followed by Next.
At this point, you'll see a screen prompting you to name the workflow you're importing. You're also asked whether you want to import the workflow as a list workflow or a reusable workflow. The difference is that a list workflow is bound to a specific component, whereas a reusable workflow can be used on the fly.
Upon making your selection, click Finish and the workflow will be imported. Once the import process is finished, you will be taken to the Workflow Editor, shown in Figure 3.

[Click on image for larger view.] |
| Figure 3. The Workflow Editor allows you to make changes to your workflow. |
The Visio template created here is quite simple and doesn't contain any specific logic. In other words, there's a conditional statement within the template that looks for specific keywords, but we never told Visio what those keywords were.
Now we have the opportunity to add specifics to our template. In the case of the example workflow, click on the Keyword hyperlink and specify the actual keywords you want to check.
Once you've finished filling in the necessary elements within the workflow template, click the Save icon. Now, if you click on the Workflows object within the list of Site Objects, you should see your newly created workflow listed among the built-in workflows.
Click on the listing for your newly created workflow, and you will be taken to a tab for that workflow. Click on the Show Workflow Visualizations on Status Page check box, then click on the Publish button, located on the Workflow Settings ribbon.
Some Final Prep Work
Before you can use the workflow you've just created, you'll have to do a bit of configuration work on your SharePoint server. Specifically, you must verify that the Visio Web Access feature and the Visio Graphics Service are both active.
To do so, open your SharePoint site and choose the Site Settings command from the Site Actions menu. When the Site Settings page is loaded, click on the Manage Site Collection Features link. Make sure the SharePoint Server Enterprise Site Collection Feature is active. If it isn't, then click the corresponding Activate button.
Next, open the SharePoint 2010 Central Administration console, and click on the Manage Services on Server link (located in the System Settings section). Now, verify that Visio Graphics Service is running. If it isn't, then click on the Corresponding Start button.
The final step in the process is to associate the workflow you've created with a list or a library. To do so, simply open your Web browser and navigate to your SharePoint document library, and then click on the Library tab. When you do, you'll see a ribbon corresponding to the document library. Click on the Workflow Settings button, followed by the Add a Workflow link. You'll now have the opportunity to add your workflow to the document library.
Your new workflow is stored and ready for you to use or share with your colleagues.
About the Author
Brien Posey is a 22-time Microsoft MVP with decades of IT experience. As a freelance writer, Posey has written thousands of articles and contributed to several dozen books on a wide variety of IT topics. Prior to going freelance, Posey was a CIO for a national chain of hospitals and health care facilities. He has also served as a network administrator for some of the country's largest insurance companies and for the Department of Defense at Fort Knox. In addition to his continued work in IT, Posey has spent the last several years actively training as a commercial scientist-astronaut candidate in preparation to fly on a mission to study polar mesospheric clouds from space. You can follow his spaceflight training on his Web site.