In-Depth
PowerShell 2.0: Why It Matters
Learn how the latest version of Windows PowerShell can help you perform daily tasks and improve your efficiency.
- By Jeffery Hicks
- 01/01/2010
IT professionals likely met the October arrival of Windows 7 and Windows Server 2008 R2 with both joy and a heavy sigh. On one hand, I believe many organizations have been waiting for Windows 7 so that they can bypass Windows Vista. But deploying any new operating system means more work, possibly new hardware and generally an investment of time and resources. That said, I firmly believe the one feature that will offer the greatest return on your investment is Windows PowerShell version 2.0.
PowerShell is the management tool you'll eventually be using to manage your servers and desktops. Of course, PowerShell needs to be everywhere, and starting with Windows 7 and Windows Server 2008 R2, it will be. I can't teach you everything you need to know about PowerShell 2.0, but I want to highlight some killer features that I think will make you sit up and take notice.
Remoting
In PowerShell 1.0, managing remote computers was limited to using Windows Management Instrumentation (WMI) via the Get-WMIObject cmdlet. Administrators have been using WMI for years, so this isn't especially new. However, WMI needs Remote Procedure Call (RPC) connectivity, which means firewall configuration and troubleshooting when things don't work. It's also slow when working with multiple computers. If you wanted to query 10 computers for disk information via WMI, you could only do so sequentially. That's hardly efficient.
PowerShell 2.0 offers a variety of remote-management techniques. Many cmdlets now offer a Computername parameter:
PS C:\> get-process -ComputerName Research23
These cmdlets use the Microsoft .NET Framework to establish a remote connection and return the results to your console. This type of connection, while useful, still relies on RPC and Distributed Component Object Model (DCOM) connectivity.
To overcome this challenge, PowerShell 2.0 introduces a new paradigm for remote computer management. PowerShell uses the WS-Management (WS-MAN) protocols to establish Secure Shell (SSH)-like connections to remote computers. Microsoft's implementation of these protocols is the WinRM service, which now ships with Microsoft's latest operating systems. WinRM connects to remote machines via ports 80 and 443 by default, which makes this a much more firewall-friendly solution. You can modify the ports if you wish. In a domain environment, you can easily establish a telnet-ish connection, but you can secure it to a remote computer and execute commands.
One major change from PowerShell 1.0 is that PowerShell 2.0 must be installed not only on your machine, but also on any remote computer you want to manage. However, because 2.0 is now shipping by default, this should become less of an issue over time. Before you can use remoting, you first must enable it both locally and on your remote machines.
This is a one-time, easy task. Open an elevated PowerShell session and run Enable-PSRemoting.
Once configured, you can connect to a remote computer using the Enter-PSSession cmdlet. Once you've connected, your prompt will reflect the remote connection. From here on, any command you run is executing on the remote computer -- even command-line tools such as IPCONFIG and NETSH, although you can't use the latter in interactive mode. You can only execute complete NETSH commands.
You can also establish connections to multiple remote computers simultaneously. There are several approaches. Here's one. First, using New-PSSession, create a session variable for all the remote computers you want to connect to:
PS C:\> $sessions=new-pssession mycompany-
dc01,vista01,win2k801
Using Invoke-Command, execute a PowerShell expression, and it'll execute simultaneously on all the remote computers. The results will be returned to your console.
You'll note I'm using WMI, which is perfectly acceptable and in some cases necessary. However, WMI is executing locally on the remote machines, and the only data that's returned to me via WinRM are the results. There's much more to remoting, so be sure to look at cmdlet help and the About_Remoting help topic.

[Click on image for larger view.] |
| Figure 1. The PowerShell Integrated Scripting Environment as an editor. |
Background Jobs
Another fantastic PowerShell 2.0 feature, which also can apply to remoting, is support for background jobs. In PowerShell 1.0, if you had to execute a long-running expression, your PowerShell session was blocked until it completed. There wasn't a native way to push a process to the background as you can in the Unix and Linux worlds.
| Name |
Synopsis |
| Enter-PSSession |
Starts an interactive session with a remote computer. |
| Exit-PSSession |
Ends an interactive session with a remote computer. |
| Export-PSSession |
Imports commands from another session and saves them in a Windows PowerShell module. |
| Get-PSSession |
Gets the Windows PowerShell sessions (PSSessions) in the current session. |
| Import-PSSession |
Imports commands from another session into the current session. |
| New-PSSession |
Creates a persistent connection to a local or remote computer. |
| Remove-PSSession |
Closes one or more PSSessions. |
Table 1. Windows PowerShell PSSession Cmdlets |
PowerShell can start jobs either on the local computer or on a remote computer. There are a few cmdlets, primarily Get-WMIObject and Invoke-Command, which have a -AsJob parameter:
PS C:\> get-wmiobject win32_ntlogevent -filter
"logfile='system'" -as job
Instead of waiting for the results, PowerShell creates a background job. PowerShell 2.0 introduces several Job cmdlets.
The Get-Job cmdlet shows the status of a given job. Let me check the status of the WMI job I just ran:
PS C:\> get-job job13

Id     Name        State      HasMoreData     Location
Command
--     ----        -----      -----------     --------
-------
13     Job13       Completed  True            localhost
Get-WMIObject
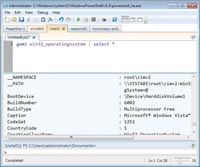
[Click on image for larger view.] |
| Figure 2. Multiple remote Integrated Scripting Environment sessions. |
The Receive-Job cmdlet returns the job results to my console. I can use the data in a PowerShell pipeline just like any other expression. You'll notice I'm using the -keep parameter to retain the job results. Otherwise, they'll be cleared from the job cache when Receive-Job finishes:
PS C:\> receive-job job13 -keep | sort Type | group
Type | sort Count -Descending | format-table
Count,Name -auto

Count Name
----- ----
24127 Information
  354 Error
  106 Warning
    3 Critical
You can use this same technique in an interactive remote session. Where background jobs help most is in running tasks on multiple computers. I'll use my previously created collection of remote sessions and execute the same command remotely -- but as a local job, which means no waiting on my end:
PS C:\> invoke-command $sessions -scriptblock
{get-eventlog -list | where {$_.Entries.count -gt 0}}
-asjob
If the job runs too long, I can always kill it with Stop-Job. Otherwise, I'll work on other things and check the job status periodically. When ready, all I have to do is receive the job results and use them however I choose.
The combination of remoting and background jobs means you can accomplish a great deal without having to wait around for results. You can retrieve the results when you're ready and use them as part of any PowerShell expression.
Again, I encourage you to look at full help for the Job cmdlets, Invoke-Command and the About Job help topics.
PowerShell ISE
The final selling point for PowerShell 2.0 is the introduction of "graphical" PowerShell. When you launch the PowerShell Integrated Scripting Environment (ISE), you get an easy-to-use graphical console. Enter PowerShell commands at the prompt in the bottom pane and get results in the center panel.
The ISE also includes a bare-bones script editor in the top panel. While this will never replace commercial editors, it's definitely a major improvement over using Notepad. You can create new scripts and execute them directly in the ISE, as well as load existing scripts, as shown in Figure 1.
| Name |
Synopsis |
| Get-Job |
Gets Windows PowerShell background jobs that are running in the current session. |
| Receive-Job |
Gets the results of the Windows PowerShell background jobs in the current session. |
| Remove-Job |
Deletes a Windows PowerShell background job. |
| Start-Job |
Starts a Windows PowerShell background job. |
| Stop-Job |
Stops a Windows PowerShell background job. |
| Wait-Job |
Suppresses the command prompt until one or all of the Windows PowerShell background jobs running in the session are complete. |
Table 2. Windows PowerShell Job Cmdlets |
It's easy to configure the ISE to meet your needs. You can hide and resize panels, create custom menus and more. But perhaps one of its best features is that it integrates nicely into the remoting features. You can create as many remote PowerShell tabs from the File menu as you like -- or you can open multiple local PowerShell sessions. Enter commands just as you would any other interactive PowerShell console session. The beauty here is that with the tabbed interface, it's extremely easy to manage multiple computers simultaneously.
Want to create a script and run it on a remote computer? Not a problem with the ISE. Check out what I have going on in Figure 2. The PowerShell1 tab is a local
PowerShell instance. The other tabs are to different remote computers in multiple domains. I can even run a script command on the remote Vista computer. You can create jobs as well. Anything you can run in a standard PowerShell console, you can run in the ISE.
There will be a segment of Windows IT pros who are more comfortable with a graphical interface, and the ISE should please them. There's also one more new graphical element to PowerShell 2.0, and it requires the .NET Framework 3.5 SP1. It's the Out-GridView cmdlet. Pipe a PowerShell expression to Out-GridView, and you'll get a graphical grid layout complete with sortable columns, columns you can hide and filtering capabilities. I can run this from the standard PowerShell Console or the ISE and get a graphic grid like the one in Figure 3:
PS C:\> get-process -computer mycompany-dc01 |
out-gridview

[Click on image for larger view.] |
| Figure 3. The PowerShell Out-GridView. |
Within the grid view, I can re-sort column headings with a mouse click. Using the Add Criteria button allows me to select columns to use as filtering criteria. For example, I could filter out processes that don't have a working set size of at least 20,000. Clicking ClearAll brings me right back to my original data. Out-Gridview is terrific for working with large data sets.
This is merely a taste of all the juicy goodness that awaits you in PowerShell 2.0. It's not that complicated to learn, and once you get a handle on the basics -- especially the features I discussed here -- you'll be amazed at what you can accomplish. Students in my PowerShell 1.0 classes recognize the value and realize how much PowerShell can help them in their daily tasks. PowerShell 2.0 takes us even further by an order of magnitude.
Get your hands on Windows 7, Windows Server 2008 R2 or even a beta of the down-level PowerShell 2.0 packages, and try these things out for yourself. One day soon, PowerShell will be as ubiquitous and transparent as TCP/IP. Granted, the Unix world has had management shells for more than 30 years, so PowerShell has some catching up to do. But there are many smart people on the Windows PowerShell team and an active user community that has declared that PowerShell matters to the community's members. I hope it will matter to you.